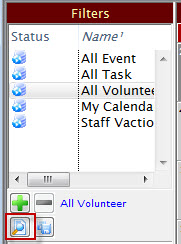
The Filter Pane
Filters are a key part of the calendar.
- You decide what data you want to see on your calendars, that is, you do not see data that does not match the filter.
- There are a standard 4 filters available to all users. These show the maximum amount of data.
- You can change the filter you are using to show you what you need to know.
- You can customize filters for specific positions or staff, that way they don't see data they don't need.
- The starting filter can be customized.
- All Plays
- All Tasks
- All Volunteers
- My Calendar
- Click the Add icon to create a new filter. Click here to learn more about creating a filter.
- Click the Delete icon to delete a filter.
- Click the Edit icon to modify a filter. Click here to learn how to edit an exisiting filter.
- Click the Save Current icon to save the current view and filter as a new filter. This is most often used if you have opened this window from within a Project (or other area where this feature is available) to display all it's tasks in a new calendar. The current view and filter are saved to a new filter.
For example: You only want to see what is happening in the venue. You don't care about who owns it or what needs to be done. You weant to start with the Month, Week or Day view. These custiomizations are just an appearnace. You can view any or all just by changing your filter. Remember the Rubic's Cube®.
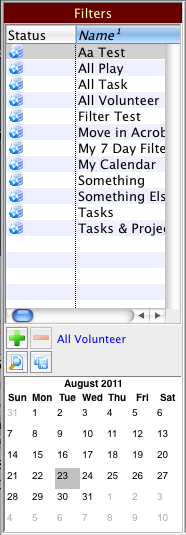 |
The Filter pane is on the left side of the Calendar window and allows you to quickly and easily subset your data by selecting a filter. You can select which data to see and which data not to see.
A filter allows you to select which tasks, performances, volunteer activities, and projects to display. It also allows you to select the visual display for the calendar, such as the view, and whether certain calendar features display or not. All these are stored in the filter. You are able to create an unlimited number of different filtures based on your own specific requirements. When you initially open the calendar window, whatever filter was last selected when the window was closed is restored when the window is reopened. Theatre Manager has 4 standard default filters that cannot be deleted or modified. They are the only filters available to someone without the Facility Management module. If you do not have the Facility Management module, you cannot create any new filters. The 4 standard filters are: |
 |
The filter pane has 4 buttons: Add, Delete, Edit and Save Current.
|
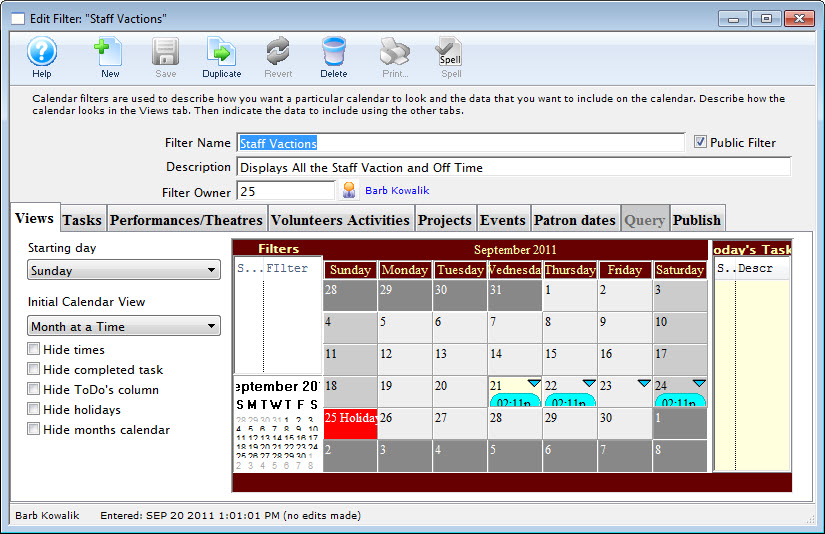
Adding a New Filter
Calendar filters are used to describe how you want a particular calendar to look and the data you want to inlude in the calendar. To add a new filter, you perform the following steps:
- Click the Add
 button, or select Add
  from the right click context menu.
The Edit Filter: (inserting) window opens.
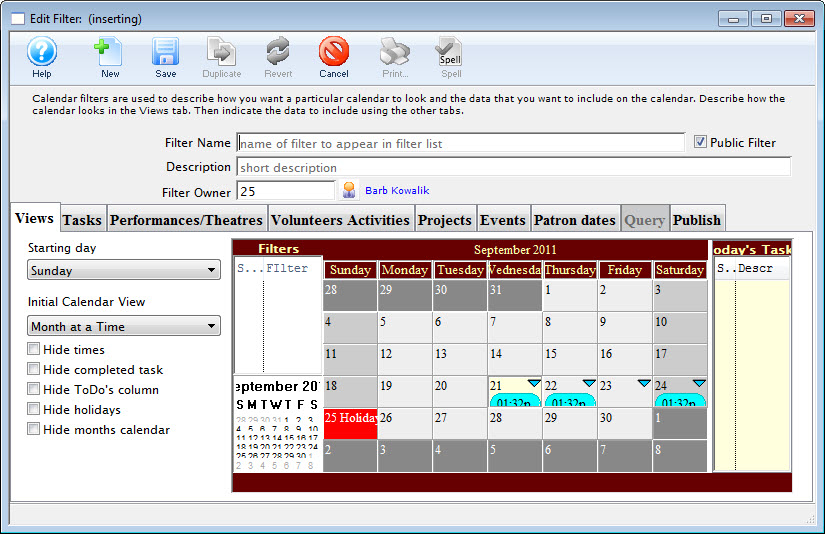
- Enter a Filter Name. Filter Name is a mandatory field.
This is the name of the filter that appears in the filter list.
- Enter a Description. The Description is a mandatory field.
Enter a description that describes in a few words what the filter does. This way others will not create the same filter. You can also choose via the Public Filter checkbox if others can view and use the filter. If you disable the checkbox, the filter will not appear in others' filter lists.
- Only the Filter Owner or Administrators can edit a filter. If you want others to edit it as well, remove the owner; then anyone can edit it.
You can set up the various pieces of the filter in the tabs on the window: Views, Tasks, Theatres, Volunteer Activities, Projects, Plays, and Query (currently unused). The Publish tab lets you set up the filter to be manually (and in the future, automatically) published as a shared calendar to the Internet.
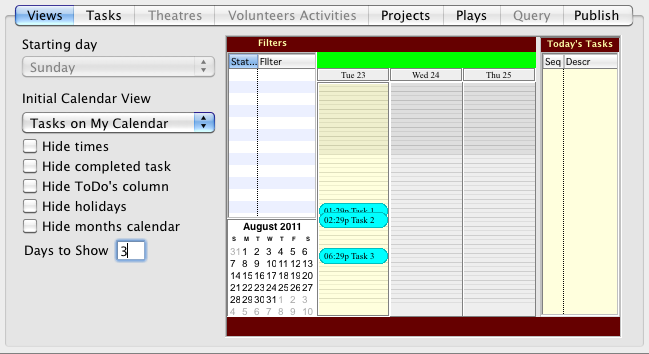
Views Tab

The Views tab is used to select options for the visual display of the various items on the list.
As you make changes to on the Views tab, the mini-calendar on the window changes so you can see what the effects of the changes will be.
Parts of the Views Tab
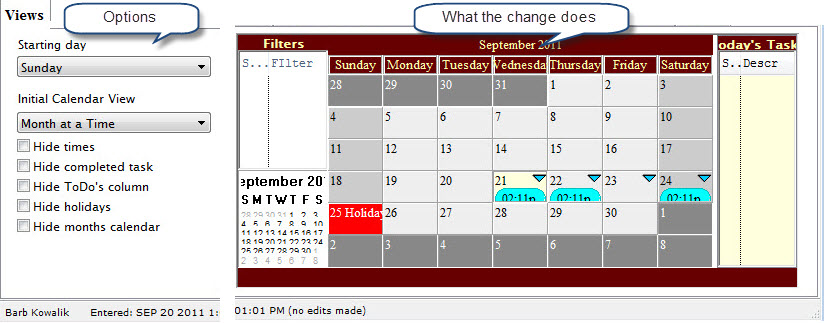
| Starting Day | 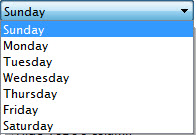 The dropdown list lets you select the starting day for the week. Sunday is the default.
 |
| Initial Calendar View | 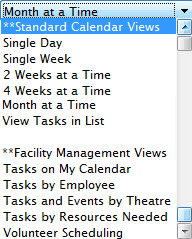 Determines the initial view of the calendar. You can select between typical calendar views and group views that may show more than one calendar column at a time. Determines the initial view of the calendar. You can select between typical calendar views and group views that may show more than one calendar column at a time.
|
| Check Boxes | Hide times - determines if the times will show on the individual calendar items. |
| Hide completed tasks - hides any tasks whose Status is "Done" or "Cancelled". | |
| Hide ToDo's column - hides the Today's Tasks and ToDo's column on the right of the calendar. | |
| Hide holidays - Hides holidays. | |
| Hide month calendar - hides the month calendar in the bottom left of the calendar. |
If you have selected an appropriate group calendar, Days to Show will display, enabling you to show more than one day at a time for each calendar column, as you can see in this example:
Tasks Tab

The Tasks tab is used to select whether tasks display for the filter and which ones.
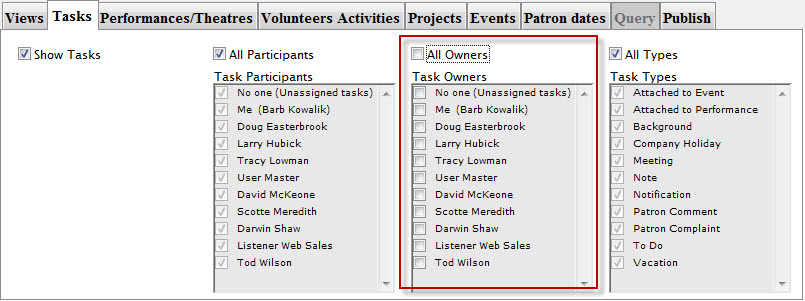
If Show Tasks is selected, tasks will be displayed on the calendar. By default, All Participants, All Owners, and All Types are shown.
If you turn off All Participants, you will be able to select individual task participants (employees only) to show. You also have the special options of "No one", meaning tasks that have no one assigned to them, and "Me", which will show the tasks of whomever you are logged in as.
If you turn off All Owners, (as in the above image) you will be able to select only tasks owned by particular employees. You also have the special options of "No one", meaning tasks that are owned by no one, and "Me", which will show the tasks of owned by whomever you are logged in as.
If you turn off All Tasks, you will be able to select only tasks of certain types that you wish to see.
Performance/Theatres Tab

You use the Performances/Theatres tab to select the venues to display for the filter.
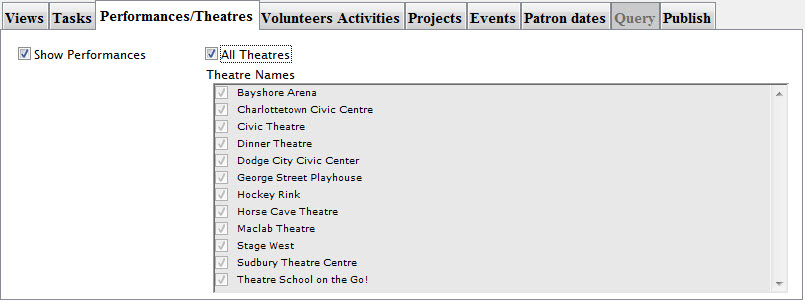
If Show Performances is selected, performances will be displayed on the calendar. By default, All Theatres are shown.
If you turn off All Theatres, you will be able to select individual theatres or venues to display.
Volunteer Activities Tab

The Volunteer Activities tab is used to select whether volunteer activities display for the filter and which ones.
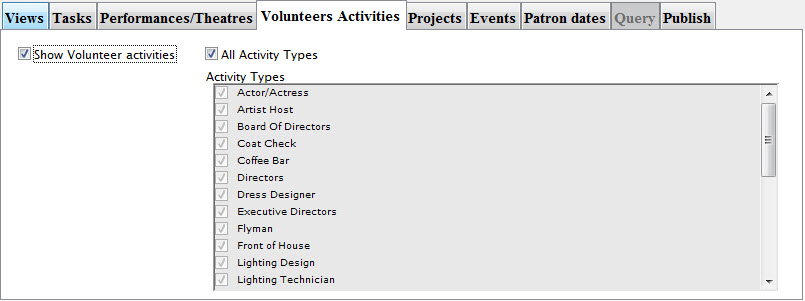
If Show Volunteer activities is selected, volunteer activities will be displayed on the calendar. By default, All Activity Types are shown.
If you turn off All Activity Types, you will be able to select individual activity types to display.
Projects Tab

The Projects tab is used to select whether projects display differently for the filter and which ones.
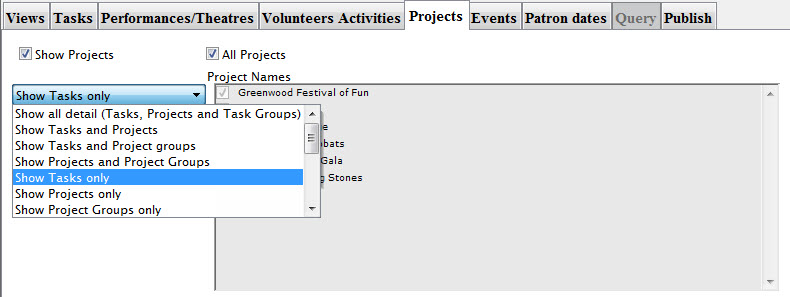
If Show Projects is selected, project tasks will be displayed on the calendar using their default project colour instead of the task colour. By default, All Projects are shown.
Turning off All Projects, you can select individual projects, so that only their tasks are displayed.
|
If you had only selected the Tasks checkbox you would have seen these project tasks as well. When you select Projects, it shows the projects tasks using your default colour (usually yellow), while the non-Project tasks remain in the task default colour (usually blue). |
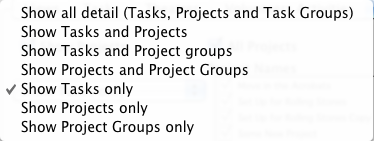
You can also determine the level of detail to show for projects, such as whether the project record or the group records display. The default is for only the tasks that are part of the project to show.
Events / Plays Tab

The Events / Plays tab is an additional filter that can be applied on top of the others. It is used to select whether only tasks, performances, volunteer activities, or projects attached to particular plays/events will be seen in the calendar.
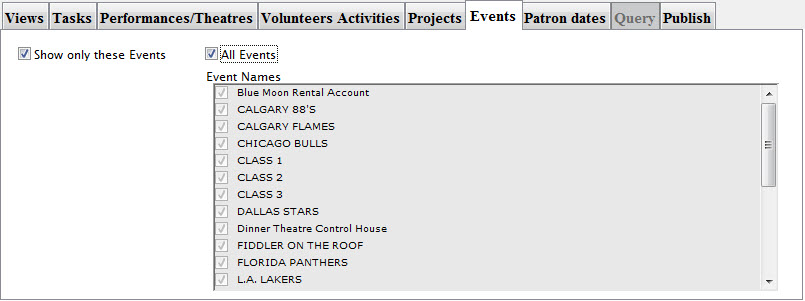
If Show only these Plays is selected, then the additional filtering is applied. By default, All Plays are shown.
If you turn off All Plays, you will be able to select individual plays/events so that only calendar items attached to those plays/events are displayed.
Patron Dates Tab

The Patron Dates tab is used to select whether birthdays, anniversaries and spouse birthdays display on the calendar.
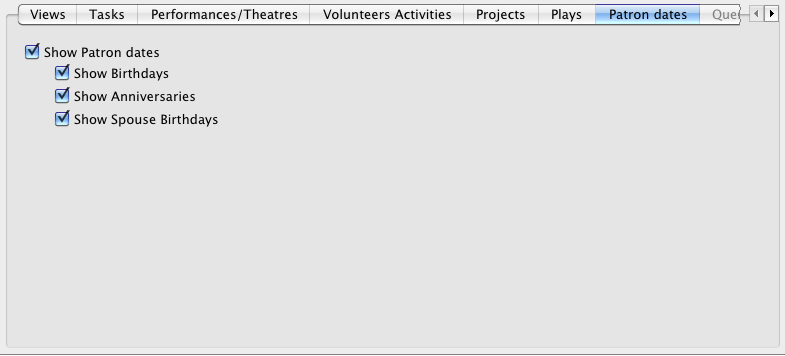
If Show Patron dates is selected, you can choose whether to show birthdays, anniversaries and/or spouse birthdays on the calendar.
Click here for more information on these fields in Patron Data.
|
If the date is on February 29 and the current year is not a leap year, it is shown on February 28 instead. |
Query Tab
The Query tab is unavailable at this time.
Publish tab

You use the Publish tab to upload a shared calendar file to the internet.
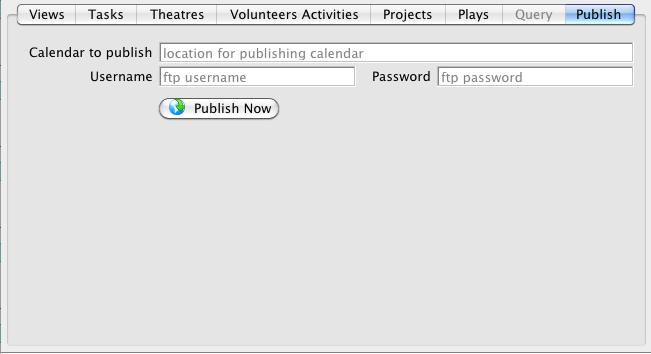
To publish a calendar, you perform the following steps:
- In the Calendar to Publish entry box, enter the web location of the calendar.
The format will resemble:
www.example.com/calendars/public/MyEventsCalendar.ics

This does not have to be any special calendar location, it just needs to be a location where a file can be FTP'd to.
- Enter the Username for the ftp account.
- Enter the Password for the ftp account.
- Click the Publish Now

You will be asked to enter a starting and ending date. All items on the calendar that match the filter criteria and between the starting and ending dates will be packaged up into an industry-standard iCalendar file (.ICS extension) and FTP'd to the location on the web.
If the starting date is omitted, all calendar items into infinity past will be included. If the ending date is omitted, all calendar items into infinity future will be included.
The resulting calendar can be subscribed to from iCal or Outlook by entering the file location in these programs. Or you can supply a link to the calendar in the form:
webcal://www.example.com/calendars.public/MyEventsCalendar.ics
Clicking on the link will open their calendar program and ask if they want to subscribe to the calendar.
This feature can be used to publish a calendar of all performances for the season to your website. Patrons can subscribe to the feed and when you re-publish in the future with new performances, their calendar will be updated with the new performances as well.
It can also be used to publish work schedules for people. If they are subscribed they will also get all the changes in their personal calendars.
|
The subscribers to these calendars DO NOT have to have a copy of Theatre Manager for this to work. |
Editing an Existing Filter
Calendar filters are used to describe how you want a particular calendar to look and the data you want to inlude in the calendar. To edit an existing filter, you perform the following steps:
- In the Filter pane of the Calendar window, highlight the filter you wish to edit.
- Click the Edit
 button, or select Open
  from the right click context menu.
The Edit Filter: "Fliter Name" window opens.
You can now change the filter.
You can also change the various pieces of the filter in the tabs on the window: Views, Tasks, Theatres, Volunteer Activities, Projects, Plays, and Query (currently unused). The Publish tab lets you set up the filter to be manually (and in the future, automatically) published as a shared calendar to the Internet.
Filter Context Menu
To open the context menu, right click when your mouse is in the Filter Pane. The following flyout opens.
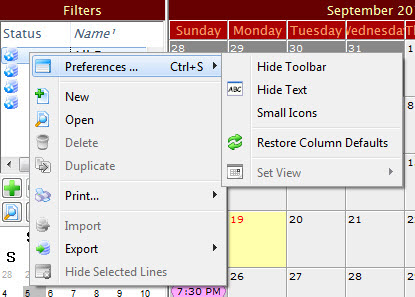
Parts of the Filter Context Menu
| Preferences | Hide Toolbar / Show Toolbar - Toggles between displaying and hiding the Calendar window toolbar.
Hide Text / Show Text - Toggles between showing and hiding the text underneth the icons in the Calendar window toolbar. Small Icons / Normal Icons - Toggles between showing large or small icons in the Calendar window toolbar Restore Column Defaults - If you have moved or changed the width of any colmns in the Filter display, this selection restores them to the default. Set View - Not available in this window. |
| New | Opens the Edit Filter window. Click her for more information. |
| Open | Opens the selected filter for editing. |
| Delete | Deletes the selected filter. You cannot delete the 4 basic filters. |
| Duplicate | Duplicates the selected filter. You cannot duplicate the 4 basic filters. |
| Prints the list of filters as shown. | |
| Import | Not available in this window. |
| Export |
Exports the selected filter in the following formats:
|
Filter Pane Features
The last item in the filter pane is the calendar selector. It provides an easy way to select a date and update the calendar.

The purpose of this calendar is to to display the current month. This allows you to see the context of where you are, especially helpful when viewing the group or daily calendars.
Additionally, you can change the date by clicking on the date you want.
If there is no calendar pane showing at the bottom of the Filter pane You can show or hide the calendar by using the toggle buttons.
 Click to close the Filter Pane. Click to close the Filter Pane. |
 Click to open the Filter Pane. Click to open the Filter Pane. |
 Click to close the filter Calendar Click to close the filter Calendar |
 Click to open the filter Calendar. Click to open the filter Calendar. |
You can also adjust the size of the panes in the Filter pane by dragging the borders of the different sections, similar to how you can in other Theatre Manager windows.
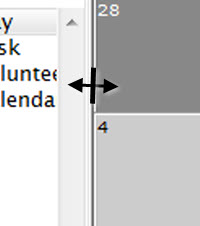
There is a handle between the main calendar and the Filters portions of the window.