Importing Data to TM
Theatre Manager supports the importing of Patron information and Theatre Map Seat Names. This section describes how to prepare a file and import information into the Patron files.
 |
For Patron data, you can import demographic data only (names, address, phone numbers, email address, etc.). Transactional data, such as ticket history, donation history or other purchases must be imported by Arts Management Systems. |
The Import Process
Importing a file consists of a number of steps:
- Obtaining a data file either by purchasing one or exporting the data fields from another program.
- Preparing the data file in tab-delimited format by reviewing it, correcting it and aligning columns.
- Making a backup of the database before an import is strongly recommended. The effect of an import cannot be reversed - the only recourse is to restore to a backup.
- Deciding which data to include in the import.
- Deciding which fields should be used to match with existing patron data and merged versus adding data.
Preparation
- Look at the data to import in a tool (like Excel) and adjust the data so columns are consistent.
- Add column headers for each data item.
- Use special names for those column headers, especially if the column can be used to match records during the import and replace data in the database.
- Fill down columns with missing data, if you want a default for a particular column (e.g. if there is no Country listed for some records, and you want a default, then entering a country in the empty fields in that column).
- Add some fields of your own, if appropriate, to create defaults for imported data.
- You can import the Excel spreadsheet in a number of formats. You can
- Import the columns you want from the Excel spreadsheet in either .XLS or .XLSX format, even with calculations in it. TM only looks at the content of the column and ignores the actual calculation.
- Save the Excel document as a TEXT file in either TAB or COMMA delimited format. (TAB delimited is recommended - it seems easier to use).
- Other tools that will be help are Text editors like BBedit. Opening the prepared text file with an editor can help with hidden formatting like columns, carriage returns, and more. See View, Text Display, Show Invisibles.
|
Sometimes MS Excel documents have unwanted extra lines and formatting that can increase the record count when imported. To prevent this from happening,
|
Preparing the Import File
Tab delimited format means that each field in the database is separated by a tab and the last field in each record has a carriage return after it. The first record in the data may be the title of the fields for clarity, although this is not necessary.
Patron Import Sample
| Company | Address Line 1 | Address Line 2 | City | State | Postal Code | gPhoneWork |
| Elk Whistle | 18032-C Lemon Drive | F Street | Yorba Linda | CA | 92886 | (714) 695-0994 |
| Namah Dance and Music Ensemble | 5756 Wallis Lane | Woodland Hills | CA | 91367 | 626) 576-8730 | |
| L.A. SYMPHONIC WINDS | 23309 Mariano | Woodland Hills | CA | 91367 | 818,348-2990 |
Notes about the Import File
- The first row in this import file contains a description of the fields, or columns of data. Examples are 'Company' and 'City'. The only benefit of using descriptive names for the column headers is to assist the column matching process. Because of the change where there can be many email accounts, phone numbers, addresses, etc. for a patron, we needed to create some special column titles that refer to columns that have special use for convenient importing or matching data.
- There are some spaces at the beginning of some fields. Work Phone in the second row has some spaces before the (714) area code. Theatre Manager will remove all extra spaces at the start and end of each field.
- Some columns have blank entries. In this case, a value for 'Address Line 2' is only present in the second row. The last two rows will be imported as blanks.
- Theatre Manager will attempt to fix data problems during import. On the last line, 'L.A. SYMPHONIC WINDS' will be converted to 'L.A. Symphonic Winds' and '818,348-2990' will be corrected to '(818) 348-2990'. The conversion will occur depending on the parameters set in System Preferences for auto-capitalization.
Cleaning Up Data
It is very important that each column of data contains the same type of data, otherwise importing the data file would provide disastrous results. The import process will simply import whatever is in that column into that field in the database. For example, the 'Company' column should only contain Company names. If it does not, the import may end up with last names in the first name or addresses in a company name. Each patron would have to be deleted and the import would have to be started again.
When data importing, you should 'clean up the data' prior to importing. This can be done by creating separate columns for:
- patron salutation
- patron name-first (if the first and last are in the same field, the import will auto-split them)
- patron name-last
- address line 1
- address line 2
- city
- province
- postal code/Zip Code
- country (Optional)
Special Import Column Names
There are also some fields that can be used for matching fields - which allow data to be replaced in current records.
Import Fields with Special Meaning
You can use any of the special fields below when you do your import process. They will match up with fields in the database such as lookup data or phone numbers.
 |
The import routines will automatically create new values into Code Tables for the special meaning fields during the import process. In most cases, there is no need to prepopulate code table values that will be used.
The exception is gPaymentMethod - all payment methods must be created prior to using them. |
- gPatronType - patron type - individual, company, staff, etc. Code Table "Patron Type".
- gPhoneHome - patron home phone number
- gPhoneWork - patron work phone number
- gPhoneCell - patron mobile phone number
- gPhoneFax - patron fax phone number
- gEmailHome - patron home email address
- gEmailWork - patron work email address
- gWebsite - patron work website URL
Some special fields that will "update" the field, rather then add new contact information to the patron account
- gPrimaryPhone - Patron primary phone number
- gPrimaryEmail - Patron primary email address
- gPrimaryFax - Patron primary fax number
- gPrimaryWeb - Patron primary web site URL
- MKT_C_SEQ - REFER to special field for matching patron numbers on import
- gC_AGE_CODEresult - Marketing age code
- gC_MKT6result - Marketing field #6
- gC_MKT7result - Marketing field #7
- gC_MKT8result - Marketing field #8
- gC_ACTIVEresult - Marketing Volunteer Status
- gMktVol1Result - Volunteer Popup field #1
- gMktVol2Result - Volunteer Popup field #2
- gMktVol3Result - Volunteer Popup field #3
- gMktVol4Result - Volunteer Popup field #4
- gMktVol5Result - Volunteer Popup field #5
- gMktVol6Result - Volunteer Popup field #6
- gMktVol7Result - Volunteer Popup field #7
- gMktVol8Result - Volunteer Popup field #8
- gMktVol9Result - Volunteer Popup field #9
- gMktVol10Result - Volunteer Popup field #10
- gDonorGivingCapacity - Marketing Donor Giving Capacity
- gDonorMovesStatus - Marketing Donor Moves Management Status
- PM_SHORT_NAME and gName1 through gName15 - are up to 16 mail list columns. If you want to import any mail list, then you must have ONE column called PM_SHORT_NAME.
- The contents of the field indicate which mail list to which the patron will be added.
- You can comma separate the mail lists to add to a patron such as list1,list2,list3 and/or
- You can have multiple columns in your import file named 'gName1' through 'gName15'. In those columns, you can have blanks or mail lists to which you want people added (eg list1 or list2, etc.)
- In this way, you can use up to 16 columns to specify a lot of mail lists to add a patron to, either many in one column separated by commas, or in separate columns if that is more clear for you.
- I_ORD_REASON_BUY_RESULT - Order reason "Why did Patron Buy?", Code Table "Order Reason to Buy".
- gSource - Delivery Method - ticket handling status.
- 0 = Hold for Pickup/Taken
- 1 = Mail to Patron
- 2 = Hold for WillCall
- 3 = Hold @ Door for Coupon
- gTixUsed - Patron Attended - flag to indicate if patron attended the performance.
- attended = indicate that patron attended the performance
- gAttendedReason - description for the Patron Attended or Not Attended Reason. Code Table "Course Attendance Reasons".
- gDonor1Field - Donor Popup field #1
- gDonor2Field - Donor Popup field #2
- gDonor3Field - Donor Popup field #3
- gAccount - Account number to assign to new donation campaigns
- gMember1Field - Member Popup field #1
- gMember2Field - Member Popup field #2
- gMember3Field - Member Popup field #3
- gAccount - Account number to assign to new member/pass type
- gPaymentMethod - Payment Method. Matching "Payment Code" in code table "Payment Methods". All payment methods must be created prior to using them.
- gOrigin - Payment Source - location of where the payment originated.
- 0 = Internet/Web Sales
- 1 = Telephone Order
- 2 = Mail Order
- 3 = Patron Present
Matching Fields
The following fields could be used as unique identifiers to import and match records to data that exists in Theatre Manager, or they could just be used to import data. The meaning changes depending on how you use them for matching data during the import process.
MKT_C_SEQ
This is a special field that is allows you to match imported data with existing patrons based on the patron number. This should only be used if the data file originated from Theatre Manager in the first place, such as for address correction, and you are sure the Patron number matches the one in Theatre Manager (otherwise the results will be overwritten and jumbled data). If you are going to match on patron number, be sure to make a backup of the database first and verify the success of the results after the import.
|
If you plan to Export patron names for address correction purposes through a Mail House or other verification service, be sure to include the Patron number on the export, so that when you reimport the corrections back in, you have the patron number to link the corrected address with the correct patron record. In addition, be sure not to merge any patron records while the list is at the Mail House, or else the patron numbers may not align when you reimport the data. |
|
Helpful Link: Canada Post address correction web site |
MKT_FIELD_1 through MKT_FIELD_5
These are the marketing fields on the patron record. If they are unique within your database, and you specify them as a column header in the import file, they will also be presented as 'matching field' options. Only do this is you have used these fields to reference unique keys from another system (such as prior ticketing systems).
What to Import
During the import, the program will try to match data with an existing patron based on fields you select. If a match is found, only the fields in the import file will be replaced. The remaining patron information will remain untouched. This may be useful when importing an address correction from the post office. The user may not want to update the patrons first name or last name, just their address, city and postal/zip code fields. If so, only include those columns in the import file.
Here are some general guide lines:
| Patron Number |
|
| Salutations |
|
| First Name |
|
| Last Name |
|
| Suffix |
|
| Address |
|
| State/Province |
|
| Country |
|
| Phone Numbers |
|
1. Importing Data
- From the main menu bar, go to File >> Import/Export >> Patron >> Patron.
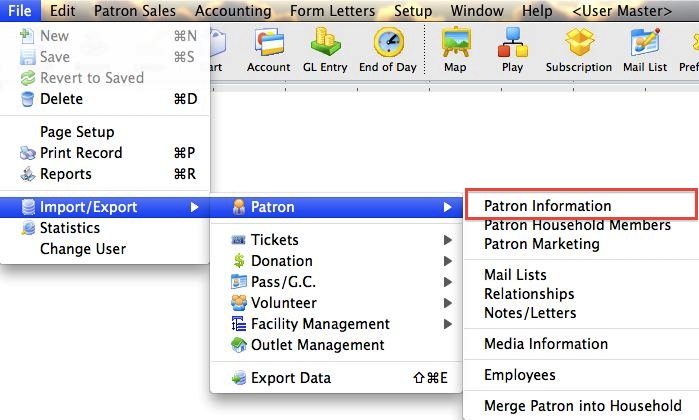
This will open the Import Data window.
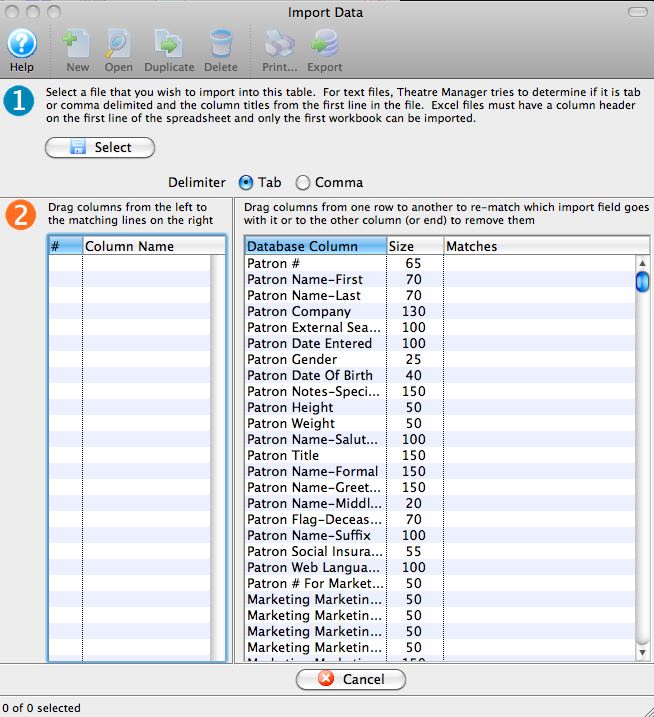
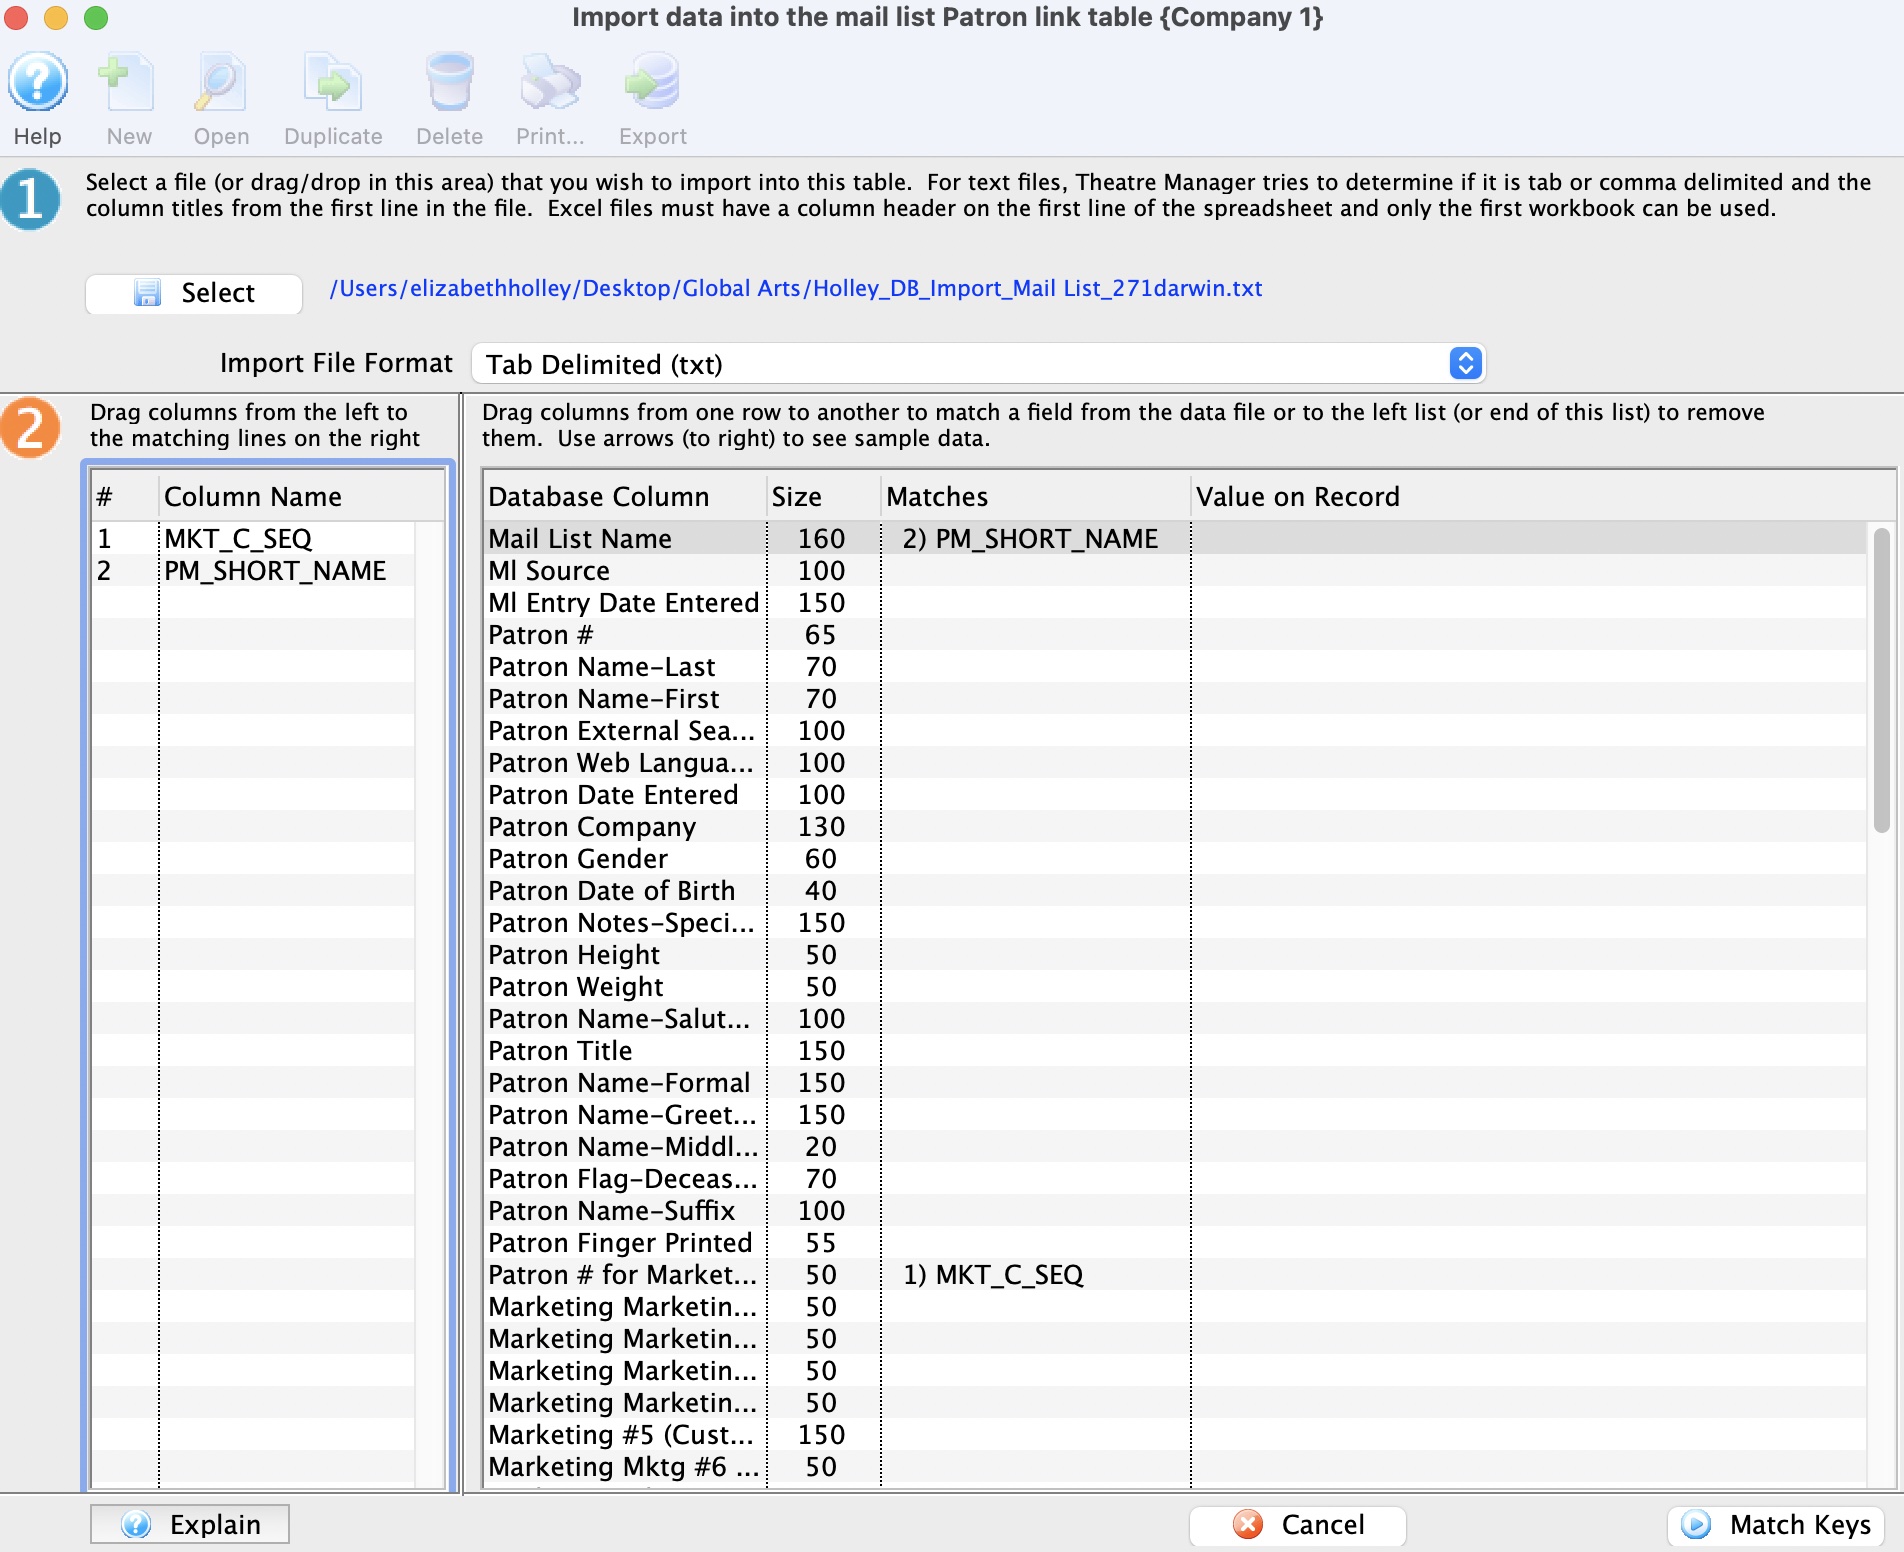
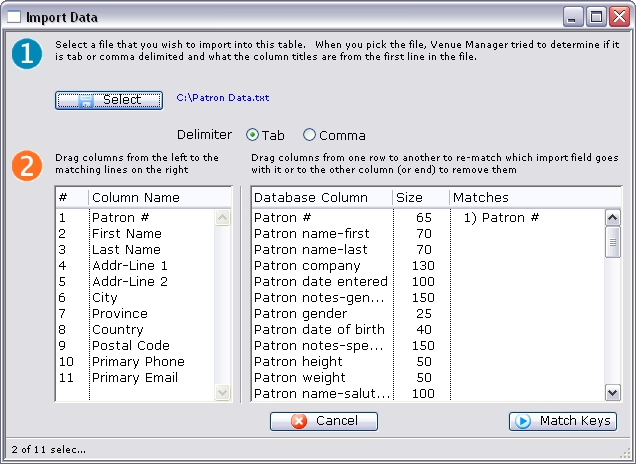
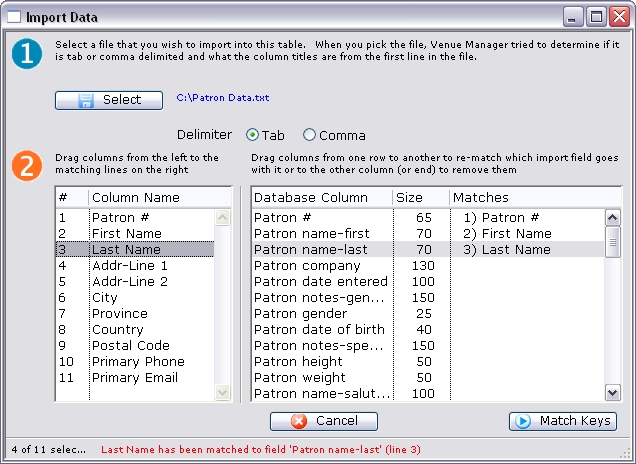
2. Match Fields to Database
Step 2 of the data import process is to match the spreadsheet columns up with the Theatre Manager data fields.
Parts of the Import Data Window
 |
The first step in the data import process. |
 |
Opens the user's operating system dialog for opening a file. |
| Delimiter | Select the type of delimiter used in the import file. The two possible types are Tab Delimited and Comma Separated. |
 |
The second step in the data import process. |
| # | A numerical order to the fields found in the data import file. |
| Column | The column headers found in the data import file. |
| Database Column | A list of the database columns in Theatre Manager to which the data import can be matched. |
| Size | The size in pixels of the width of the column |
| Matches | When a data import column header is matched to a TM database field, it is placed here. |
 |
Cancels the data import process. |
 |
Moves to the next step in the data import process of matching keys. |
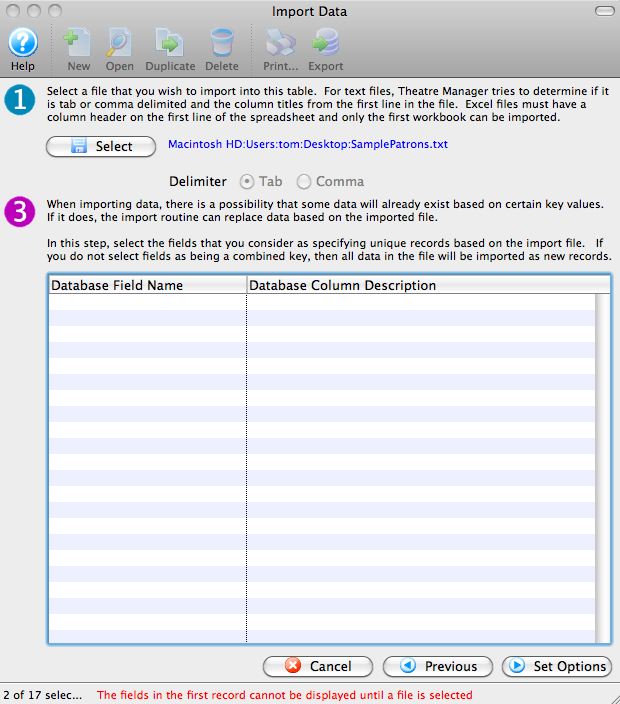
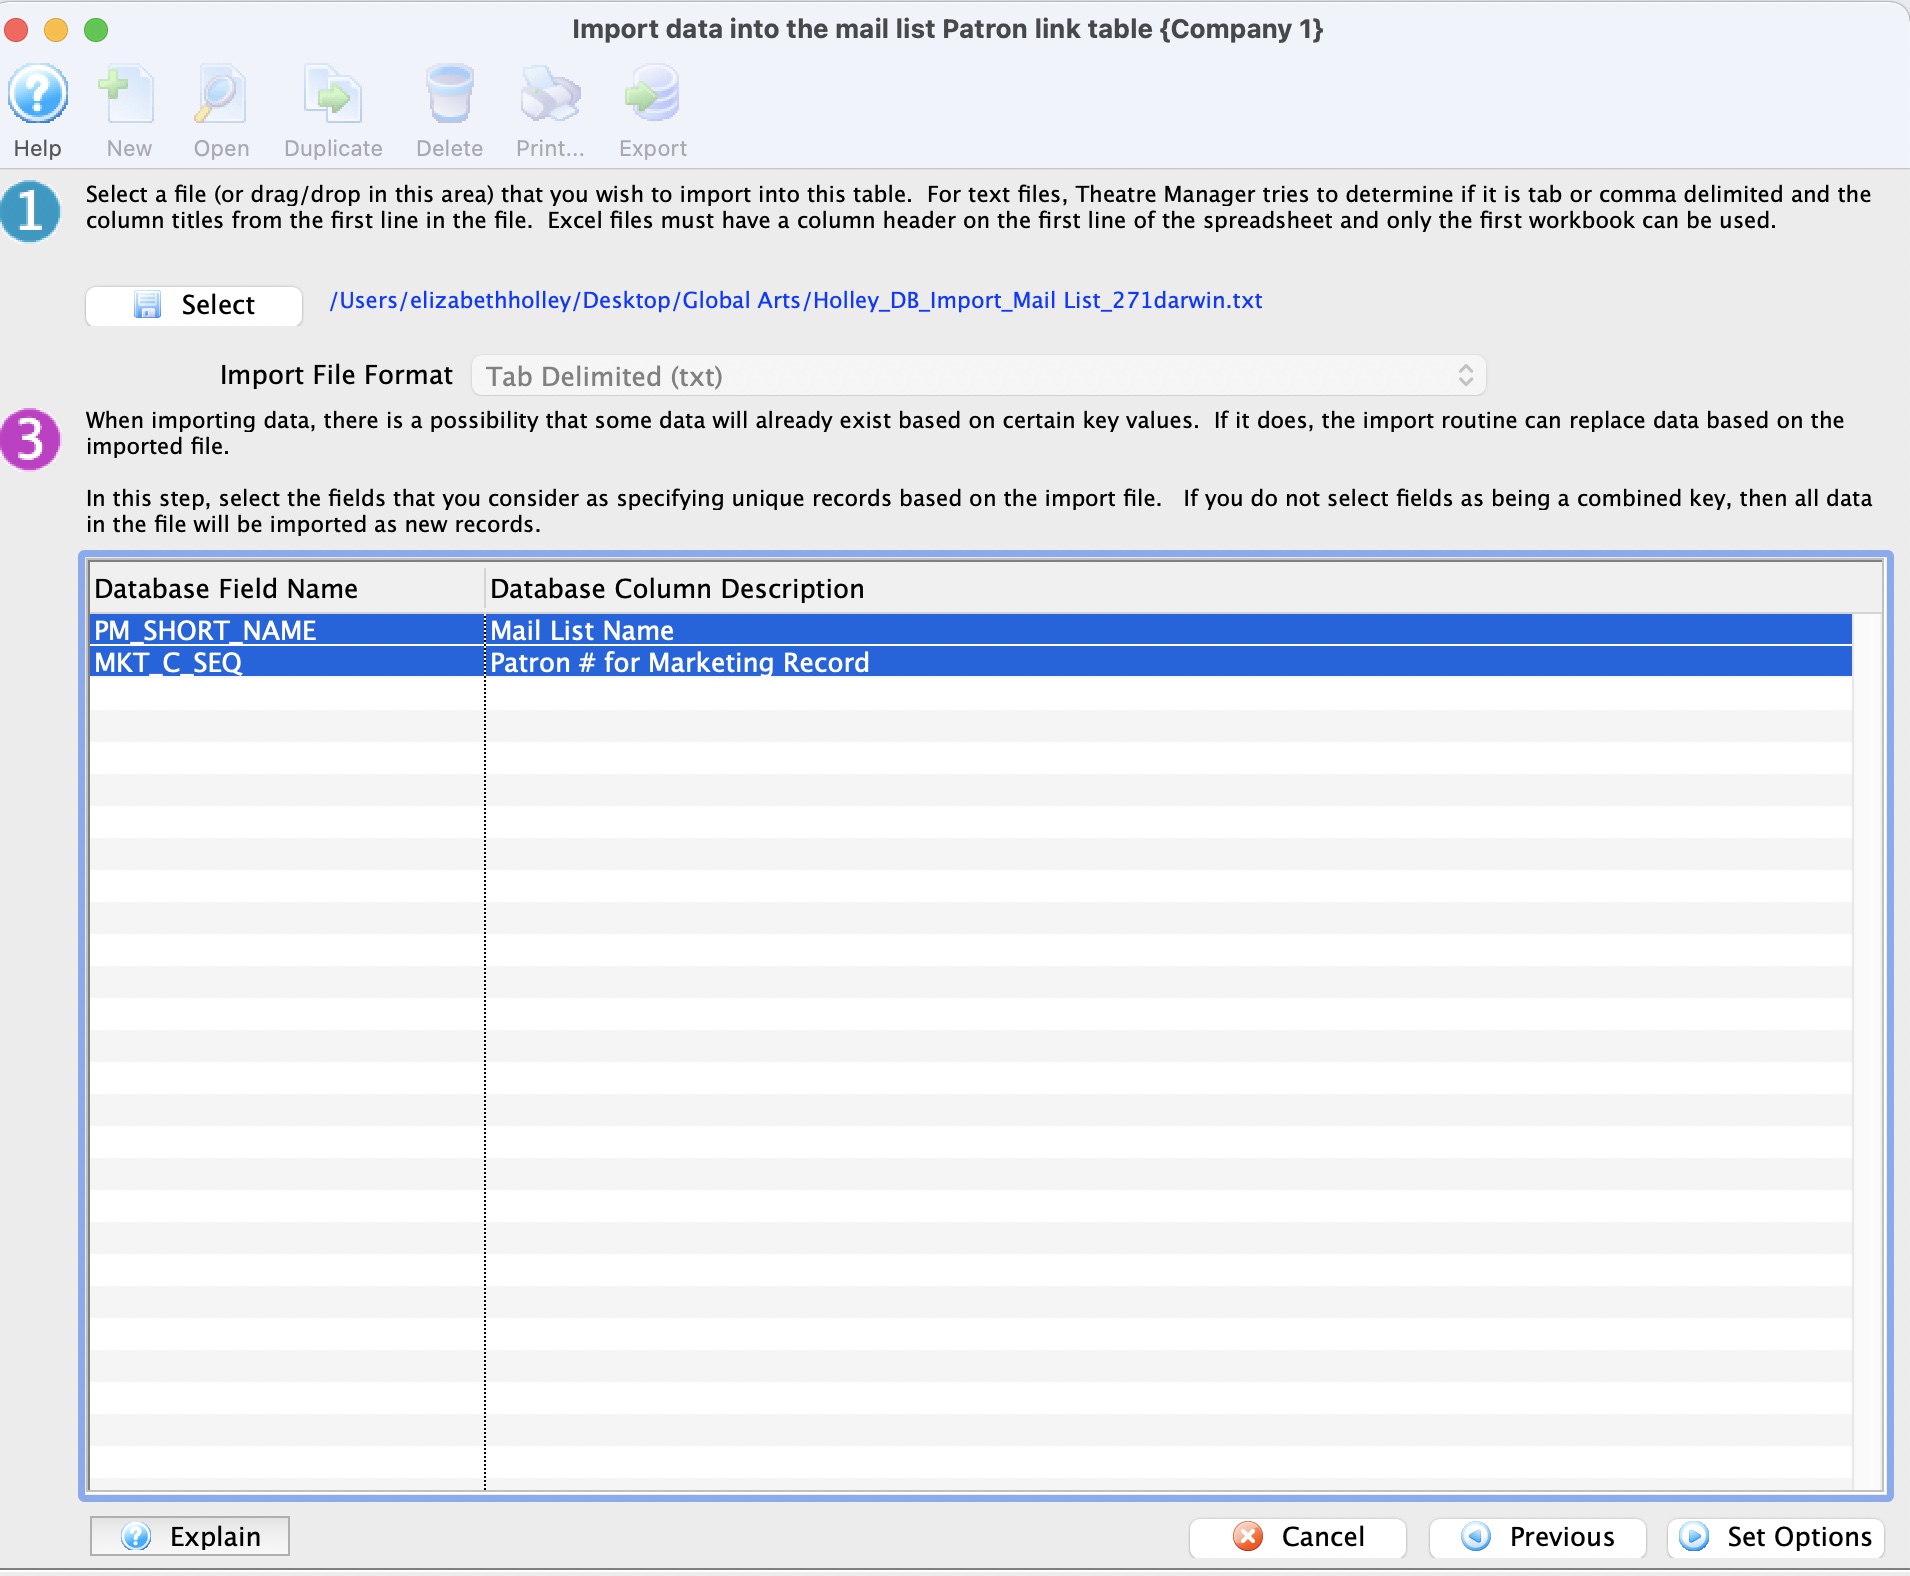
3. Select Key Field to Match On
Step 3 of the process is to select the Theatre Manager database field used to locate the existing patron account.
Parts of the Import Data Window
|
The first step in the data import process. |
|
Opens the user's operating system dialog for opening a file. |
| Delimiter | Select the type of delimiter used in the import file. The two possible types are Tab Delimited and Comma Separated. |
 |
The third step in the data import process. |
| Database Field Name | If you are importing a field that is considered a matching field (such as MKT_C_SEQ for the patron number), then they will appear here. If you select one of the matching fields, Theatre Manger will replace data in the database if it finds the record on the database. If not, TM can insert records (depending on the options you select). |
| Database Column Description | describes the meaning of the column |
|
Cancels the data import process. |
 |
Moves to the match keys step in the data import process. |
 |
Moves to the Set Options step in the data import process of setting options. |
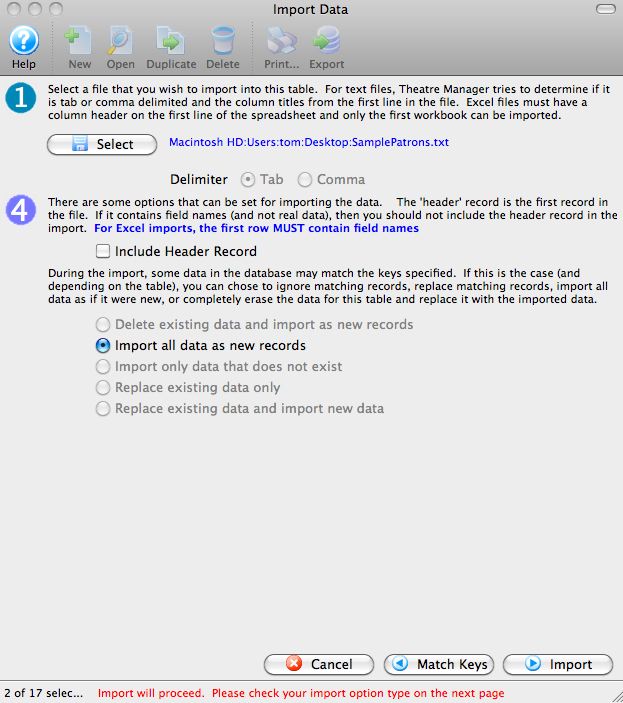
4. Data Import Options
Step 4 is the options available when importing the data into Theatre Manager.
Parts of the Import Data Window
|
The first step in the data import process. |
|
Opens the user's operating system dialog for opening a file. |
| Delimiter | Select the type of delimiter used in the import file. The two possible types are Tab Delimited and Comma Separated. |
 |
The fourth step in the data import process. |
| Include Header Record | If the first row of the data import file contains information that needs to be imported, then check this box to include the data. Otherwise the information will not be included as TM assumes that it is header information. |
| Delete existing data and import as new records | |
| Import all data as new records | A new patron record will be created for each row of the data that is imported. |
| Import only data that does not exist | During the import, TM will look for duplicates and only import new data. |
| Replace existing data only | During the import, TM will look for matching records and replace the existing information contained in the record. |
| Replace existing data and import new data | During the import, TM will look for matching records to update, and if records aren't found, it will create new records. |
|
Cancels the data import process. |
|
Moves to the previous step in the data import process. Click here for more information on the previous step of the data import process. |
 |
Moves to the next step in the data import process of importing the data. |
Sample Imports
Importing Existing Patron To A Mail List
There are times when a group of patrons from the Theatre Manager database may need to be exported and imported back into Theatre Manager in order to create a new mail list. This might be required:
- to recover and old Mail List that was deleted and needs to be recovered -or-
- when an excel document containing patron numbers is manipulated in some way to further identify patrons (eg donors where their 6 year trend shoes each years donations increased by 10% every year -or-
- a list of people is passed to another department for selection for marketing purposes or to have their content altered in some way
|
Before using the import features, we suggest making a backup of the database - just in case. |
Prepare the list of patrons
- Clean up data file.
- Open the file in Excel.
- Remove all column except the Patron # column.
- Change the first line in the column from Patron # to MKT_C_SEQ.
- Make the first line in the next column read PM_SHORT_NAME.
- Fill in the PM_SHORT_NAME column with:
- to add to an existing mail list: the exact name of the Mail List from Theatre Manager.
- to create a new mail list: the name of a non-existent mail list in Theatre Manager. Theatre Manager will create that new mail list for you
- Note: patrons cannot exist in a mail list twice, so they will be automatically de-duplicated
- Save the document as a tab-delimited file.
Import Patrons To A Mail List
- Click File >> Import/Export >> Patron >> Mail Lists.
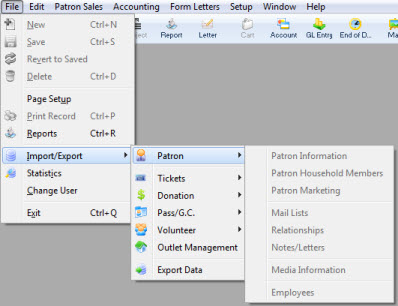
This will open the Import Data window.
For more information on the Import Data window, click here.
- Set the Delimiter format of the file and use the Select
 button to pick the file that contains the data to be imported.
An Open File dialog for the user's operating system will appear.
Once the file has been selected, the column headers will appear in Step 2 of the window. Scroll through the list to ensure MKT_C_SEQ appears next to Patron # For Marketing Record and PM_SHORT_NAME appears next to Mail List Name. If a column header from the import file does not automatically match, drag the column from the left to the matching line on the right.
- Once all fields have been matched, click on the Match Keys
 button to move to Step 3.
The MKT_C_SEQ should be listed in Step 3 next to Patron # For Marketing Record. This line should be highlighted by default.
- Click the Set Options
 button to move to Step 4.
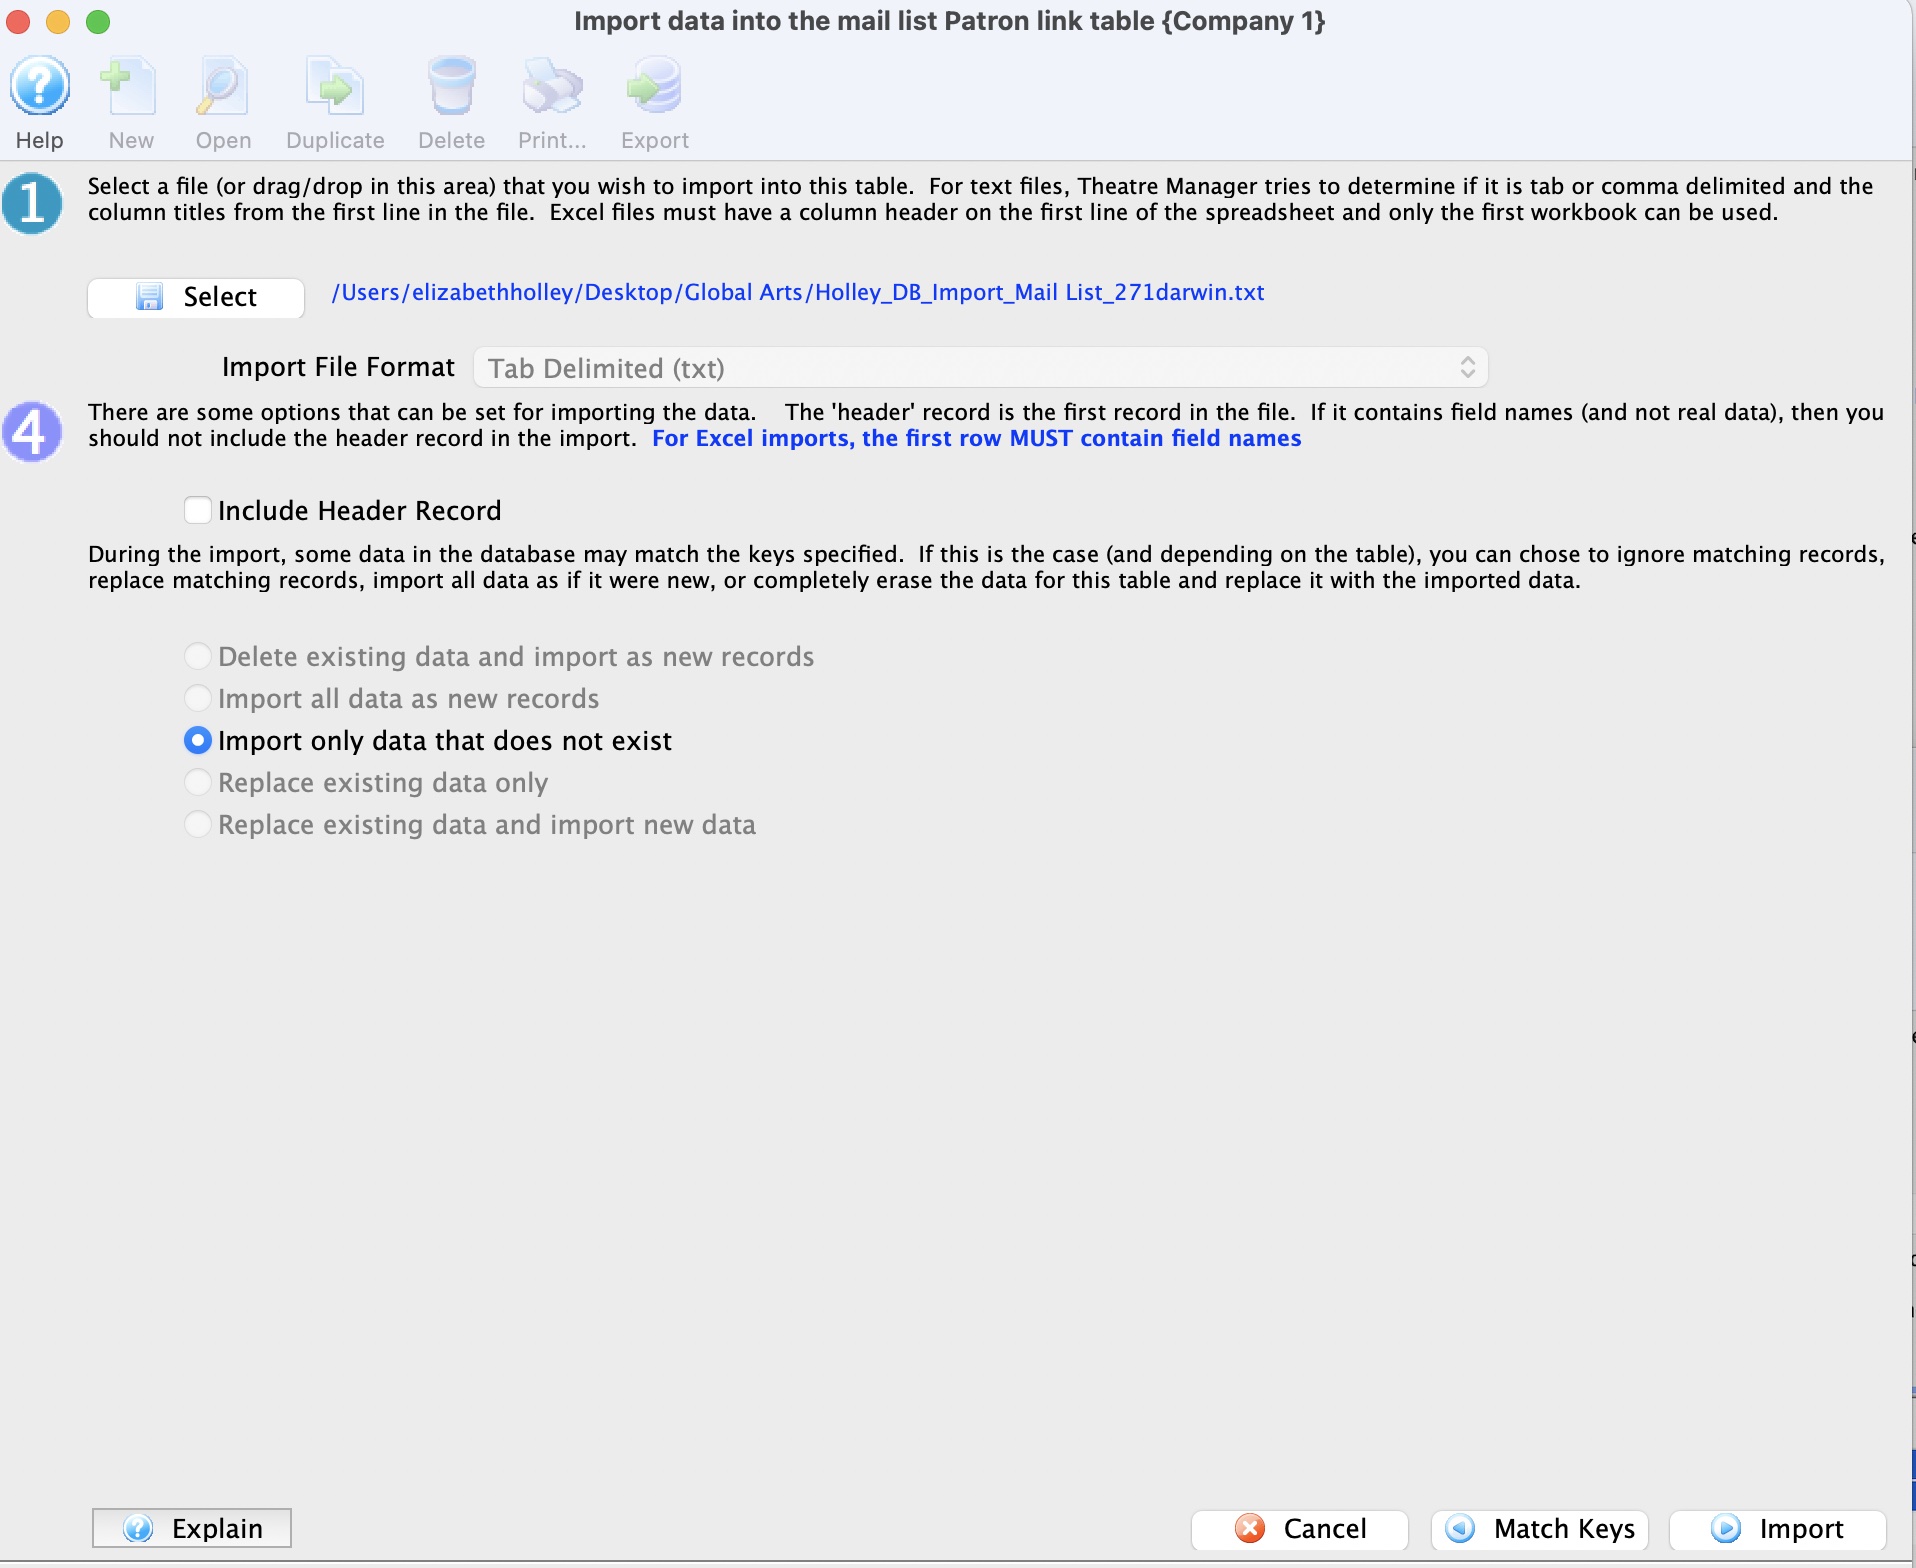
- The bullet in Step 4 defaults to Import only data that does not exist.
- Click the Import button to begin the import process.
A warning message will appear.
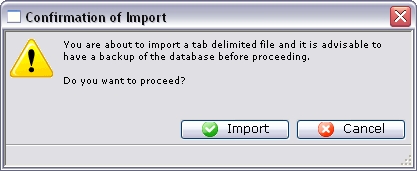
- Click the Import
 button to confirm the importing of data.
At the bottom of the Data Import window, a message will appear to show the import has started.

Depending on how much data is being imported, the import routine can take some time to run.
When the import is complete, a final dialog will appear.
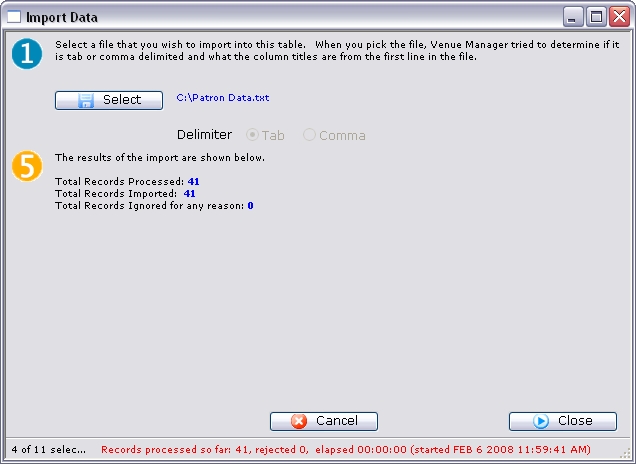
- Review the information on the dialog window, and then click the Close
 button to finish.
The Patrons have now been added to the Mail List. The Mail List can be opened and reviewed for details.
Importing Patron Data
At this time Theatre Manager allows organizations to import patron data only from another program. All other data importing should be handled by the Arts Management staff to ensure the data is properly imported. Before beginning the import process, please click here to read the tips on importing data.
- From the main menu bar, go to File >> Import/Export >> Patron >> Patron.
This will open the Import Data window.
For more information on the Import Data window, click here.
- Set the Delimiter format of the file and use the Select button to pick the file that contains the data to be imported.
An Open File dialog for the user's operating system will appear.
Once the file has been selected, the column headers will appear in Step 2 of the window.
- From the box on the left hand side, match the fields with fields in Theatre Manager.
To match fields, click on a field and drag it to the right hand side to match it.
- Once all fields have been matched, click on the Match Keys button to move to Step 3.
- If the data has any unique keys, they can be established here.
- Click the Set Options button to move to Step 4.
- Set any additional options before beginning the data import.
- Once everything is set, click the Import button to begin the import process.
A warning message will appear.
Ensure that a backup of the database has been done. - Click the Import button to confirm the importing of data.
At the bottom of the Data Import window, a message will appear to show the import has started.
Depending on how much data is being imported, the import routine can take some time to run.
When the import is complete, a final dialog will appear.
- Review the information on the dialog window, and then click the Close button to finish.