Legacy Support Pages
While those machines have served us faithfully in the past, they do sometimes need to be retired.
In the event that they cannot be retired, we have moved any support pages here for those legacy bits of equipment and software into this catch-all location so that you can still access the support.
Emailing an Employee their Password
If an Employee forgets their password, then they can have Theatre Manager email them their password so that they may log back in. This requires ALL the following conditions to be true:
- The Employee must have a valid email address listed in their employee preferences window. This email address their primary email address on the Contact Info tab of their Patron record.
- The Employee must have Normal access. Outlet Administrator or Master User Access passwords cannot be emailed.
- The Employee must not have a Resigned Date in their Employee record.
- Resigned means they made too many attempts to log in and are now locked out.
- They will need reinstated first.
- The number of attempts allowed is determined on the PCI Security tab of Setup>>System Preferences.
|
The proper email settings need to be defined in Company Preferences under Web Email Settings. This allows emails to be sent to the Employee. If you receive an SMTP error when attempting to have your password mailed to you, please have somebody who still has access check the SMTP settings first, then try again. |
For an Employee to get their password emailed to them, they perform the following steps:
- Start Theatre Manager by clicking on the Theatre Manager Desktop
 icon.
icon. -
In the log in window, double click on yourself as if you were going to log n
- Click on the yellow 'envelope' at the bottom of the login window.

if the user hovers over the envelope icon, the tooltip will indicate the email address that the password will be sent to.
Theatre Manager will email the password to the primary email address on file in that Employee's patron record.
Deprecated: Ticket Printers Tab
 |
NOTE: Printer preferences have moved to a new location: HARDWARE PREFERENCES.
All Devices must be previously set up in device setup |
Architecture and Network Settings
|
Theatre Manager Server is required for Version 10 and is designed to take advantage of the power of machines with multiple cpu cores and works more efficiently as the number of cores is increased.
You can install for Macintosh 64 bit (for OSX 10.6.8 or greater) or Windows (XP and up). |
Architecture
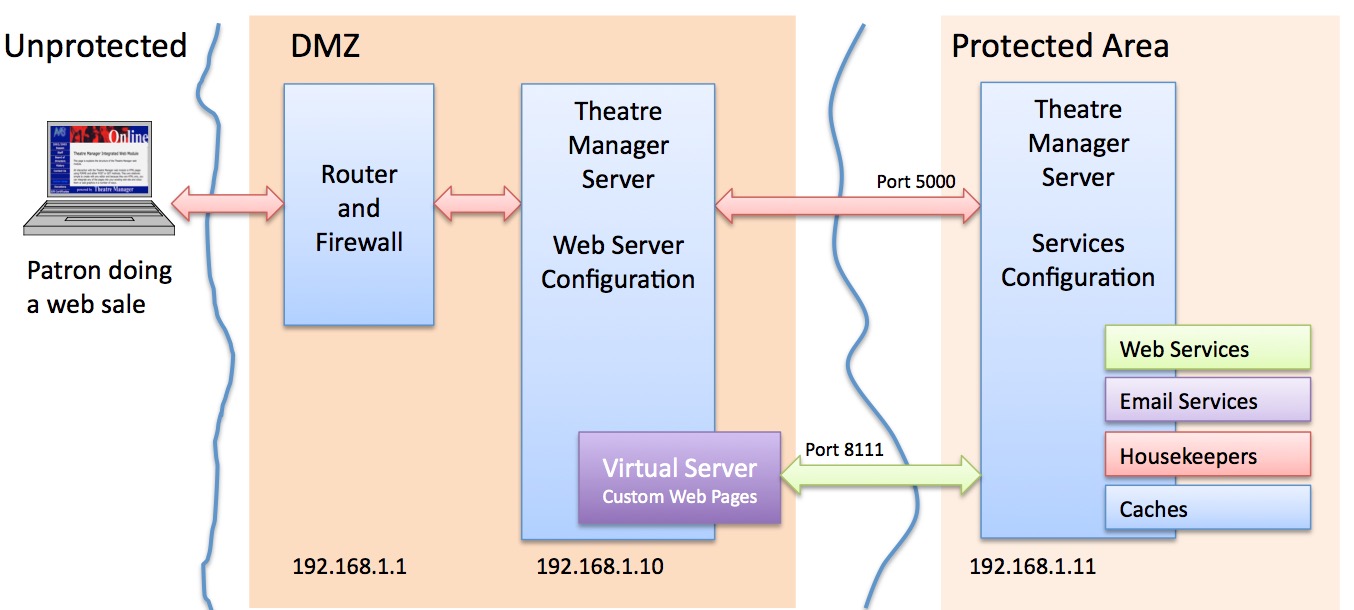
The diagram below illustrates the typical web infrastructure setup. To handle more load you can do one of 3 things:
- Increase the number of services that a machine can handle (assuming there is enough ram and CPU's)
- Add another machine to handle mores services (in the protected area) and tell the server (in the protected area) about them
- Replace a smaller machine with a larger machine and add more services to it
Process Flow
- A patron uses their web browser to initiate a web sales request.
- The request is sent to the firewall/router
- It passes through the router to a Theatre Manager Server (configured as a Web Server/load Balancer
- The web server looks for a TM Server (configured for services) in the protected area that has the availability to handle the request and passes it though to it
- While handing the request, the service may ask for custom web pages from the web server. If there are no custom pages, it uses the latest built in pages deployed with the TM Server
Web Server Configuration
It can also be used in the vast majority of situations with moderate web sales requirements, even if you have:
- one or more machine dedicated to web services -and-
- multiple cores on each machine (4 or more is better) -and-
- machines that are roughly equivalent -and-
- each machine can have services for all outlets
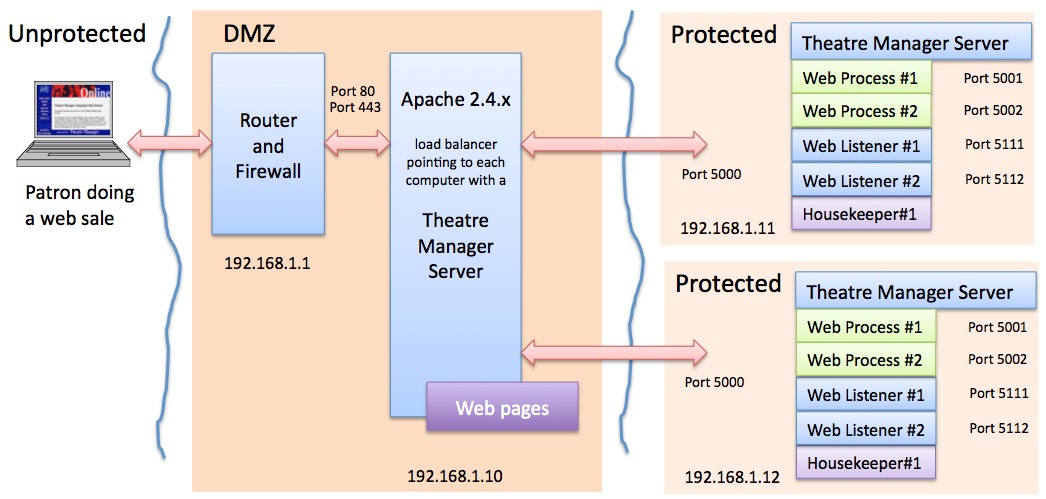
Traffic flow for Simple Setup of Theatre Manager Server
- All web traffic for 'tickets.yourvenue.org' flows through the router and firewall on ports 80 and 443
- The firewall passes traffic to Apache on ports 80 and 443
- Apache has a load balancer that forwards traffic to each Theatre Manager Server machine on port 5000.
- If and web service on the Theatre Manage Server need a template web page, it asks apache for it (on port 80 or 443)
- All completed web pages flow back to the patron.
For this setup to work, each machine must have:
- One or more second generation listener processes
- One of more classic listeners, sufficient to handle the load requested of it from that machine
TM Server Custom Setup
Consider this option if you:
- have multiple outlets,
- need to load balance traffic across multiple machines of varying capability,
- have very large onsales (typically thousands of seats to sold in a short time) and high traffic spikes on occasion
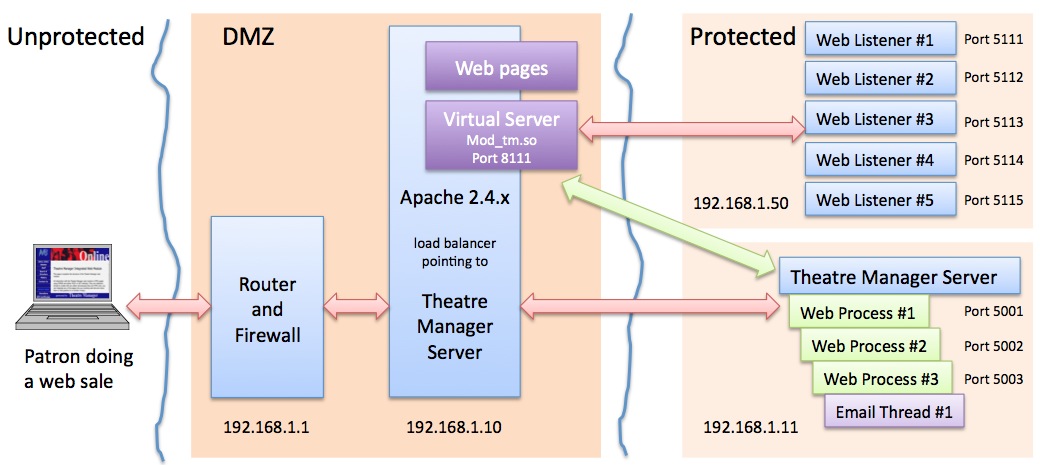
Traffic flow with the Theatre Manager Server
- All web traffic for 'tickets.yourvenue.org' flows through the router and firewall on ports 80 and 443
- The firewall passes traffic to TM Listener on ports 80 and 443
- TM Listener passes all requests to the Theatre Manager Server using the built in Load Balancer.
- The IP/Ports for each of the Theatre Manager Web Server must be specified in the extra/httpd-balance.conf file
- If the Theatre Manager Server can handle the web request, it will do so immediately.
- If the Theatre Manager Server cannot handle the request, the following happens:
- it contacts TM Web Server at port 8111 to talk to the virtual server (this is an internal port and is not exposed to the internet). However, make sure your firewall allows internal communication to this port.
- The Theatre Manager Server hands the response to the customer
Observing the TM Server Processes
- It is running as a service
- You cannot monitor or control it directly.
- You can observe it indirectly using the web listener logs from the web monitor inside TM
- You can also monitor some activity by viewing the console logs/event logs or using an activity monitor/task manager to see the CPU it uses.
- You can control the behaviour of the second generation listener by opening a web browser and using the url http://127.0.0.1:3012 on the machine with the second generation listener
Setup Considerations for TM Server
- cores-1 'Theatre Manager Server' processes start. Meaning a 4 core machine will start 3 processes, an 8 core machine will start 7 processes, a dual 4 core with hyperthreading will start 15 process.
- 3 'Logging' connections will be started for logging activity to the database. These are used by the new server
- 1 or more 'Housekeeper' connections are started to handle worker activity. Worker activity currently means things like:
- Cleaning up expired carts on a periodic basis
- Sending out emails automatically that are due to go, whether created by an eblast or from the customer when they ask for their password or get a purchase confirmation. The email worker is very fast -- over 12,000 emails/hour.
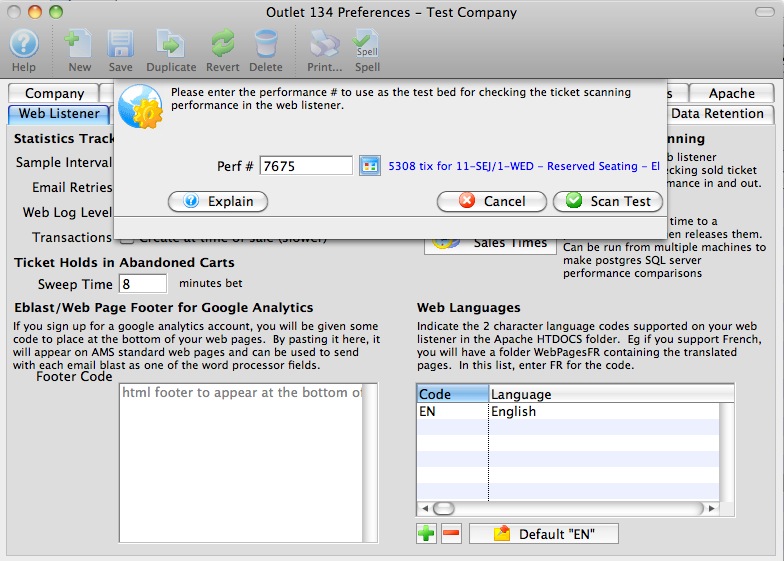
Check Scan Performance

causes Theatre Manager to initiate a test to try to determine the maximum speed for checking in and checking out an entire performance record (when complete, all tickets are returned to their original status).
An onscreen report is generated with statistics of its speed. This can be useful if you need to check network speed when using attendance scanners.
You will need to provide a performance that has ticket sold to it as per the window below and then click 'Test' to initiate the test.
Installation - Motorola MC50, MC55, MC55A, MC5590
|
As of 2019, these scanners are no longer supported (5 years after original notice). Refer to Linea-Pro IOS based scanners
In early 2014, the MCxx family reached a technological end of life after many years of being the standard for scanning in the industry. They do not support any of the latest end to end security and the windows mobile operating system is defunct Recognizing this, we added support for Linea-Pro IOS based scanners (far easier to set up on networks, use and offer more capability). If you have existing MCxx scanners, we can provide support and replacement parts on as-available basis. |

Following are the key functions of the scanner and how to set it up.
- Description of the Motorola MC50 and the buttons on it.
- Downloading and Installing the AMS Ticket scanning program on the scanner using Active Sync.
Note: he link on this installer has been removed as it is no longer supported
- Setup of the scanner and mating of the scanner with your router and network.
- Setup of the login information and some key communication parameters before scanning can occur
Description of the Motorola MC50/MC55/MC55A/MC5590 Buttons
Theatre Manager supports the MC50, MC55, MC55A or similar wireless scanners for tracking people entering and leaving a venue.
The scanner operation buttons are:
- The yellow scan buttons are on both sides at the top of the scanner. They are interchangable so you can use either for scanning.
- When you are using the Theatre Manager AMS Ticket program, all functions are accessed by clicking on the touch sensitive screen using a stylus or your finger.
- The orange button at the bottom left of the keyboard is the numlock button. Pressing it once allows entry of a number. Pressing it twice turns on num-lock. Pressing it again, turns the keyboard back to alpha. It is handy when entering information to set up the device.
Active Sync for Windows
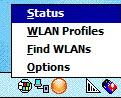
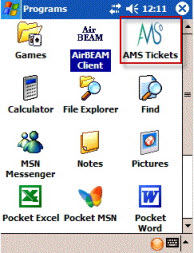 If the AMS Tickets program is not on the scanner, you will need to install it. You can determine if it is in the scanner by clicking the start menu at the top of the scanner and looking down the list for the Programs' menu item. When you pick Programs, you will see a list of applications loaded on the device.
Look for AMS Tickets.
In the screen at the right, you can see the 'AMS' logo with the name 'AMS Tickets' in the first row on the 3rd Column
If you cannot find the icon the program will need to be installed.
|
Installation must be done on a PC because the connection cables that come with the device are USB and serial. If you have a credit card server, this is an ideal machine for this purpose. Installation only needs to be done once because the program is placed into nonvolatile ram, so even if you run out of battery power, it will still be there. |
Prerequisites
You need:
- The Windows Mobile software and the AMS Ticket program. You can download all you need from our web site.
- If you have Win 2000 or XP, then you must install Active Sync 4.5.
- For Windows Vista, 7, 8 and later, Microsoft Windows Mobile Device Center (WMDC) replaces ActiveSync. WMDC offers device management and data synchronization between a Windows Mobile-based device and a computer and is most often installed on the computer as part of the operatiing system.
- A PC computer with a USB connection.
Installing Active Sync 4.5
|
Active Sync 4.5 only applies to installing software on the Motorola scanners using windows 2000 or XP. If you have Vista and above, Microsoft Windows Mobile Device Center (WMDC) replaces ActiveSync and you may need to download and install that instead (if it is not already on the computer) |
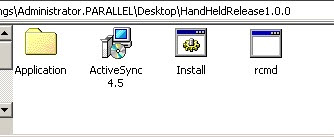
| Step 1 |
If you have not already done so, download the installers for the AMS ticket program. Expand the zip file to a convenient location and have a look at the folder. You will see some folders and files that look like the image to the right. If you have plugged in the scanner to your USB port, please unplug it. Double click on the ActiveSync 4.5 installer. This is the first step in getting the program installed. This happens once, regardless of the number of scanners you need to install the program on. |
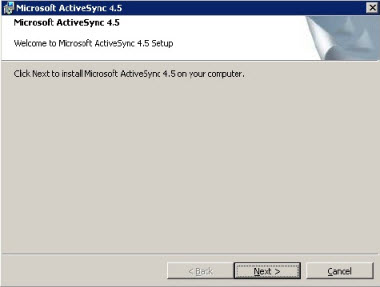
| Step 2 |
An installation window, similar to the one to the left, opens. Please follow the instructions to Install Active Sync 4.5. Click the Next button. |
|
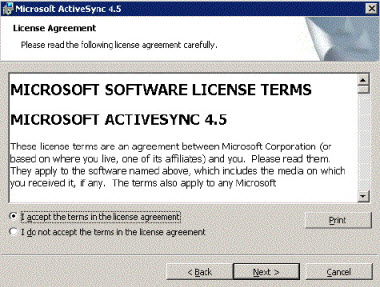
Step 3 |
After reading the terms, click to accept the licence terms, then click the Next button. |
|
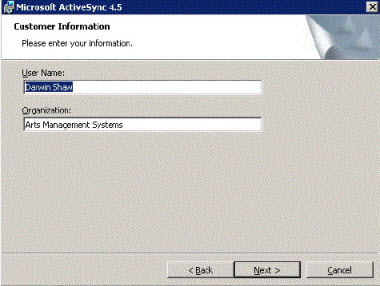
Step 4 |
Enter your user name and customer information and click Next. The software will most likely default the information for you. |
|
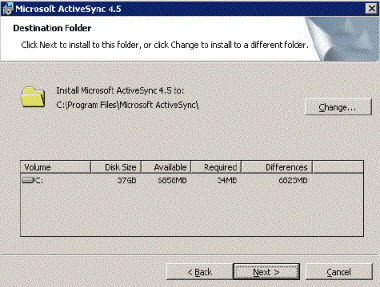
Step 5 |
Again click Next. |
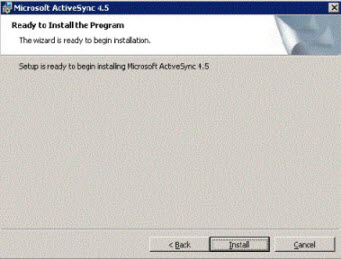
| Step 6 |
Click the Install button and wait till the installer is finished doing its work. This can take several minutes, depending on the speed of your machine. |
|
Step 7 |
Once you have installed Active Sync, you should see an icon at the bottom left of your computer in the icon tray. It looks like a couple of 'arrows' in a circle. If it is grayed out (like this picture), the device is not in and not connected. |
|
Step 8 |
If the scanner is its cradle and is connected, you should see the the icon is 'green' (indicating a connection). |
|
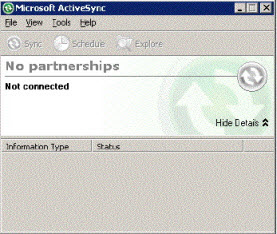
Step 9 |
In either case, you can 'double-click' on the icon to open the active sync program. You will see a window like the one on the left. |
|
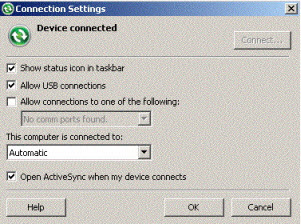
Step 10 |
If you have no connection, after plugging the scanner devince and the USB cradle, go to File->Connection Settings. This window has some settings that can be changed and should look like the image on the left. The default setting is to allow USB connections, but if you are having issues, please check to ensure the settings are similar. The important thing, is to get the Device Connected message. |


Installation the Scan Ticket Application
|
These instructions are based on installation using Active Sync using a windows XP computer. If you have Window vista or later, Microsoft Windows Mobile Device Center (WMDC) replaces ActiveSync. You can skip the install of Active Sync 4.5 |
|
You will also need to know the scanner type you have (MC50, MC55, or MC55A) and select the latest version of the software from the appropriate folder in the installer archive. |

|
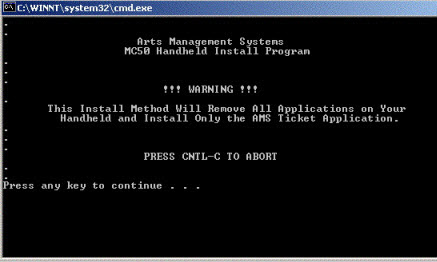
Step 1 |
Once connected to active sync or equivalent (the window does not have to be open):
|
| Step 2 |
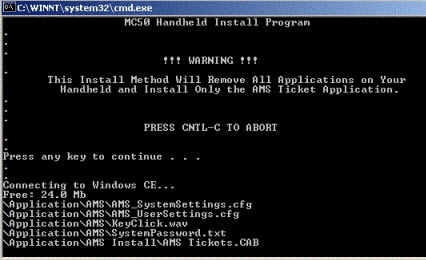
As the install progresses, you see the results of dos commands and file copy. This step can take a while (perhaps 10 minutes) as it moves the data onto the hand held device. Do not unplug the hand held device during the installation. |
|
Step 3 |
While the sync is occurring, the scanner device will show items are being transferred with a set of left/right arrows on the screen near the time. There is no animation of the arrows while the transfer is happening. |
|
Step 4 |
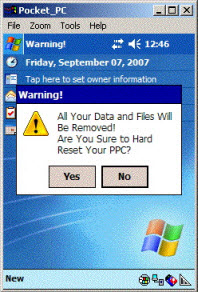
At the end of the install, the DOS screen will close on your computer and the screen on your mobile device will ask if you want to reset the computer. Although the messages 'all data and files will be removed', it really means the data that supported the installation of TM or other programs. Click Yes |
|
Step 5 |
After the restart of the device, you need to follow through with the device initialization. This includes: |
Mating the Scanner to Your Network
Click the icon to down load a PDF instruction sheet of this page.
Setting up a scanner requires two things to be done.
- The first is mating the scanner to your network and making it acceptable to your routers (all routers if you have multiple and if necessary).
- The second is getting the communication and parameters set up.
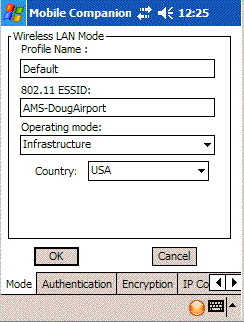
Mating the scanner with your network
We expect you are running a closed network - where you cannot log on unless your router has the mac address of the scanner entered into it and your scanner is set up to connect to that network using the SSID and WEP password for the wireless router.
You will need to involve your network support people to complete some of this part of the setup. Once done, it should not have to change again.These instructions focus on the part of the setup relating to the scanner.
| |||
 |
| ||
 |
| ||
 |
| ||
 |
| ||
| |||
 |
| ||
 |
| ||
 |
|
MC55A addendum for Settings
The MC55A has Windows Mobile 6.5 (r) installed and has a few quirks as the interface is far less intuitive. Please adjust communication settings from within the Ticket Scanning program using the following general steps starting from the 'Theatre Manager Setup' window.
|
|
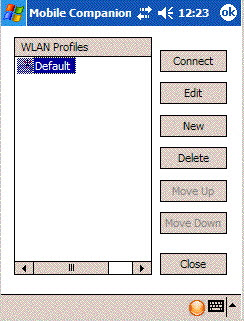
Create and Managing a profile |
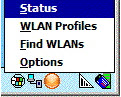
Using the wireless button, select Manage Profiles
| ||
| Now that you have a profile, time to select it and use it. Press and hold on the profile until the popup appears and click 'Connect'. The icon changes if you have active connection. You may need to 'x' out of this window to continue. Before you do, please refer to for last minute settings that you might need to check. | |||
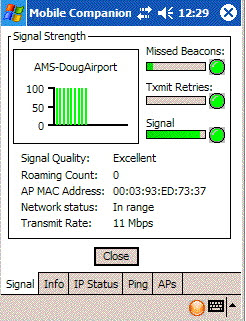
Testing the Signal |
Pressuming you are connected, click the Wireless button again in the ticket scanning program.
| ||
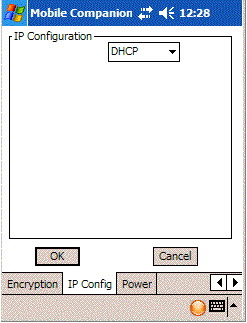
Testing the Network |
| ||
|
Once the network settings are done, then the next step is to try and end to end test. You will need to start at least one Theatre Manager Web Listener. For the purposes of the test, it is better that only one be started. |
|||
Testing a Scan |
On the Web listener window, there is a pop-up at the bottom middle of the screen beside the Show Detail button. This is the log Level selection which is normally set to Error. Change the setting to say Ticket Scanning . The Web Listener will now report more messages, including those sent by a scanner. It is helpful in the diagnostic process.
| ||
Real Life Testing |
The final step in the test process is to take the scanners to locations where you will use them (if you see messages that the scanner is communicating in the previous section).
| ||
Training |
The scanners do work, as there are hundreds in use. However, we recommend that you have a training practice session a few days before using it on your first real event. Have the ushers come in and try it. Help them scan in and scan out people so that they are familiar with the basic operation. Then try the scanners on a small event first - it is almost a certainty that there will be minor problems when real patrons are involved. Patrons bring tickets to the wrong event and your ushers need time to adapt to the controls that a scanner brings. Once you have a few smaller events under your belt and feel comfortable, then you are ready for all events. | ||
Scanner Prefs-Motorola MC50/55
|
Google bought Motorola in may 2012 and subsequently sold it to Lenovo. These scanners are no longer PCI compliant due to low encryption capabilities.
Note: the Motorola scanners are no longer supported. Replacement scanners are the linea pro, which is also more reliable and versatile. |
| Accessing Setup |
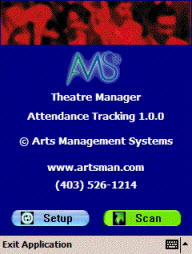
 Once the software is installed and the scanner is mated to the network, you can click the start menu, programs and the click on the AMS Tickets application.
It may take a couple of seconds or so to start as the scan program is synchronizing time with a time server and making sure the clock on the program is set properly. When it does start, you will see the screen at the side. Now we can set up scanning for an event / play. This must be done in advance of each performance that you are scanning tickets for. All that needs to be done is set up some parameters. Click the 'Setup' button on the screen. | ||||
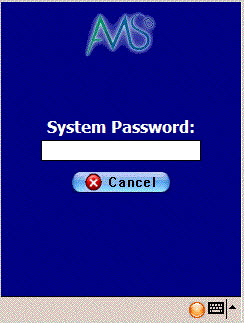 You will be asked for a system password to change the settings for the
performance. Type '123' (this can be changed) and once the password is
right, the next window will automatically appear.
You will be asked for a system password to change the settings for the
performance. Type '123' (this can be changed) and once the password is
right, the next window will automatically appear. | |||||
| Sample Setup |
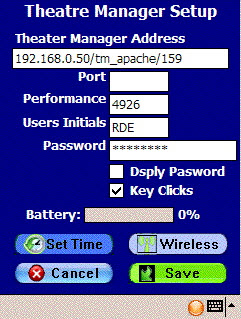 When you open the preferences window using either of the two methods above, you have some fields that must be filled in. These are below (Press the orange button on the keyboard twice to turn the num-lock on mode):
| ||||
|
You can access this option directly from the main screen where the scan & setup buttons are. Click the 'Scan' button and you will see a screen like the one on the left. At the bottom is a 'checkout' button with a red arrow. This means the mode is currently 'check in' and you click this button to change the mode to 'checkout'. It will also change the arrow at the top from green (checkin mode) to red (checkout mode) If there is a green arrow with 'check in' at the bottom, then the current mode is 'checkout' mode. Click the 'Checkin' button to change the mode to checkin. |
Theatre Manager Server Settings For Motorola Scanners
The Motorola Scanners rely on port 80 to scan tickets. The Theatre Manager Server, by default, elevates all traffic to Port 443. For this reason additional settings need to be added to the Theatre Manager Server through the Director to allow for scanner communication on Port 80.
Q: Why are there specific settings for the Motorola Scanners?
A: The Motorola scanners do not support secure connections to the Theatre Manager Server web server. The process below outlines how to setup an unencrypted side-entry point to the DMZ web server, while still maintaining a secure connection to the primary web server. If you’d like to have end-to-end security then please email sales@artsman.com for information on the updated, and fully secure, iOS scanners.
Settings
- On the Web Server computer, open the Theatre Manager Server Director in a browser by visiting http://127.0.0.1:3012

- Select the Configure tab.
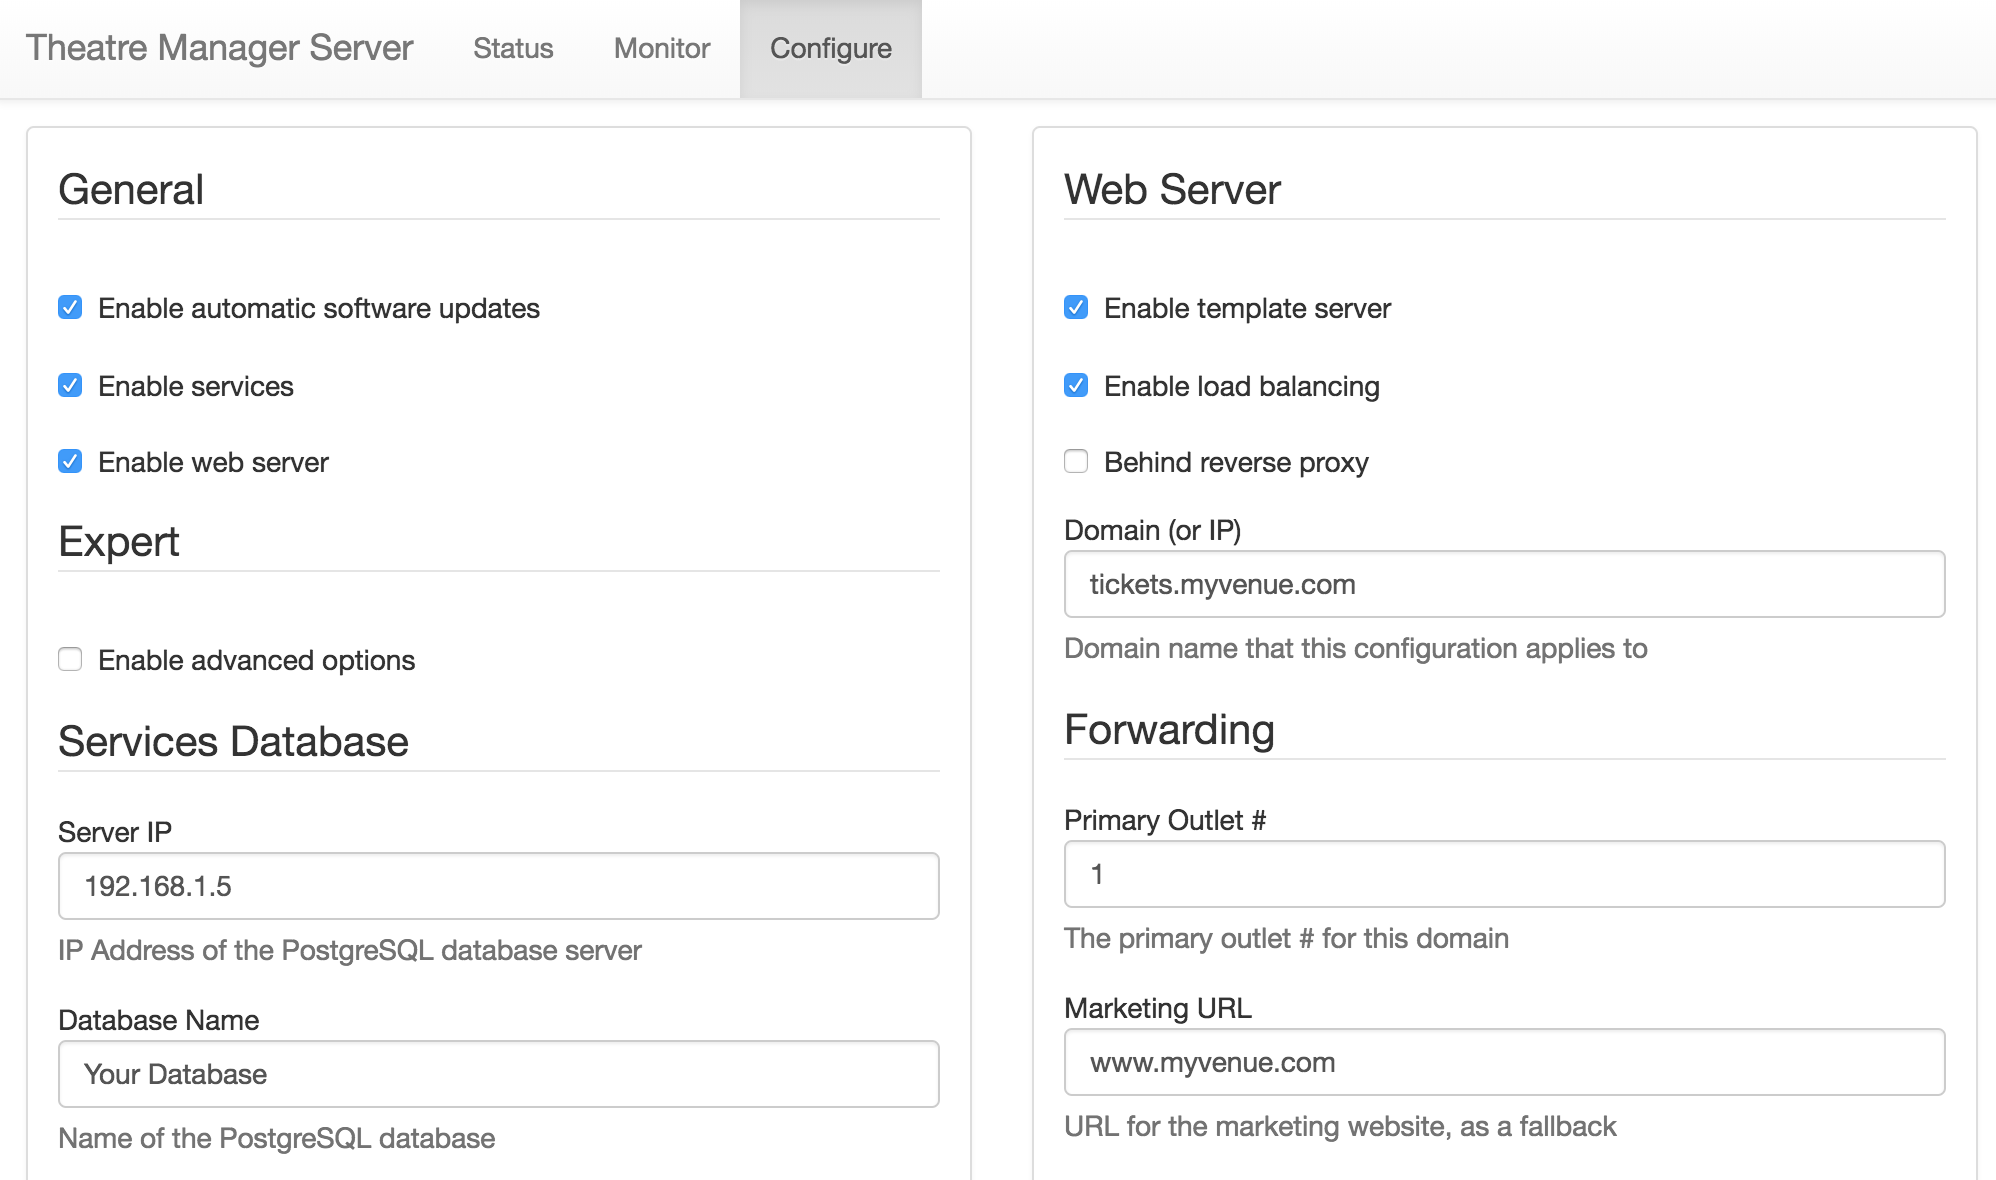
- Check the box for Enable advanced options and click Save at the bottom of the left column. This will open up more tabs within the Director window.
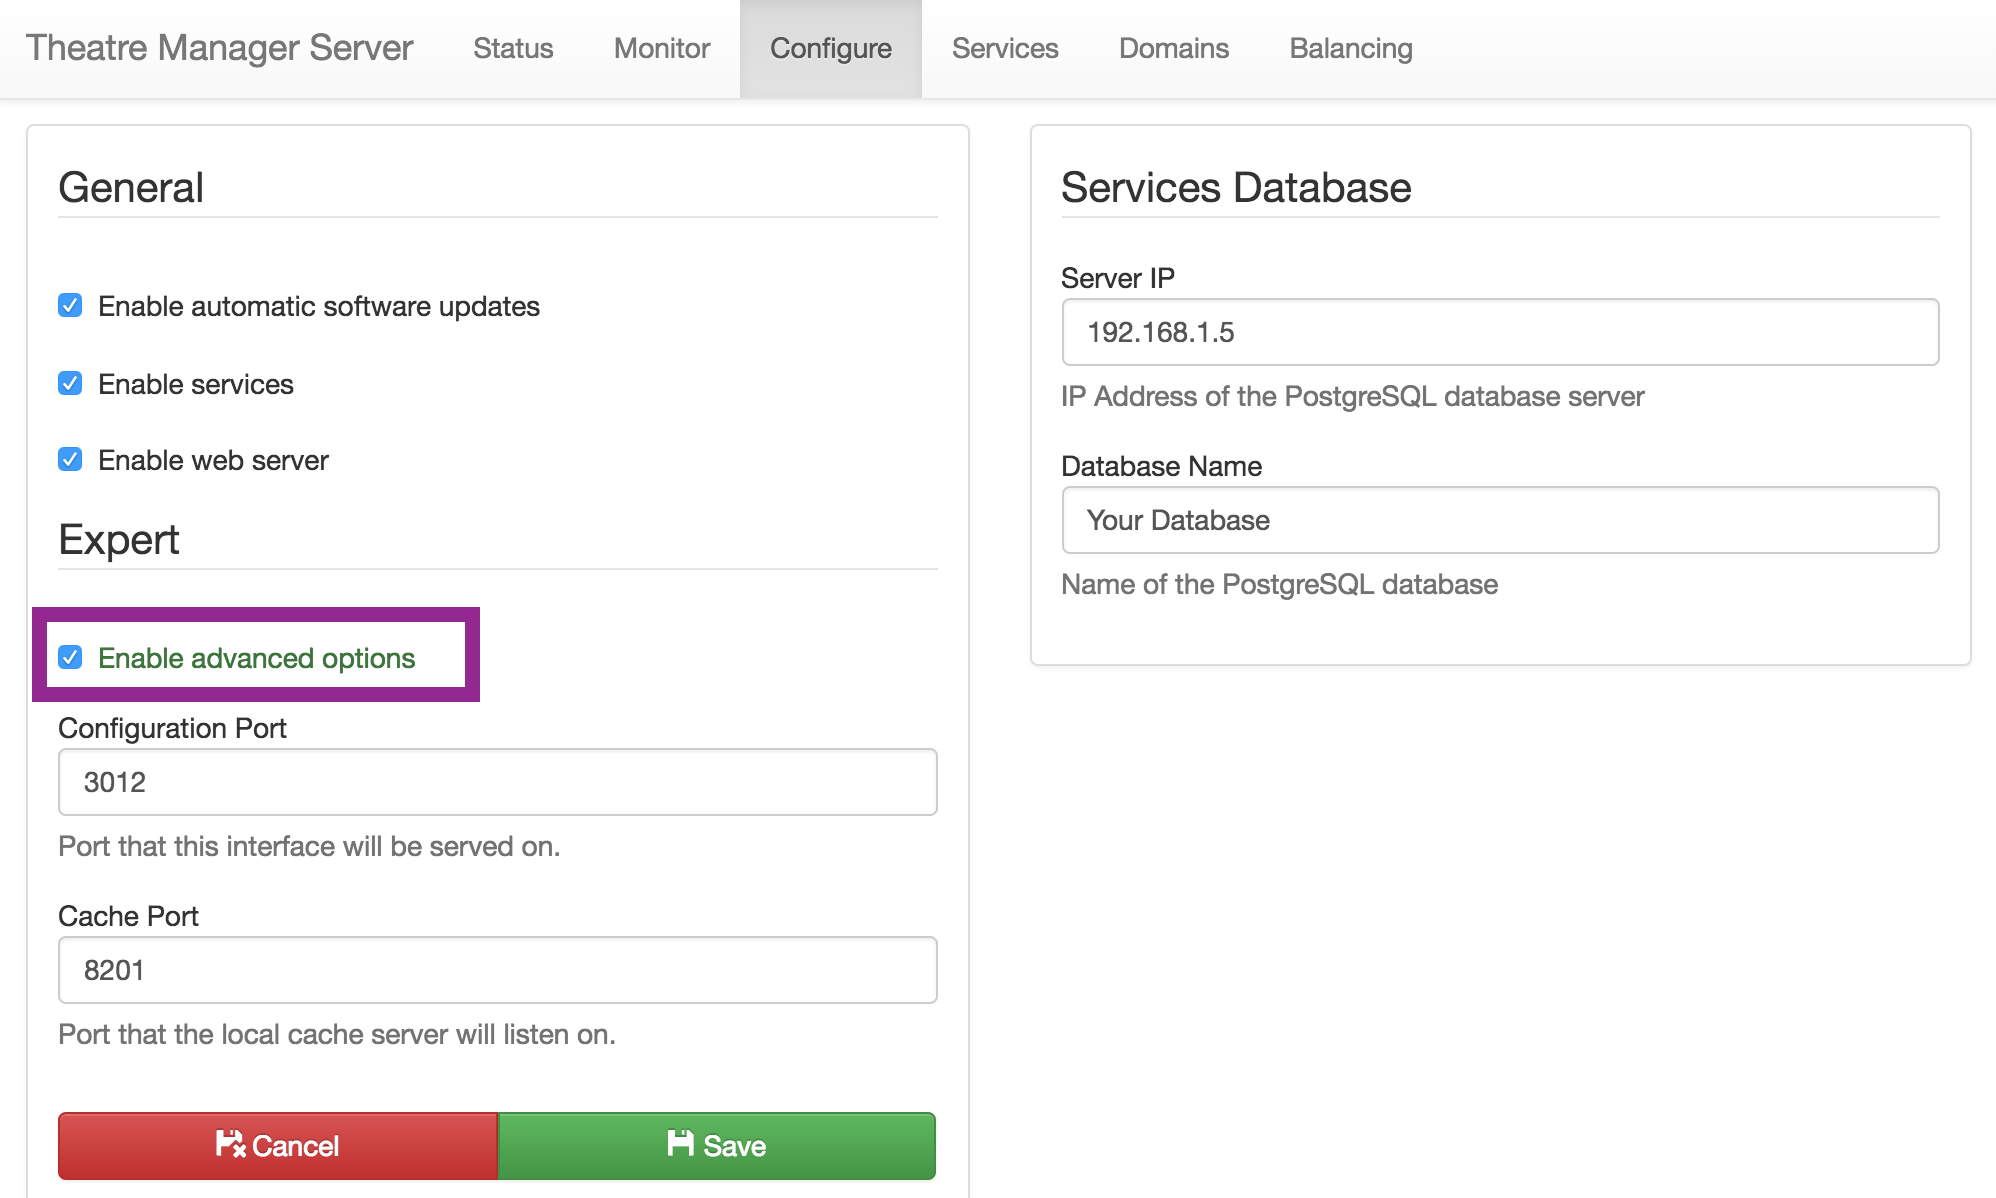
- Select the Domain tab at the top of the Director window.
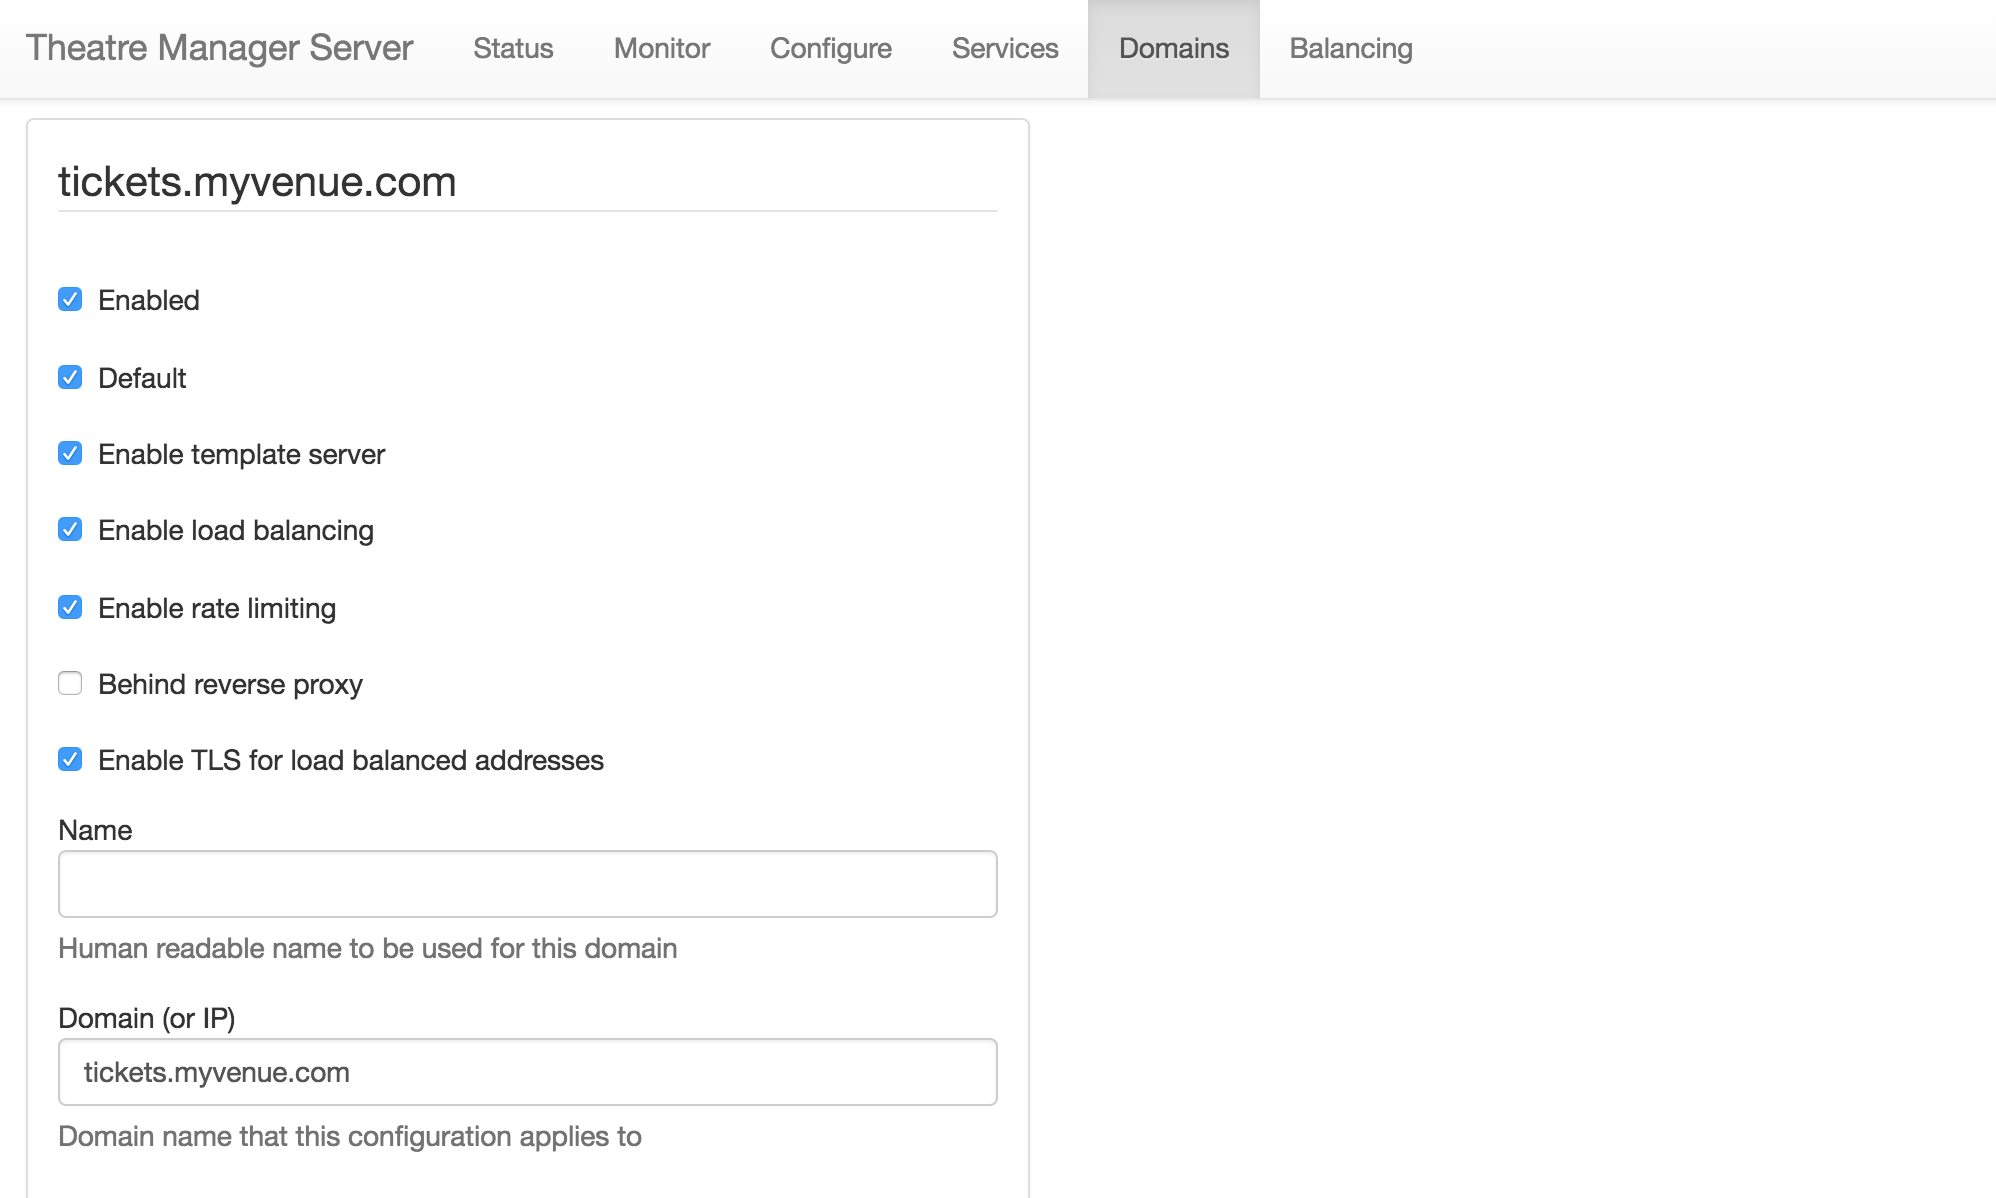
- Scroll to the bottom of the window and click the Add Another Domain button.
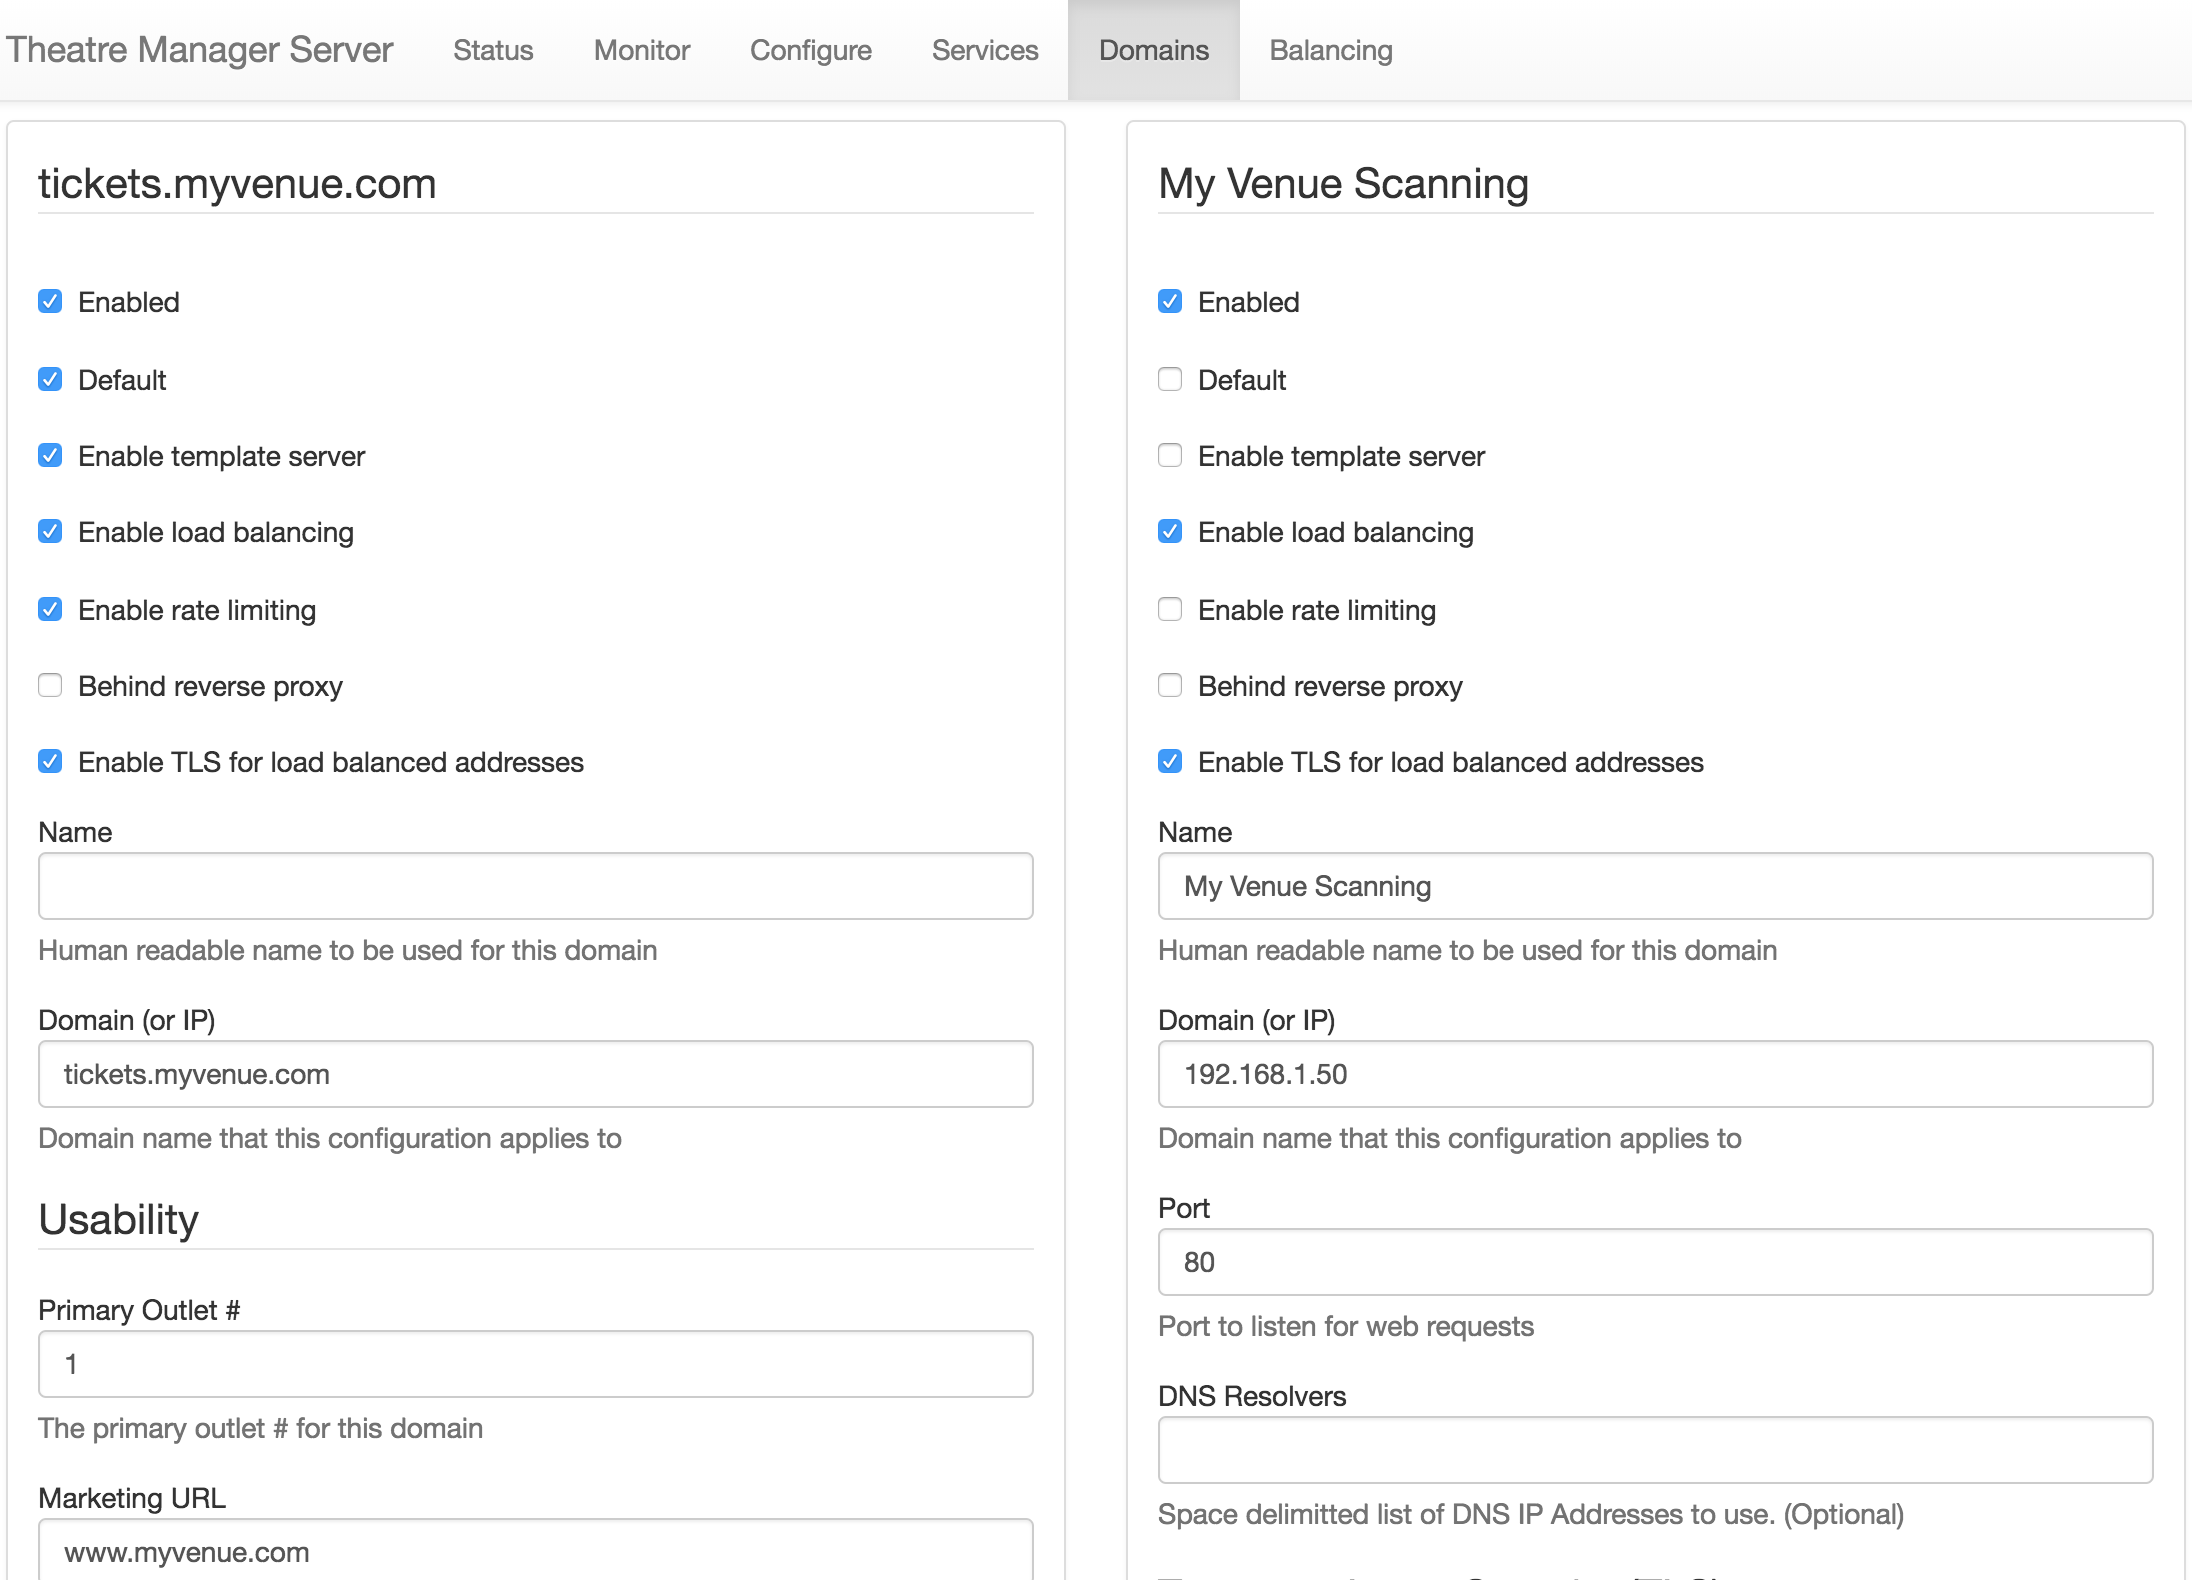
- Fill in the following details for the new domain:
- Check the Enabled box.
- Check the Enable load balancing box.
- Check the Enable TLS for load balance addresses box.
- Enter a Name for this connection. It may be something like Your Venue Scanning.
- Enter the Domain (or IP). This should be the IP address of the Web Listener.
- Enter 80 into the Port field.
- Click the Save button at the bottom of the right column.
- Select the Balancing tab at top of the Director window.
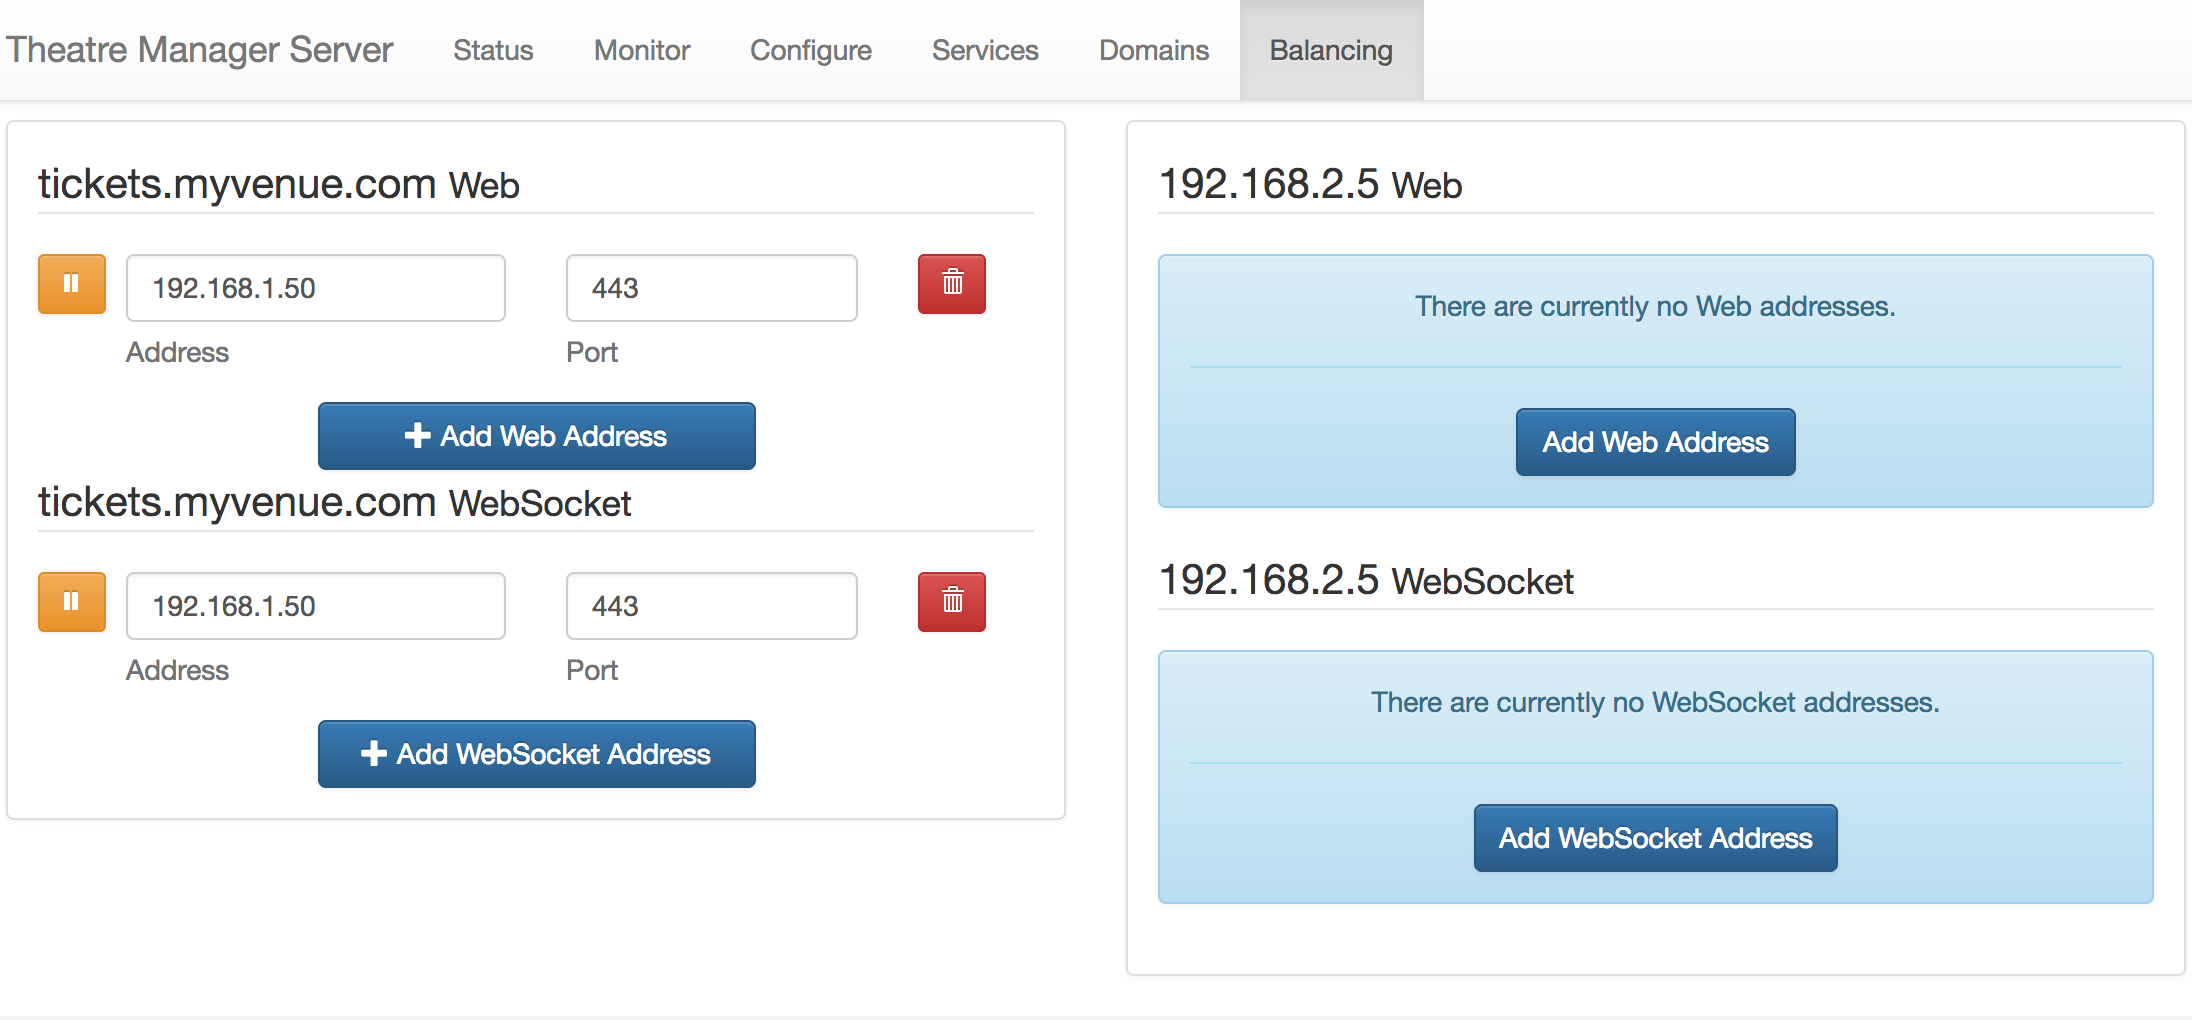
- Click the Add Web Address button under right column.
- Enter the following details:
- Set the Address to be the IP address of the Web Listener.
- Enter 443 in the Port field.
- Click the Save button at the bottom of the right column.
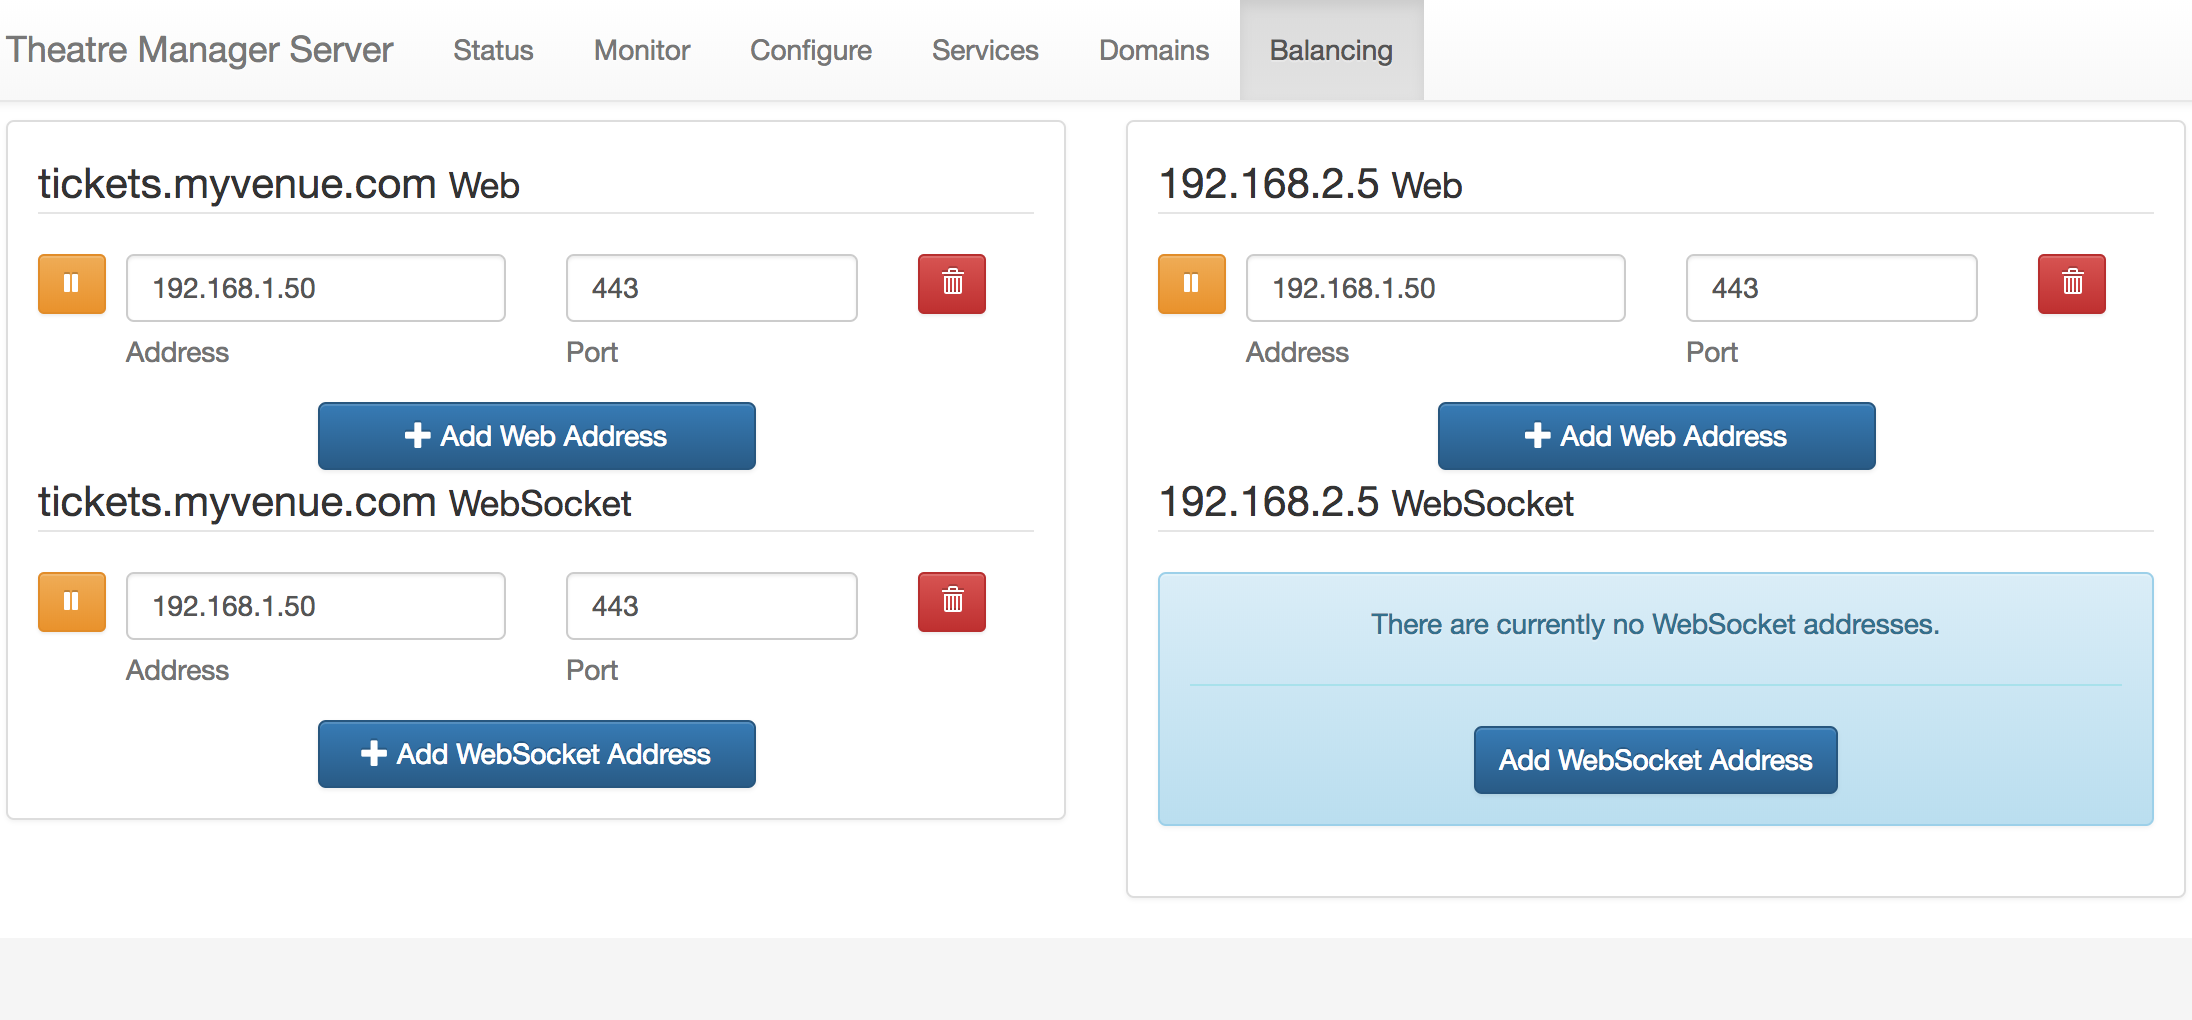
The Theatre Manager Server is now read to scan tickets using a Motorola Scanner.
Wireless Scanner Tips/Troubleshooting
The following list are some things that we've encountered that may help you.
Settings for Performance and Static IP
- Set power performance to maximum
(Jul 2011 O/S) Windows Start -> System Tab -> Power -> Advanced -> Set to "Max Performance"
(Nov 2011 O/S) Windows -> Settings -> System Power -> CPU Power [tab] -> Set to "Max Performance"
- Increase time for auto-shutdown/sleep mode
(Jul 2011 O/S) Windows Start -> System Tab -> ??? -> Advanced -> Either remove sleep mode or set to 10 to 15 minutes
(Nov 2011 O/S) Windows -> Settings -> System Power -> Advanced [tab] -> Turn OFF "Turn off device if not used for" or set to the highest minutes.
- This will stop the scanner from going to sleep and upon waking up, possibly receiving a different IP address.
- It also allows for faster scanning at the door as the usher does not need to wait for the scanner to wake up and re-connect to the wireless router.
- Set the Scanner to have a fixed IP address
Theatre Manager counts the number of scanners in use by the IP address of the scanner that it is connecting from. If it is a DHCP and if each time the scanner connects to the network, it is given a new IP address, then you may run out of ticket scanner licenses.
You can talk with the IT department personnel responsible for issuing IP addresses to determine a range of suitable numbers to assign to the scanners and set the scanner to a fixed IP. This will make connections to the wireless hub faster and allow Theatre Manager to keep track of the various scanners more effectively.
Finally, if you can connect via internet explorer (located in the applications folder on the scanner) on the wireless device to your web site, you should have all the network infrastructure in place to do ticket scanning. This means only the Theatre Manager scanning program needs set up.
Changing the System password
Theatre Manager's application for the scanners is preset with the System Entry Password and System Exit Password of "123" (without the quotes). You may change this password and set your own System Entry and System Exit Password.
After you have changed the password(s), ensure you provide the updated password(s) to the required people within your organization> Otherwise they will not be able to access the Theatre Manager scanner application setup utilities.
To change the password(s), you perform the following steps:
Using Activesync- Gain access to the scanner via ActiveSync.
Start browsing the files on the scanner. To learn more about ActiveSync, click here.
- The files you are looking for are in the Applications -> AMS folder:
- SystemPassword.txt (it contains 123)
- ExitPassword.txt (it contains 123)
- Edit the contents of either file to the new password.
You can edit the password files directly on the wireless scanner itself.
To change the password(s), you perform the following steps:
- Navigate to Windows -> File Explorer -> Applications -> AMS
The files you are looking for are:
- SystemPassword.txt (it contains 123)
- ExitPassword.txt (it contains 123)
Quick tips on scanner connections
Quick tips on scanner connections
- Make sure Wireless is on (it is off by default)
Windows Start -> Settings -> Connections tab
- Change network from "work" to "internet"
Windows Start -> Settings -> Connections -> WIFI -> change "work" to "internet"
- Turn Wireless mode "on"
Windows Start -> Settings -> Connections -> Wireless Manager -> On
- Uncheck the 801.11d checkbox
This can be accessed from the home screen (or from the AMS setup/wireless/Options screen) by:
- Clicking on the wifi settings
- Clicking on the Fusion button on the bottom menu
- Choosing Options, Regulatory (needs to be set to the country you are in to match your router - usually USA or Canada)
- uncheck the 801.11d checkbox.
Scan displays numbers slowly
Symptoms
The symptoms seem to be that the first number from the ticket will appear on the scanner, then a small delay, then the second number will appear, then a small delay, then the rest of the numbers. In total, it might take the scanner just over a second to register all the numbers, rather than a fluid slow of digits to the screen.
Solution #1
If this occurs, the MC55 needs version 2.0.0.4A or later of scan wedge software installed. Please download and reinstall as per instructions to put the new software in place. Also, please record any settings you have made to set up the scanner as the re-install process clears all data and settings from the scanner.
Solution #2
Recent versions of Windows Mobile also has spell checking turned on. This has a rather detrimental effect on ticket scanning - as it the scanner tries to spell check and predict each ticket number as it is scanned. Please turn this off.
Scanner Count Exceeded and Scanner Speed
Only a couple of your scanners appear to be working. The scanners that are not working show the following:
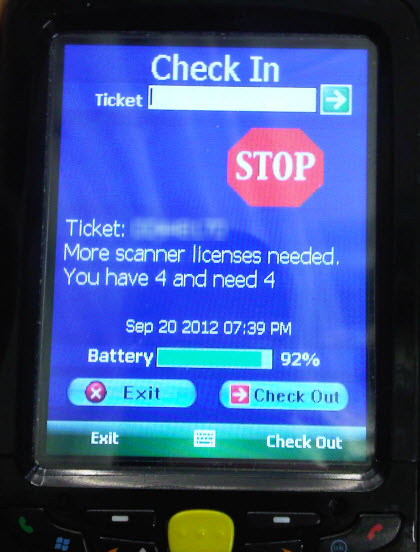
Scanners should be using a fixed IP address. Click here for more information.
Theatre Manager tracks the scanner count by IP Address. If the scanner change their IP address (which they can do if they do not have a fixed IP address) a single scanner could be counted multiple times and your database knows how many scanners you are licensed for. If an IP address changes, then the database says - and now we have a fifth IP address. So somewhere along the line, Scanner #2 got assigned a new IP address.
Second, Stop/Start all the Web Listeners (so they are all off at the same time). This will reset the IP addresses in the log. When you start the scanners again, the new IPs will be registered and the scanner counts will be refreshed. You can also go the to the Web Listener and click the Clear Cache button.
Do not use a DNS Address, use a Static IP Address.
Further on the scanner, is it looking for tickets.YourTheater.com or is it looking for the direct IP address of the Apache machine (192.xxx.xxx.xxx)? Entering the IP of the Apache machine will speed transmission as the scanner will not have to wait for the DNS to resolve. You change this in the scanner setup, and change the address. Click here for the setup page.
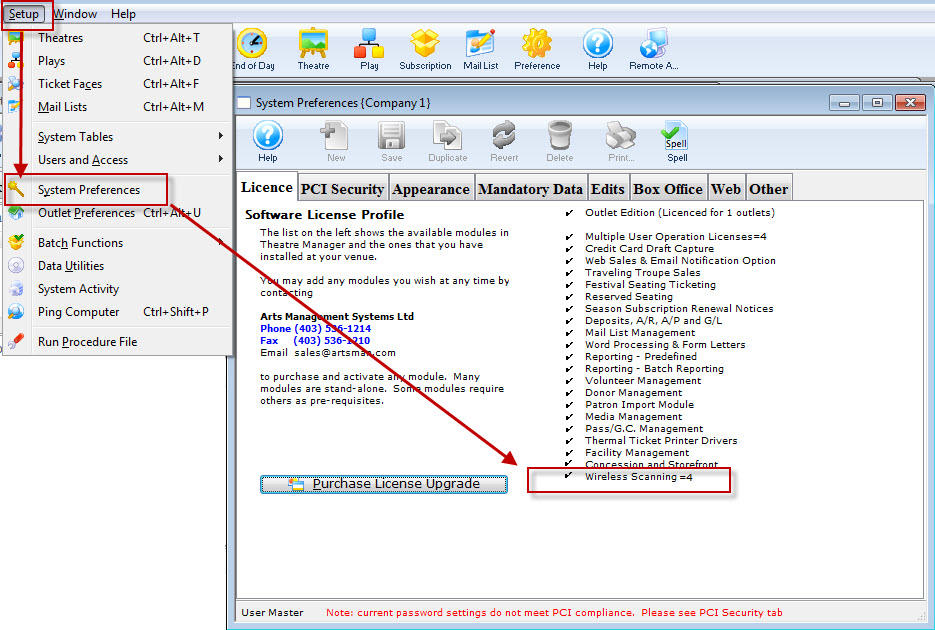
Check the Number of Scanners
To check the number of scanners you can pair to your system, choose Setup >> System Preferences.
Postgres Setup Pages (OSX)
|
These steps are no longer required if you are using Postgres 9.3 or later on OSX. All current installers use Postgres 9.6 or later. |
Mac OS X Lion or later - Multiple Drive Setup and Install
|
The steps outlined are similar if you have a Mac Mini or Mac Pro running OS X 10.6.x or earlier. You will have an install DVD and can do most of the steps without connecting to the internet. |
The general process to prepare such a machine for optimal performance is:
- Save any data or databases that you have on the machine
- Stripe the drives
- Reinstall Lion Server
- Install Postgres as normal
- Restore a database to that server
The steps have a degree of technical complexity and assume you are able to interpret and adapt to variations in the process yourself.
Striping a Mac with two or more drives under Lion or later
Since Lion does not come with any install disks, you will need to follow a special procedure to stripe the drives on Lion servers as follows:
- Make a backup of any data on the computer that you deem important if you have been using it for a while
- Connect the Mac Mini/Mac Pro to the internet, a monitor and keyboard. The internet is important as it will be required to restore the operating system
- Restart the Mac with the Apple and R keys held down simultaneously. This will boot from the internal Lion partition on the drive
- When the machine responds with the OS X operating system installer screen, select the language of your choice and begin the install
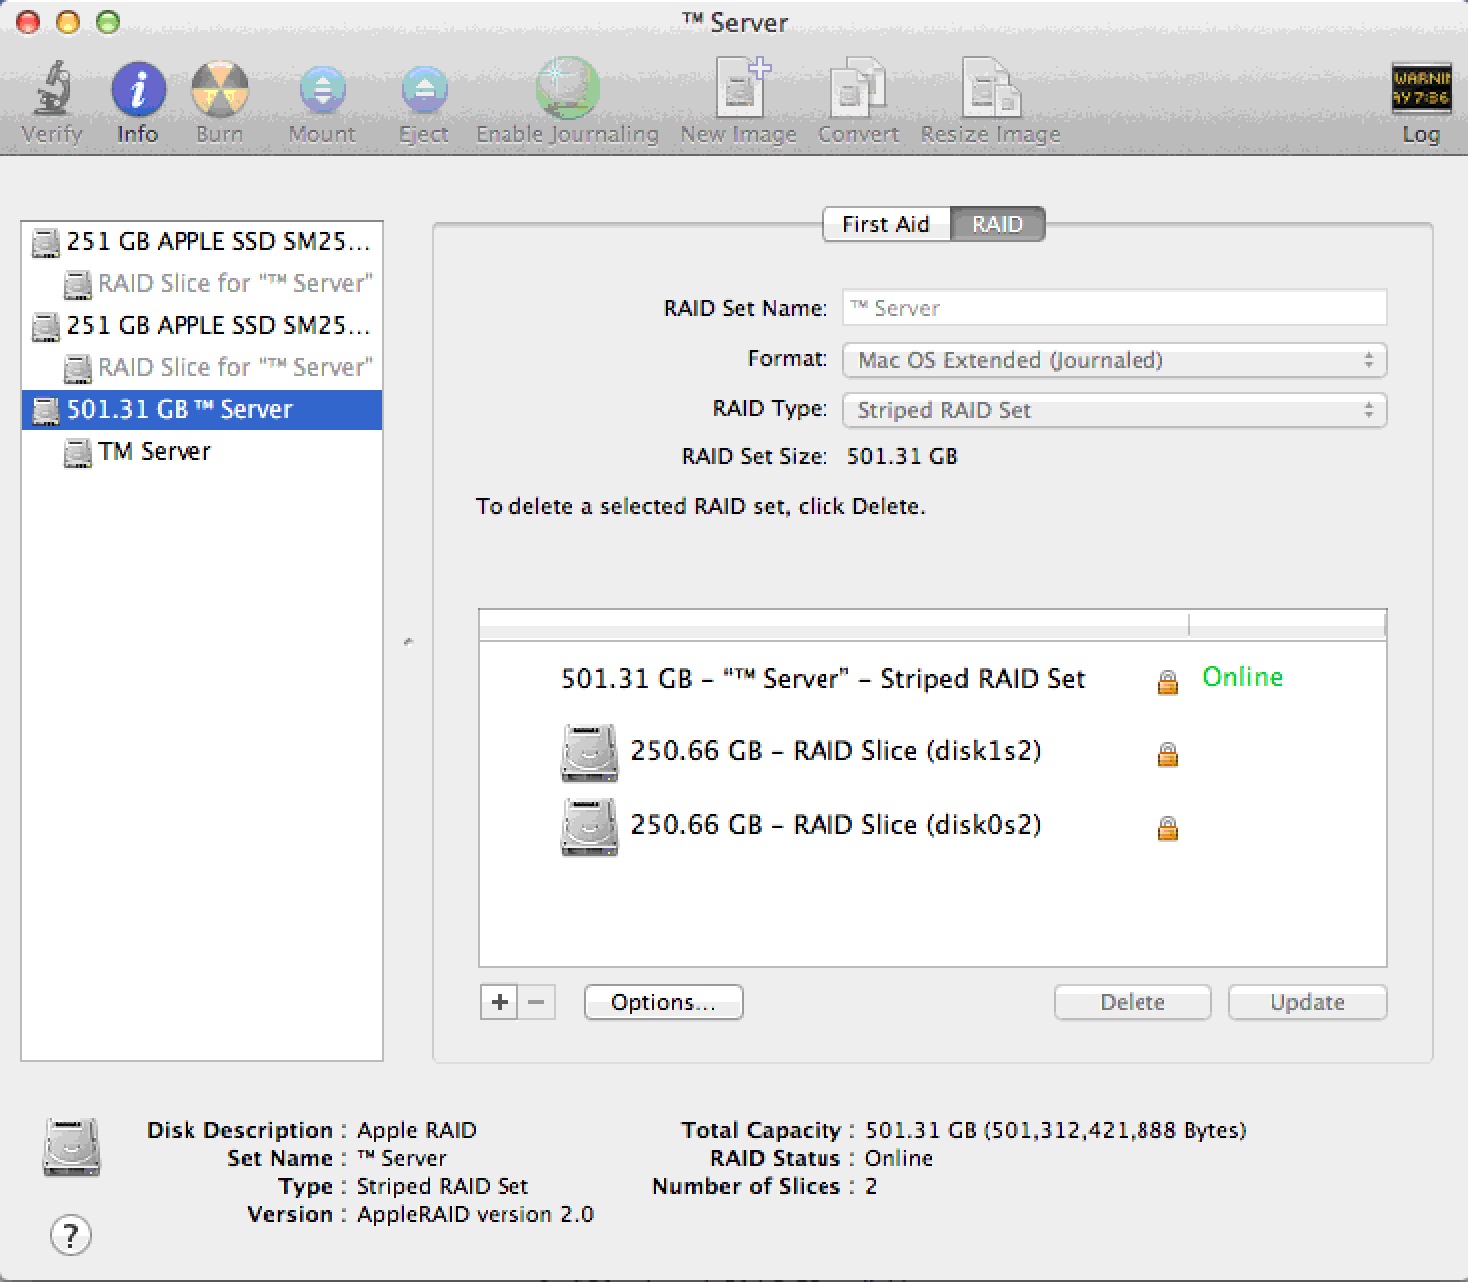
- The next screen will be the utilities window. Select Disk Utility and:
- After selecting a drive, click on the the 'RAID' tab.
- Select STRIPED RAID SET for the 'RAID Type' prompt. The default is a mirrored drive set, so be careful; otherwise, you will end up starting over.
- Drag both individual drives into the RAID Stripe and verify that the estimated size of the RAID set is the total of both drives. (it should look similar to the diagram below)
- Create the RAID Striped Set.
- After confirming you want to do this, Partition Utility will bring the RAID array back online.
- Quit 'Disk Utility'
- On the main window, you should now select 'Reinstall Mac OS X Lion' (optionally, you could restore from a time machine backup). Follow any/all prompts and reinstall Lion. It may say that File Vault or some other features are disabled - it's the price of gaining a lot of performance from the dual drive server.
- The download from the Apple web site may take a while, so let the installer do its thing.
Post Installation Steps
- After installing and configuring, download any updates using 'Software Update'. You may need to repeat this step until there are no more updates available.
- Configure the server with a static IP address
- Disable Airport, Spotlight indexing, Time Machine and any power saving settings
- Setup the firewall as required
- Ensure the backup script is setup and thoroughly tested and that there is a step that can successfully FTP the database to another machine (or copy it using the Unix 'cp' command). If a hard drive in the striped RAID set dies, none of the data on any drive is recoverable so OFF-MACHINE backups are mandatory.
Step 2: Create user and import Database
|
This step is no longer required -- the installers do it for you |
In most circumstances, you can skip this and the remainder of the steps if you are only installing a demo. If you are not, you will need to proceed to steps 3 and 4.
Installing a demo if one was not installed
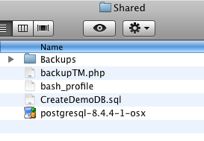
The database server needs a specific user called TheatreManager with specific privileges that will be assigned as the owner of each database. We also want to import a demo database. This step assumes that you have installed things into the /Users/Shared directory. If you did not, then you will need to edit the script and do this step manually.
| 1. | Go to /Users/Shared directory. You should see some files and folders with names that look like below.
|
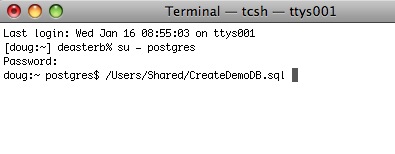
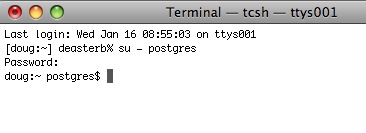
| 2. | Start terminal and change the user to 'postgres' by typing: su - postgres Press RETURN and then type the postgres user's password (password will not display anything)
|
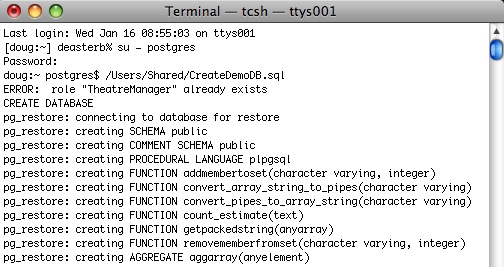
| 3. | Drag the script '/Users/Shared/CreateDemoDB.sql onto the terminal window. This shortcut saves typing anything. Click into the terminal window and then press RETURN to start the command. If it does not run, then possible issues are:
 |
| 4. | The script will run and load up the TheatreManagerDemo database. You can modify this script to load up a customer database if necessary by editing it in BBedit or in TextEdit (make sure to save it as text if you use TextEdit - its preference, unfortunately, is to save as a .rtf document). Note, any WARNING messages from the TheatreManagerDemo database creation can be ignored. These warnings are normal.
|
.bash_profile in terminal
|
This step is no longer required if you are using Postgres 9.3 or later. All current installers use Postgres 9.6 or later. |
Otherwise, this step is not required under most circumstances.
| 1. | Start Terminal and navigate to the home directory for postgres user.
Type: cd /Library/PostgreSQL/9.3 |
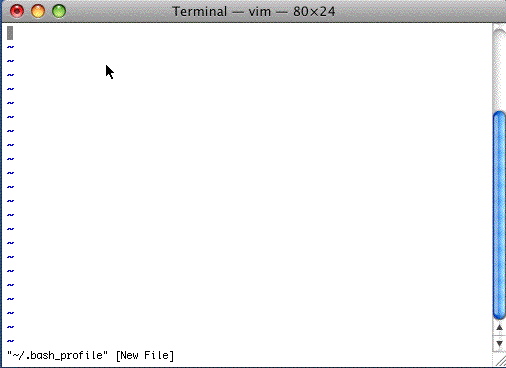
| 2. | Next, let's update the profile for Terminal to that it makes life easier in Postgres from this point on. Type
it will open with an empty window as below.
Just like when using VI for the other two files, type: to put you in insert mode |
| 3. | 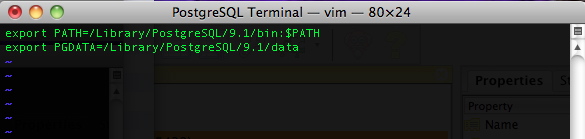 Type the two lines into the file exactly as shown. When done, type, in this order: hit the '' key (the insert mode will dissappear) (the window will show the 'Entering Ex mode' message) and the window will clear and you will be back at Terminal. The next time you start Terminal under the Postgres user account, you will have access to the Postgres commands and data directory in a more convenient fashion. |
OS X Shared Memory Settings
|
This step is no longer required if you are using Postgres 9.3 or later. All current installers use Postgres 9.6 or later. |
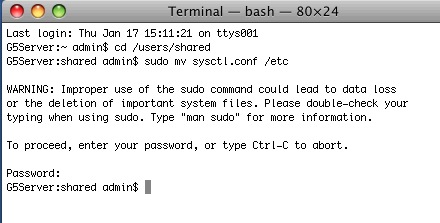
If you used the Theatre Manager Postgres installer, it will detect if you have more than 2 GB of RAM in your machine and automatically insert these into the /etc/sysctl.conf file for you. After installing Postgres the first time, simply reboot the server - these settings will have been done for you and you need not continue with the steps below.
BEFORE STARTING: Ensure you are in Terminal at your own user, not postgres. This is a fairly technical topic and the reference: http://www.postgresql.org/docs/9.0/interactive/kernel-resources.html
| 1. |
Open Terminal again and type: su - [Your UserName] Type vi /etc/sysctl.confType I to insert data Add the lines: kern.sysv.shmmax=1610612736kern.sysv.shmmin=1 kern.sysv.shmmni=256 kern.sysv.shmseg=64 kern.sysv.shmall=393216 kern.sysv.maxproc=2048 kern.maxprocperuid=512 These settings reflect the maximum size of a shared buffer. These settings assume you are running at least 2GB of RAM. If you have less RAM, these settings may need to be altered. shmmax is the key setting; it is in bytes. If the machine has more memory to use, then this could be increased as well. shmall is the shmmax setting divided by 4. Hit the Esc key Hit Shift Q Type wq Hit Enter Restart OS X after doing this. This is required to apply the changes.
Restart OS X after doing this. This is required to apply the changes. |
 There is a sample of this file in /users/Shared/ from the install. If your machine has 2GB of RAM or more, you could move it to the right folder instead by:
Web Support
Wireless Scanner Setup
Theatre Manager supports two types of devices, the Symbol SPT 1864 based on the PALM operating system (version 6 - legacy only), or the newer Symbol PocketPC wireless scanners (MC50 pictured here) based on the Windows Mobile operating system (version 6 & 7).
Click on the picture of the device that you need to set up.
|
The software must be purchased & licenced from AMS in order to use it your venue |
|
|

Wireless Scanner Operation - Palm Device
Use these instructions if you are using a Palm OS based scanning device such as a Symbol SBT1846.
|
YMake sure that you fully charge the devices before a performance so that it has a full battery level. Nothing worse than the battery running out in the middle of admitting patrons. We have tested the device while it is in the charger cradle and it will still scan - if you need to do that. |
There are two general functions that can occur:
Check the Patron into the venue - which is used to make sure the ticket has not yet been used for the event
Check the patron out of the venue - which is used if a patron is already in the venue and you need to let them exit and reuse the ticket for some purpose.
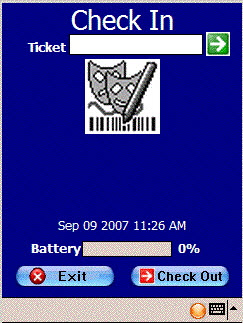
Checking in a Patron
 |
Assuming that the device has been configured (step 1 & 2) and that you have started the Scan Ticket application, checking in becomes a simple task. You need to check if you are scanning people in first. If so your screen will look like the screen to the right. The key is that the code at the bottom right says 'IN' (instead of OU). If it does not say 'IN', click the leftmost button under the screen that looks like the picture below. This button toggles the scanner from 'IN' (check in) to 'OU' (checkout) and vice versa. |
|
|
Scanning occurs by pressing any of the yellow buttons on the scanner. If the scan reads properly, you will see the ticket number in the area reserved for it and the scan will be sent automatically. There are a few responses that can happen. If the ticket is fine and the person can go in, you will see the work 'Go' and hear a beep. There may be a message under the 'ticket #' that says 'OK to Enter'. After a successful scan, do the next ticket. |
|
|
If there is any problem with the ticket, you will see the 'stop sign' and will not hear a beep. Under the 'Ticket Number', you will see a message that might be one of:
At that point you will need to decide what to do with the ticket or how to resolve the problem |


Checking out a Patron
 |
Checking out a patron is very similar to checking in a patron. Use the left most black button on the scanner to toggle between check in ('IN') mode and check out ('OU') mode. Your scanner should look like this. |
|
When you scan the ticket and the patron is about to leave, you should hear a beep and see a big 'Exit' on the screen. If there is an issue checking the patron out, you will not hear a beep. You may see an error under the 'Ticket #' that explains the issue. Errors could be one of:
Based on the response, you may need to decide to what to do with the ticket and/or scanner. |
Wireless Scanner Setup - Windows Mobile - Communication Parameters
|
|
If the previous step was set up right and the scanner is mated to the network, you can click the start menu, programs and the click on the AMS Tickets application It may take a couple of seconds or so to start as the scan program is synchronizing time with a time server and making sure the clock on the program is set properly. When it does start, you will see the screen at the side. Now we can set up scanning for an event. This must be done in advance of each performance that you are scanning tickets for. All that needs to be done is set up some parameters. Click the 'Setup' button on the screen. |
| |
You will be asked for a system password to change the settings for the performance. Type '123' (this can be changed) and once the password is right, the next window will automatically appear. |
|
version 7 sample setup |
When you open the preferences window using either of the two methods above, you have some fields that must be filled in. These are below (note you may want to press the orange button on the keyboard twice to turn it into num-lock on mode):
|
 |
There is one other preference that can be set before we begin scanning. This indicates whether we are scanning the person into the venue, or scanning them as they leave to indicate that the ticket was not used You can access this option directly from the main screen where the scan & setup buttons are. Click the 'Scan' button and you will see a screen like the one on the left. At the bottom is a 'checkout' button with a red arrow. This means the mode is currently 'check in' and you click this button to change the mode to 'checkout'. It will also change the arrow at the top from green (checkin mode) to red (checkout mode) If there is a green arrow with 'check in' at the bottom, then the current mode is 'checkout' mode. Click the 'Checkin' button to change the mode to checkin. |
 |
If you are scanning patrons into the venue, the top of the screen looks like the picture to the right. Notice that the text says 'Check In' and the arrow is green. |
 |
If you are checking patrons out of the venue, the text at the top of the screen says 'Check Out' and the arrow is red. |
Wireless Scanner Setup - Windows Mobile Setup
Updating Customized Web Pages
|
Only the files/folders inside the WebPagesEN folder have custom changes in them. Anything not in this directory uses the standard web pages which are deployed in special directories with each new TM server version so that we can keep things up to date. Refer to instructions on customizing web pages |
|
Venues using AMS cloud and GIT to update your web pages will do something similar, except the location of the web pages that have been customized are in your local git folder. |
Updating Customized Web Sites
When a new version of TMServer is released, there may be some changes to the standard web pages. If so and you want the new feature, then you should make sure you:
- back up your existing web page folder before changing anything. Make sure you have a copy of everything stored safely and/or zipped up to prevent accidental changing.
- Download the latest web pages from ArtsMan
- Compare the standard pages to the customized pages and see if you want to include any new features in the standard pages in your customized ones using the steps below:
- Open the new htdocs folder that you just downloaded
- Find your existing WebPagesEN folder on your primary TM Server machine
- Compare only files that exist in the WebPageEN on your primary TMServer with the standard templates you downloaded and then:
- Make any page updates necessary to implement new features into previously changed pages -or-
- Compare all pages in the WebPagesEN folder with those in default WebPageEN using one of the free automated comparison tools to identify differences. Copy relevant changes from the files in the default WebPagesEN files to those in custom WebPagesEN folder
Backing up your Web Pages
- Log into the machine that is the primary TM server
- Open your browser. You should be using the latest version of that browser available - eg if you are using Firefox, chrome or opera, please check for updates before continuing and install those updates.
- Type https://127.0.0.1:3012 into the URL area and ensure that the TM server interface responds
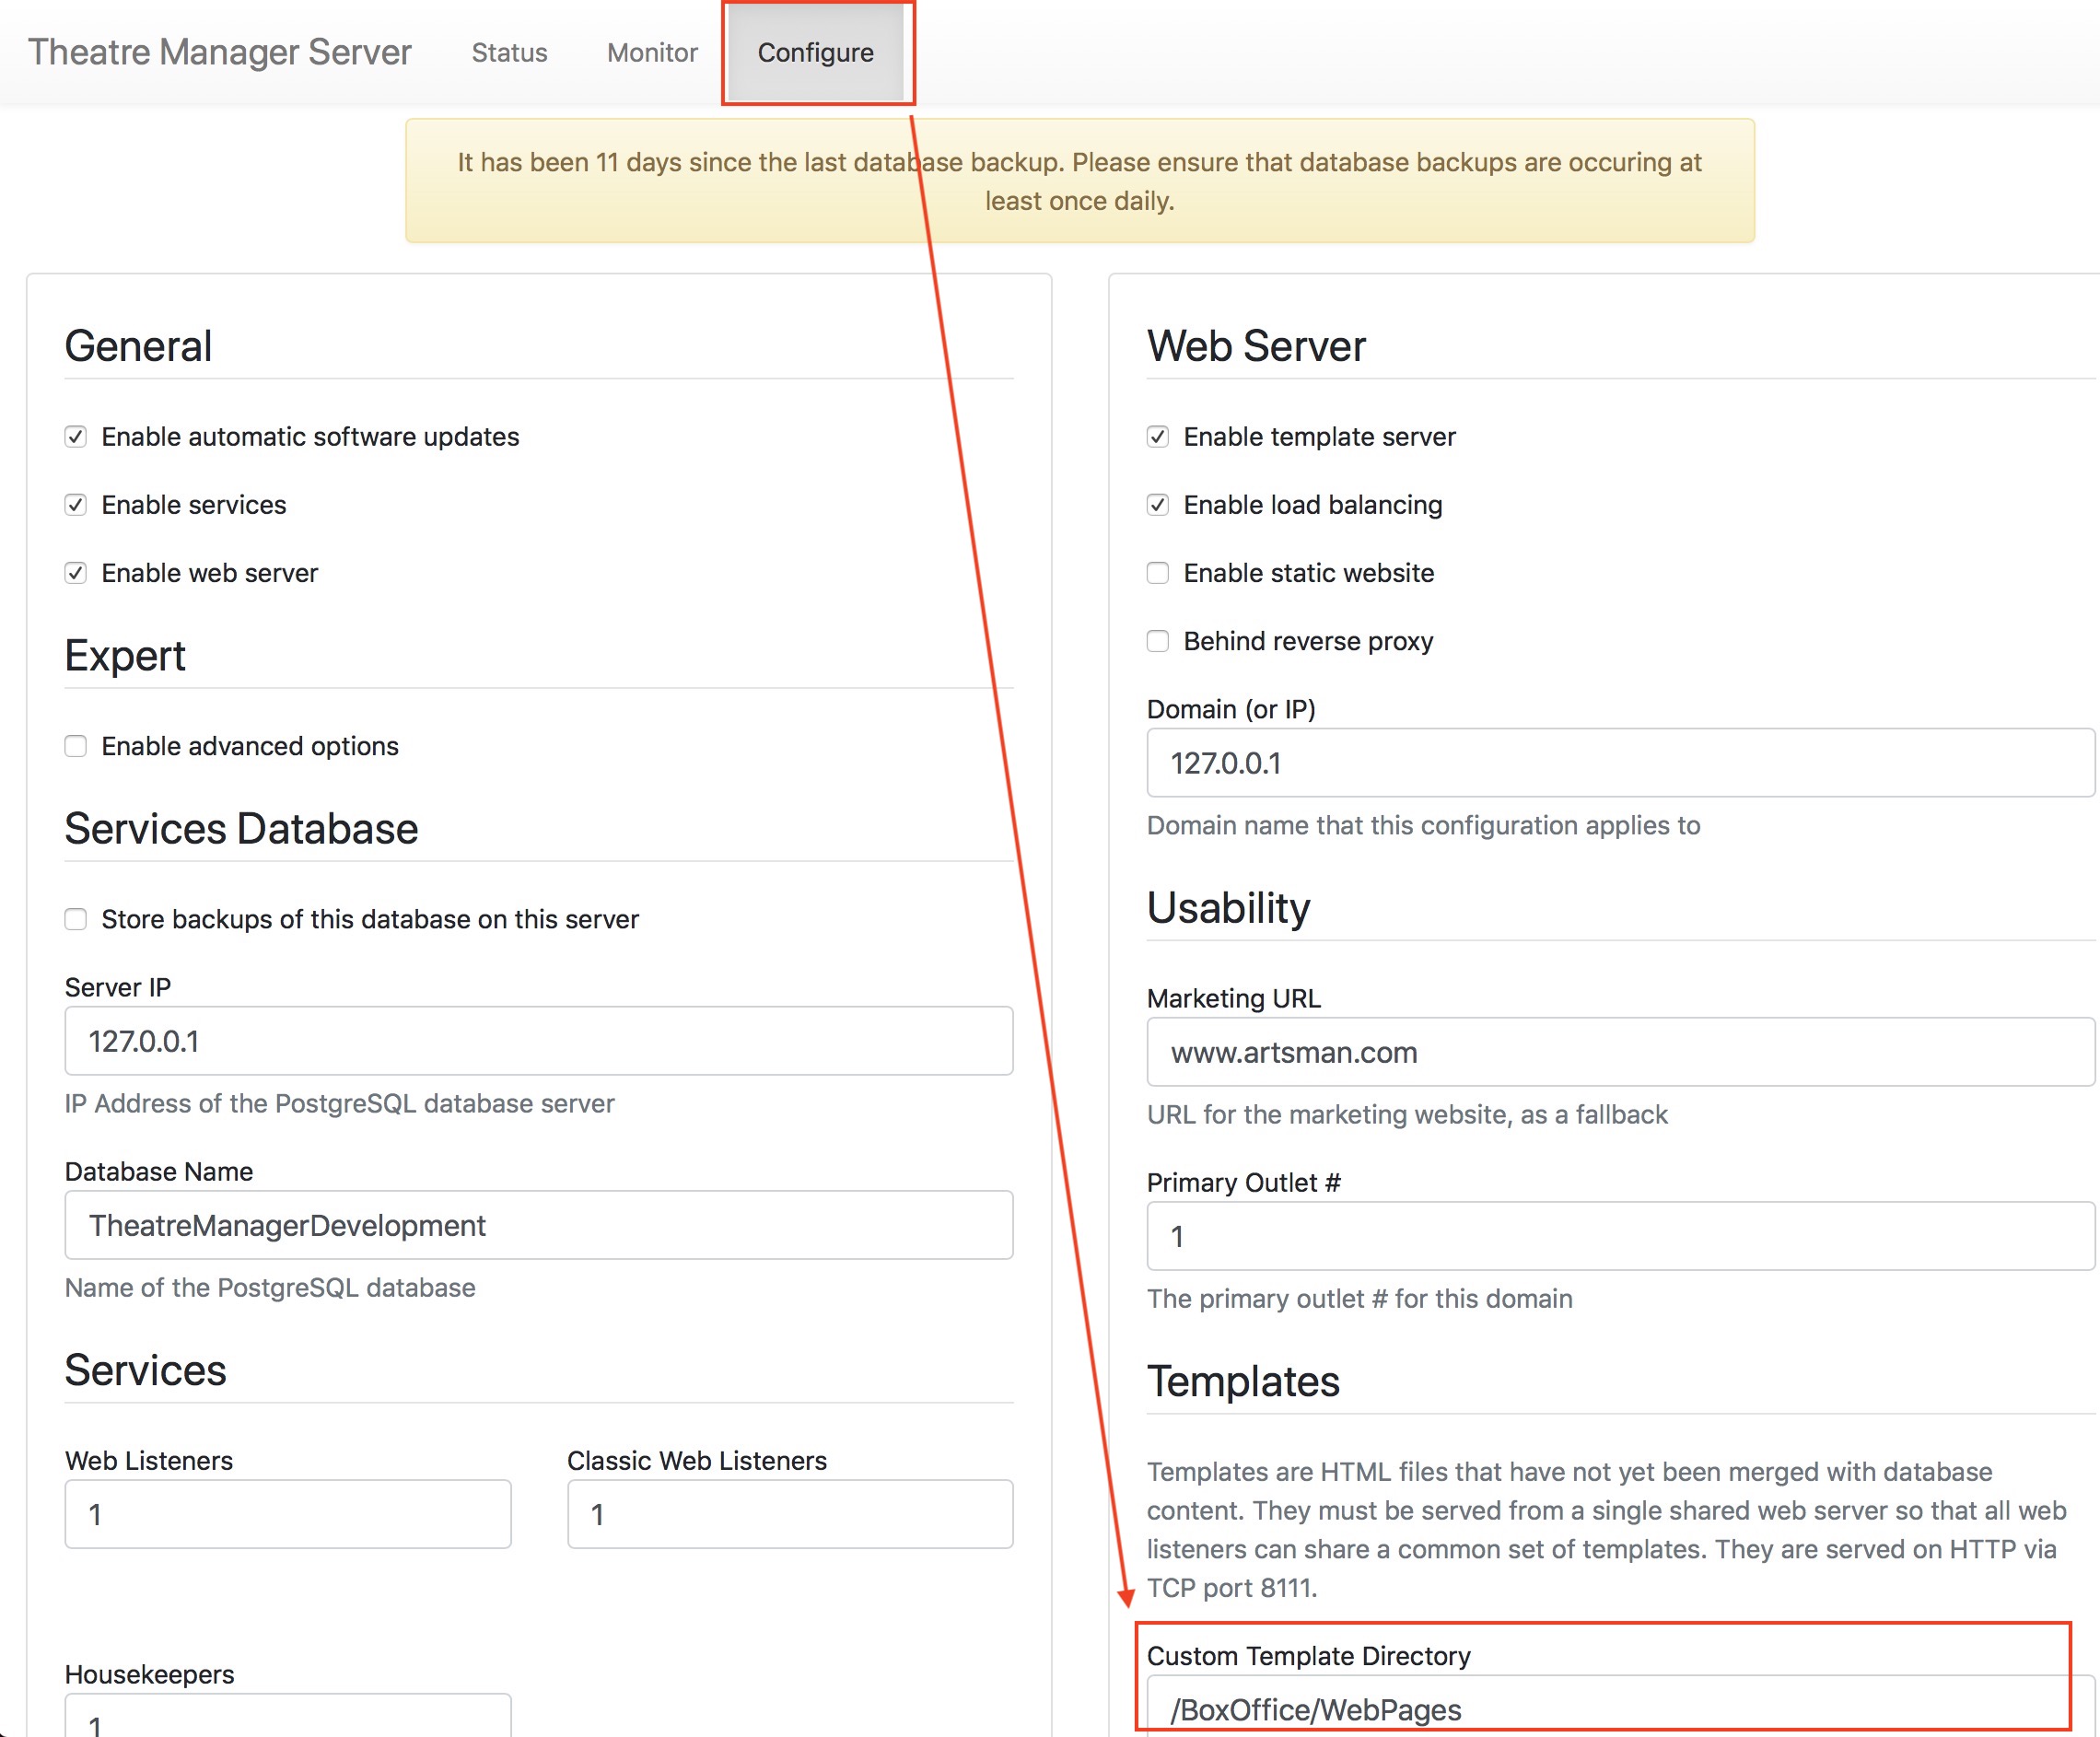
- Click on the Configure tab as indicated below
- Scroll down looking for the Templates folder. If you:
- See a folder pathname, then you have the right machine and now know where your custom templates are stored. It is typically /BoxOffice/WebPages on Mac or C:\BoxOffice\WebPages on Windows
- do not see the highlighted information, you are probably looking at a Secondary TM Server and need to go find the machine that has the Primary TM Server
Making Changes to Your Web Pages
Making Custom Changes to Web Pages
This means:
- You find the page you want to change within the WebPagesEN folder you downloaded containing the standard pages. There are:
- comments in each web page that tells you what the name of the main web page is and/or
- The name of the include file containing some of the more detail web code.
- COPY that page to the same folder location inside the live WebPagesEN folder (location found using this web page) so that only pages that are changed are inside the live web pages. We suspect you might have only a few changed pages
- Adding any new images and style sheet changes to the 'tmGifs' folder
Reverting to standard pages becomes as simple as renaming the WebPagesEN folder to something else temporarily.
Files that are 'green'
|
Recent versions of windows can make your web files appear 'Green'. This is especially true if you took your web pages to another machine, compared them and returned them to the original machine as a zipped file. |
 If you notice your file names are green, Windows will go to great lengths to protect itself from reading them and you may see messages on the web indicating that the files cannot be found or read -- yet you see them in front of you.
The solution, fortunately, is simple.
- Select all the files and folders that have green file names
- Right click and select properties from the context menu
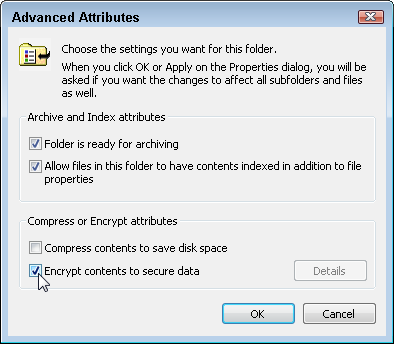
- Go to the Advanced Properties
- Uncheck the box that says 'Encrypt Contents To Secure Data' as per the picture to the right
- Save all the changes for the files and folders and files within the folders
- that should change the colour of the file names from green to black - and the file system should now see them.
Hot Standby Server
|
Replication is a feature of postgres and is automatically set up for cloud venues. Self service venues may set this up if they wish - the support team is unable to help you. |
One of the features of Postgres is the ability to create a 'hot standby' database server as a way to introduce redundancy to the system. The notion is that if a catastrophic physical failure occurred to the database server (such as the drives died, the machine melted, it got doused in water or burnt in a fire) and was found to be non-recoverable, then it would be best to get to a backup as soon as possible.
The standard backup approach allows you to go back to a snapshot. If you do a number each day, that may mean going back a few hours and reconstructing what happened from the backup to the failure.
Replication means you have one (or more) standby servers that is shadowing the contents of the main server - and may be as close as seconds old. In the case of failure, you would turn off the replication feature and start using the standby database until your primary server gets fixed.
|
Do not use replication as the only means of backup - always set up snapshot and offsite copies of your database. |
|
We always recommend using the latest version of PostgreSQL for replication. These instructions were created for PostgreSQL version 10 |
|
If you do a minor level upgrade of PostgreSQL on the main database server (e.g. from PostgreSQL v9.6.x to v9.6.y), you must also upgrade the version of Postgres on the hot standby server at the same time. There is no need to migrate the database again.
However, if you do a major level revision, you will need to do ALL the steps to re-establish the hot standby. This will change the time it requires to upgrade (but having a hot backup is worth it). |
|
If you update your version of Theatre Manager, any changes to the data in the main database are also updated on the hot standby. You never have to update the backup server as all changes come from the main server |
The general steps for making a hot standby are:
- Set up the database on the main server starting at Step 1 and going through all the steps . If you are using Theatre Manager, this was already done.
- Set up Postgres on a standby machine using Step 1 and disabling any energy saving features.
- Adjust the configuration of the main database server
- Alter the configuration of the hot standby database server
- Migrate the initial database to the standby
- Start replication
- Monitor for issues
Many thanks to this insightful article by Bartek Ciszkowski for helping make the process on Linux which we adapted to OS X. You can also read more detail on the Postgres site regarding high availability servers for any of the technical details.
Replication can be done on windows per this tutorial and it implies that there are few differences, except how to get the WAL logs replicated from one machine to the other - using a file share.
Main Postgres Server Changes
|
Replication is a feature of postgres and is automatically set up for cloud venues. Self service venues may set this up if they wish - the support team is unable to help you. |
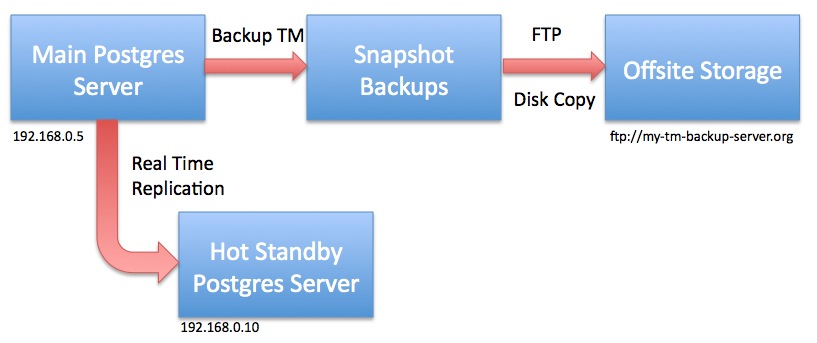
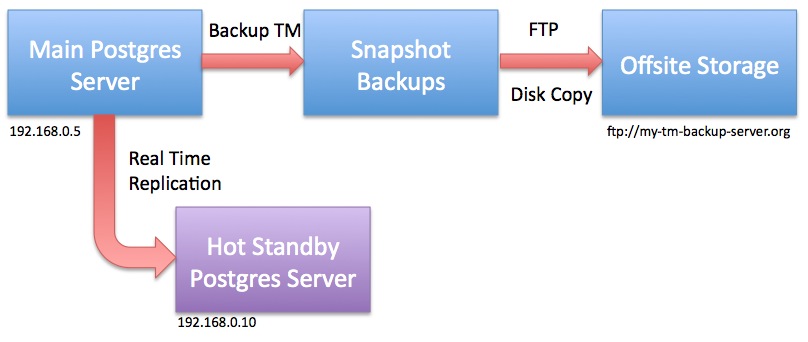
For the purposes of the example, let's assume per the diagram that
- the main database server is at 192.168.0.5 and
- the hot standby server is at 192.168.0.10
|
Do not restart any of the Postgres servers until told to do so. |
Changes to postgresql.conf
You can make these changes using PGAdmin ('Tools->Server Configuration') or by using Terminal and VI to navigate to the Data folder and edit the file. This assumes you know how to make these changes. Note that there are ' (quotes) around the RSYNC parameters below. In PGAdmin, you will not need to enter them - in VI, you will need to enter them.
These settings tell Postgres to send enough information from the master to the slave. You can read about these parameters in the official documentation and adjust them as needed.
|
wal_level = replica max_wal_senders = 10 wal_keep_segments = 32 archive_mode = on archive_command = 'rsync -aq %p postgres@192.168.0.10:/Library/PostgreSQL/10/archive/%f' archive_timeout = 60 |
Changes to pg_hba.conf
Edit the pg_hba.conf file and scroll down to the bottom. There should already be 3 lines that have replication in them which will need to be uncommented and permissions set to 'trust'. Add a line that tells the master server that the 'replication' server is at 192.168.0.10 as per the last line. Replace with the IP address of your hot standby server.

Ensuring rsync permissions work
You must to establish secure credentials between the main Postgres server and the standby server to enable rsync to transfer the files using the command above. It requires some Terminal commands and knowing what you are doing. It may be easier to have two Terminal sessions working.
| As Admin User |
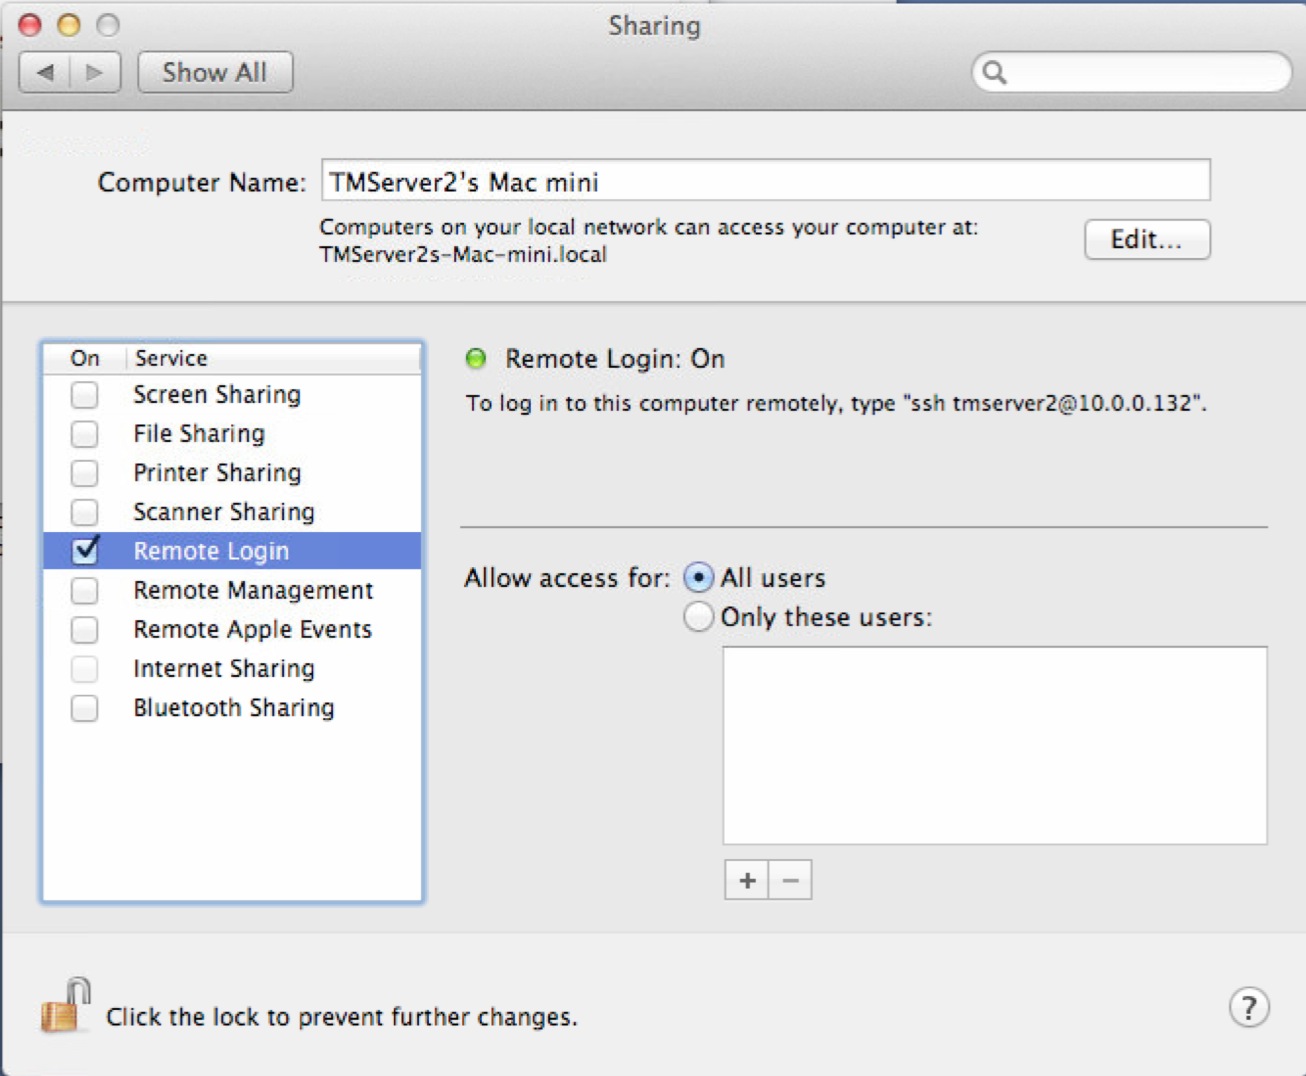
ON THE BACKUP SERVER, Open System Preferences and go to the 'Sharing'. Make sure 'Remote Login' is enabled. It can be set to all users -or- if you want to limit users, make sure the postgres user is in the list.
Make the '.ssh' folder and 'archive' folder for the postgres user in the postgres user's home directory /Library/PostgreSQL/10 and provide access to it. DO THE SAME four commands on the both the MAIN and on the HOT STANDBY server. |
|
sudo mkdir /Library/PostgreSQL/10/.ssh sudo chown postgres:daemon /Library/PostgreSQL/10/.ssh sudo chmod 700 /Library/PostgreSQL/10/.ssh |
(only postgres should have rwx access to the .ssh directory) |
|
sudo mkdir /Library/PostgreSQL/10/archive sudo chown postgres:daemon /Library/PostgreSQL/10/archive |
|
|
|
| As postgres User | ON THE MAIN SERVER,
use ssh-keygen to create a key/certificate file for SSH access and move it to the hot standby. Again, we are assuming that the hot standby will be 192.168.0.10 - replace with your hot standby IP address as required.
|
|
su - postgres cd /Library/PostgreSQL/10/.ssh/ ssh-keygen -b 4096 -t rsa -f id_rsa -P '' |
|
| (note: the end of the command is two single quotes in a row) | |
| you should get a response like:
Generating public/private rsa key pair. |
|
| touch authorized_keys cat id_rsa.pub >> authorized_keys chmod 400 id_rsa scp authorized_keys postgres@192.168.0.10:/Library/PostgreSQL/10/.ssh |
|
|
You should get a response as below
The authenticity of host '192.168.0.10 (192.168.0.10)' can't be established. Then type the following to SSH to the remote machine. You should no longer be asked for a password. If you cannot do this, then replication will not work. |
|
| ssh postgres@192.168.0.10 |
|
| It should respond with a prompt and you can type | |
| exit |
|
If you are not able to connect to the remote machine without typing a password, you may need to do one of:
|
Hot Standby Server Configuration
|
Replication is a feature of postgres and is automatically set up for cloud venues. Self service venues may set this up if they wish - the support team is unable to help you. |
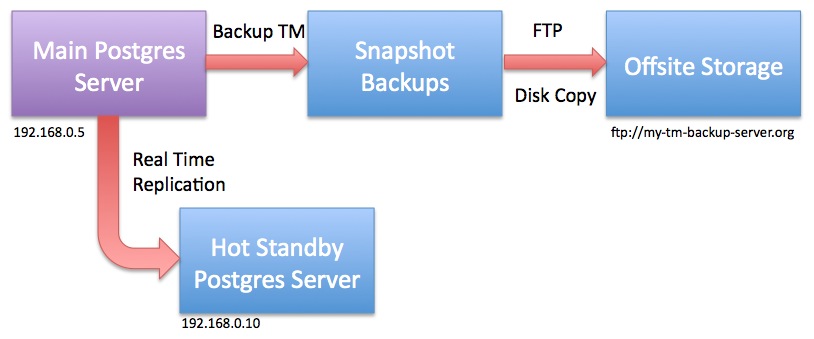
For the purposes of the example, let's assume that:
- the main database server is at 192.168.0.5 and
- the hot standby server is at 192.168.0.10 as per the diagram
- the version of postgres you are using is 10 (otherwise change 10 to xx in all commands, depending on the version of postgres you are using)
|
Stop the Hot Standby server and do not restart it until told to do so.
Start Terminal, then sign on as the Postgres user via the following commands to stop the database:
|
Create recovery.conf
Create a file called 'recovery.conf' (which should not exist) in /Library/PostgreSQL/10 for safe keeping. We will be copying this file later on as Postgres expects to find it the 'data' folder in /Library/PostgreSQL/10/data. However, we cannot put it there yet as we will be deleting everything in that directory later. Replace 192.168.0.5 with the address of your primary database server.
Using Terminal as administrator of the machine, create and edit the recovery.conf since the Postgres user cannot create this file. Alternatively, copy the text and paste it into a BBedit file on the machine and use a copy command to put it into place.
| As admin User |
then enter the contents of the file by typing the yellow text below. (you can usually copy/paste into vi if in 'insert' mode)
|
Make sure that the archive directory exists
If you did not already do this command as part of the set up of the MASTER database, you will need to do so, so that the backup files can be received by the HOT STANDBY server.
| As admin User |
Make the '.ssh' folder and 'archive' folder for the postgres user in the postgres user's home directory /Library/PostgreSQL/10 and provide access to it. DO THE SAME two commands on the both the MAIN and on the HOT STANDBY server if you have not previously done so. |
|
sudo mkdir /Library/PostgreSQL/10/archive sudo chown postgres:daemon /Library/PostgreSQL/10/archive |
|
If you are re-establishing a hot-backup server, make sure to clear out all files from the 'archive' folder on the hot standby. In Terminal, type:
You do not need to stop the main server while setting up the hot standby as we will make a base backup to 'restore to a point in time'. |
Migrating the initial database
|
Replication is a feature of postgres and is automatically set up for cloud venues. Self service venues may set this up if they wish - the support team is unable to help you. |
|
Hot Standby ServerStop the Hot Standby server and do not restart it until told to do so (it should be stopped already). We don't want any data flowing from the main database to the Hot Standby while we are preparing the servers. In Terminal, as postgres user: |
| pg_ctl stop -m fast | |
|
Main Database ServerYou may need to use pg_ctl to stop and then start the main server to get the max_wal_server change to take effect before starting the pg_basebackup. Make sure nobody is using the database, then type in Terminal, as postgres user: |
|
pg_ctl stop -m fast pg_ctl start |
Now that the hot standby is configured, it’s necessary to get the contents of the main database onto it, so that replication can sync up. This is done using a handy command named pg_basebackup, which essentially copies the entire data directory of your main database into a location of your choice. It is also what we know as an online backup, as the main database can stay in use while the command copies all the data.
On the Main Database Server
Start the pg_basebackup command and put the backup file in some place that Postgres can access. The standard backup directory /Users/Shared/Backups should be fine. The base backup should take about as long as your normal backups take and progress is shown in the Terminal window.
Make sure that Postgres has read/write access on both the local machine and the remote machine to the directory you are using.
The scp command is used to copy the base backup to the same location on the hot standby server (replace 192.168.0.10 with your backup server IP). You could use a USB key or any other mechanism to transfer the file that you want. This may also take a long time and progress is shown in the Terminal window.
|
pg_basebackup -U postgres -v -D - -P -Ft | bzip2 > /Users/Shared/Backups/pg_basebackup.tar.bz2
scp /Users/Shared/Backups/pg_basebackup.tar.bz2 postgres@192.168.0.10:/Users/Shared/Backups |
NOTE: The bzip2 command can be quite CPU intensive and only uses a single core. If a multi-core processor is available you may wish to consider using the pigz compression program instead to get a significant speed-up to the backup. Be aware that using pigz requires separate installation and it also uses a different extension than the bzip2 method: .tar.gz vs. .tar.bz2.
|
pg_basebackup -U postgres -v -D - -P -Ft | pigz > /Users/Shared/Backups/pg_basebackup.tar.gz
scp /Users/Shared/Backups/pg_basebackup.tar.gz postgres@192.168.0.10:/Users/Shared/Backups |
On the Hot Standby Server
The hot standby server should already be stopped. We need to use Terminal (as the postgres user) and remove the entire data directory - if it exists.
|
su - postgres Enter the Postgres password pg_ctl stop -m fast (just to make sure Postgres is stopped on the backup server) cd /Library/PostgreSQL/9.6/data rm -rf * ls (There should be no files) |
| tar -xjvf /Users/Shared/Backups/pg_basebackup.tar.bz2 |
| chown -R postgres:daemon /Library/PostgreSQL/9.6/data |
| cp /Library/PostgreSQL/9.6/recovery.conf /Library/PostgreSQL/9.6/data/recovery.conf |
Changes to postgresql.conf on the Hot Standby Server
The expansion of the base backup database from the main server will also restore its postgresql.conf and pg_hba.conf file.
We now need to adjust them to ensure that they are set to be a hot standby database. You can make these changes using PGAdmin ('Tools->Server Configuration') or by using Terminal and VI to navigate to the Data folder and edit the postgresql.conf file.
The settings below tell Postgres that it is the slave machine. You can read about these parameters in the official documentation and adjust them as needed.
|
hot_standby = on wal_level = hot_standby max_wal_senders = 5 wal_keep_segments = 32 |
Look for the 'archive' settings that were restored from the base backup and comment them out by putting a '#' in front of the parameter.
|
#archive_mode = on #archive_command = 'rsync -aq %p postgres@192.168.0.10:/Library/PostgreSQL/9.6/archive/%f' #archive_timeout = 60 |
Changes to pg_hba.conf on the Hot Standby Server
Edit the pg_hba.conf file and scroll down to the bottom. There should already be 3 lines that have replication in them from the main database. If they are not uncommented, you will need to do so and set permissions to 'trust' (and go back and verify the contents of the same file in the main database).

Finally, start the database on the hot standby server
| pg_ctl start |
Cleanup after Replication is Confirmed to be Working
Please confirm replication is working before doing the next step to clean up the temporary base backup files.
The base backup file was created on both the main server and migrated to the hot standby machines. If you have a large database, this file could be sizeable itself and it is best to delete it. On both machines, you can navigate to the /Users/Shared/Backups directory and remove pg_baseBackup.tar.bz2.
Alternatively: in Terminal you can:
| rm -i /Users/Shared/Backups/pg_basebackup.tar.bz2 (you will be asked to confirm the deletion) |
Verifying that the database is replicating
|
Replication is a feature of postgres and is automatically set up for cloud venues. Self service venues may set this up if they wish - the support team is unable to help you. |
- Observe the Postgres log roll forward the changes
- Looking at the replication logs to see that they are created and then removed
- Make some changes to the main database and then using pgAdmin to verify that the changes are in the backup in real time
Using pgAdmin to see Replication Status
|
Replication is a feature of postgres and is automatically set up for cloud venues. Self service venues may set this up if they wish - the support team is unable to help you. |
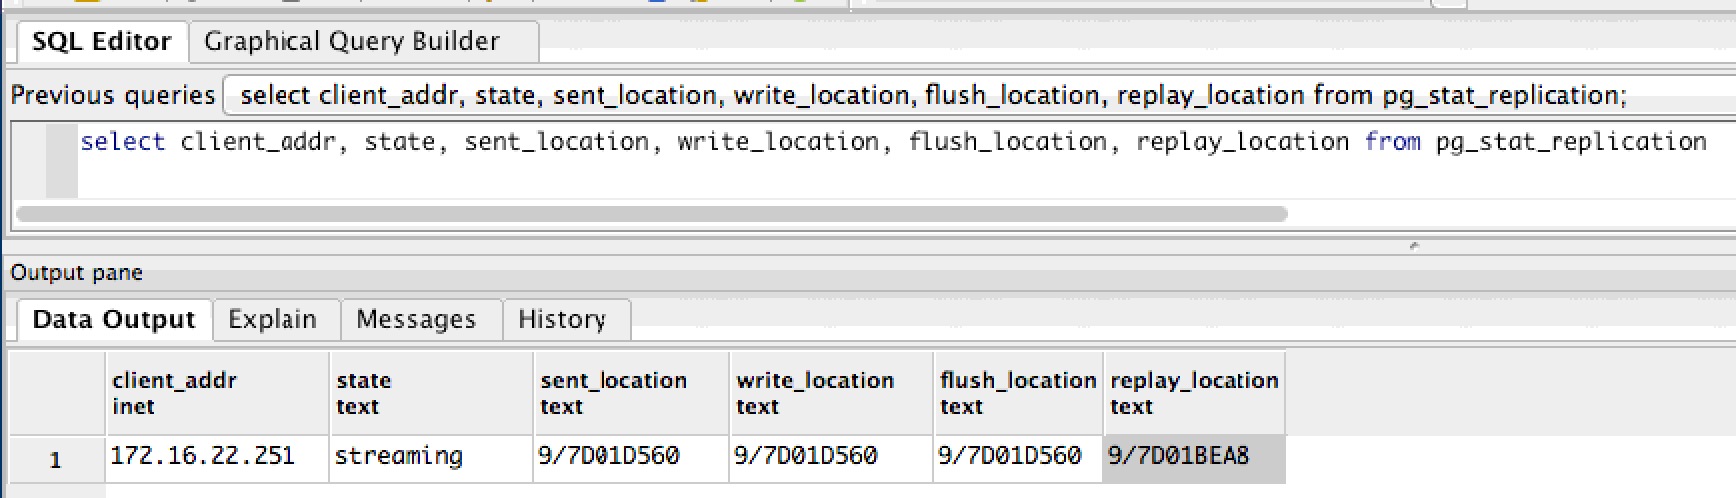
| select * from pg_stat_replication |
This should give a row back that says the server is 'streaming'. You can repeat the query and the numbers will change, indicating that replication is proceeding.
If you see a different result like:
- The status is 'catch-up', then the backup machine is not up to date with the main server, which may indicate issues.
- There is no row or data in response to this command, it means replication is not running, and your main disk will be slowly filling up -- you will run out of space. Get the properties of the disk on the main server to see how fast it it filling up and send us a support ticket. it often just means restarting one or both servers, or verifying ip addresses on the two machines.
|
If the query gives no rows back (or some other status), then things may not be set up right, or replication has not yet begun because archive log files are being recovered on the Hot Standby Server. |
Using pgAdmin to Watch Transactions
|
Replication is a feature of postgres and is automatically set up for cloud venues. Self service venues may set this up if they wish - the support team is unable to help you. |
Alternatives
Data replicates from the main server to the Hot Standby immediately. If there is a change to the main database, it should appear in the hot standby immediately after that.
|
One way to verify changes is to have the box office sell a ticket to a patron using Theatre Manager. Before the sale, there should be no transaction history for that order; after the sale, there should be some ticket transactions.
Perform this test daily or weekly to make sure that the database is replicating. |
|
Occasionally, if you take the standby down for maintenance, it may get a bit behind. In that case, you may not see changes until the archive files have been fully recovered and you may need to look at the standby server's Postgres log files for progress. The archives are created periodically as per the frequency that you set in the archive_timeout parameter) |
Verifying Simultaneous Activity on Both Servers
Follow these steps to see that data is being migrated:
- Start pgAdmin on the main server, point to the main database and start an SQL session
- Start pgAdmin on the Hot Standby server, point to the standby database (it is a different IP address) and start an SQL session
- On both machines, enter the SQL below into pgAdmin to verify the last 10 transactions
select * from f_transaction order by t_seq desc limit 10 - Log in to Theatre Manager on any workstation (or have anybody sell a ticket)
- in pgAdmin on the MAIN database, rerun the SQL above. There should now be a new login transaction or transactions that match the number of tickets sold.
- In pgAdmin on the Hot Standby database, rerun the SQL above.
- There should be the same transactions visible on the hot standby right away.
- That means the servers have replicated the data.
- In Theatre Manager, release the tickets or log out.
- in pgAdmin on the MAIN database, rerun the SQL above. There should now be MORE transactions representing your activity.
- In pgAdmin on the Hot Standby database, rerun the SQL above.
- You should see the new transactions on the standby server, meaning the servers have again replicated the data.
Reviewing Postgres Log File for Replication Entries
|
Replication is a feature of postgres and is automatically set up for cloud venues. Self service venues may set this up if they wish - the support team is unable to help you. |
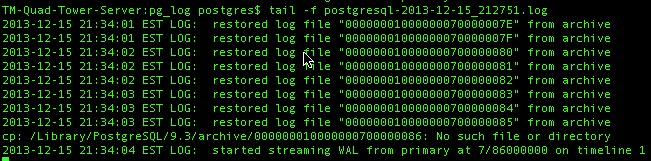
You should go to the log files once in a while and ensure that it is replicating and able to see/connect to the other database. After the tail command, you should see that the server entered standby mode and that is connecting to the main server.
Even after setting up the replication to the hot standby server, you should check this log periodically to make sure it continues to work.
|
su - postgres Enter the Postgres password cd /Library/PostgreSQL/9.6/data/pg_log ls -la (to see a list of logs) tail -f name-of-most-recent-log-file |
The example below shows the startup of the standby server after first being created (or being stopped for a period of time). The log files are consumed and, finally, replication starts. Once replication starts, no further 'restore' messages will appear in the logs -- you can then use the pgAdmin query method to view the status of replication on the main server.
Inspect the Archive Directory
|
Replication is a feature of postgres and is automatically set up for cloud venues. Self service venues may set this up if they wish - the support team is unable to help you. |
You can go to the replication folder and see that new files appear once a minute and old ones go away.
|
cd /Library/PostgreSQL/9.6/archive ls -la (to see a list of recovery files). |
For example:
- 000000010000000000000055 will have as the next file 000000010000000000000056 - about 60 seconds later or whatever time period you set in the archive_timeout command
- Eventually 000000010000000000000055 will disappear as it is processed by the hot standby
- Generally, on the server, there should be only a few of these files (5 to 10). if there are more, the server may be a little busy. If they do not decrease, replication is not working right or the server is overloaded.
- and the above will repeat.
Promoting a Standby to the Main server
|
Replication is a feature of postgres and is automatically set up for cloud venues. Self service venues may set this up if they wish - the support team is unable to help you. |
- Shut down, turn off, unplug and/or remove the main server from the network so that it is no longer active
- On the backup server, create the failover trigger file using the primary failover methodology (described in detail below):
sudo touch /tmp/pg_failover_trigger - The hot standby is now your main server.
- You may need to change the pg_hba.conf file as required to allow workstations to access the database.
It is probably okay because it was originally copied from the main server at time of making the standby. You will only need to change the pg_hba.conf file if you added more sub-nets to the main server.
- Do all the work necessary to get Theatre Manager clients to point to a new database server by doing one of:
- Use Theatre Manager to change the IP address of the database you log into -or-
- Change the IP address of the hot standby to be the same as the Master main server -or-
- Change the DNS to point to the new IP address, if that's what you use to connect to the server
- Log all clients, second generation and classic listeners into the new server IP address
- Log into the database using Theatre Manager.
- Quit and restart the Theatre Manager Server
- Quit and restart any web listeners
- Fix the reason that the main server died and plan to set up a new hot backup server
Primary Method to promoting the Backup Server to Main Server
If your recovery.conf file in the Postgres data directory was set up according to these instructions, it should have a trigger_file parameter and look like the except below.
|
# specify the name of a file whose presence should cause streaming replication to # end (i.e. failover). If you create this file, then Postgres will rename 'recovery.conf' # to 'recovery.done' and promote the hot standby to a primary server without a restart. trigger_file = '/tmp/pg_failover_trigger' |
| sudo touch /tmp/pg_failover_trigger |
- Notice the file
- Finish off the slave process and recover any log files transferred from the main server that still needs recovery
- Rename the 'recovery.conf' file to 'recovery.done'
- when that happens, it is now the primary server
Alternate Method using pg_ctl
use pg_ctl to promote the server
|
su - postgres enter the postgres password pg_ctl promote |
For more information refer to the postgres fail-over documentation
Update or Remove PostgreSQL
Updating Postgres
Download the latest Postgres installer from the ArtsMan web site. Once you have it, make sure you have done the following steps:
- Check the version of Postgres you are running. This is in the 'About Theatre Manager' menu. Look at the bottom left of the 'about Theatre Manager' screen. You will see your database name followed by a number such as (9.4.x) or (9.3.x) etc. Record this version for later.
- Log everybody out of Theatre Manager, including
- Any user at the login window and/or
- The second generation TM Server and/or
- Classic web listeners
- (optional) If you are worried that staff people might log in to Theatre Manager while the upgrade is happening, use PGAdmin (Tools->Server Configuration menu) to edit the pg_hba.conf file to restrict access and
- Comment out any access that is allowed from any another IP address - and only allow access from 127.0.0.1. You do this by double clicking on the row containing the IP address and unchecking it.
- Reload (or restart) the Postgres server configuration to make sure no other user would be able to log in and disrupt the upgrade.
- Make sure you have made a backup of the database, using the procedures in the daily backup job process. (only after everybody is logged out).
- Once you have confirmed the backup exists and have made another copy of that in a different place (just to be safe), then follow the specific instructions for updating the same version or from an older version as required. Refer back to the version of the database that you recorded in the first step above
- If the version is at least 9.4, follow the instructions to update the same version of Postgres.
- If you have a version of Postgres that is older than 9.4 (i.e. 9.3), then follow the steps for updating an older version.
- After the database has been restored, edit the pg_hba.conf and
- Uncomment any access that you removed previously
- Reload (or restart) the Postgres server configuration and make sure others can now log in.
- Restart any web services
Updating the Same Version of Postgres
|
Remember, do not attempt to try this unless you just made a backup of your database. Preferably, you should also have restored that backup on another machine for safety, logged into it using Theatre Manager to prove that you can restore a backup and that it has 100% integrity.
|
|
If you are using Hot Streaming Replication, so MUST stop the replication server FIRST and upgrade the version of postgres on it before doing the main server. If not, you may end up redoing the replication server. Always verify that replication is working properly after a postgres update.
|

- Make sure you are running postgres version 9.2 or later.
- Refer to downloading the latest Mac Installer for postgres
- Make sure you have just made a backup of the databases in the server
- use terminal and PG_CTL to 'stop' the database
a) start terminal
b) type su - postgres
c) provide the password
d) type pg_ctl stop -m immediate - Run the installer which will update and restart an existing PostgreSQL installation.
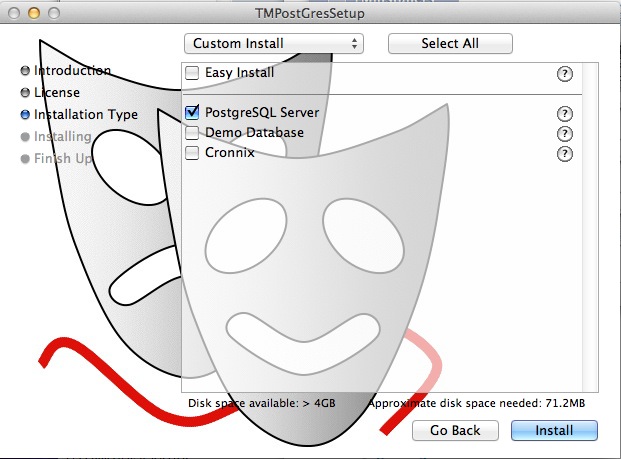
Make sure to read the next step before starting the install to decide if you can do an easy install or the custom install.
- If you have set up the hot standby server, make sure to
- stop the hot standby at the same time
- Only use the custom install to update the MAIN server (which does not install a revised demo database) as per below.
- Upgrade the Hot Standby to the same version of the database server using the same custom installer.
- Verify that replication is still working after the upgrade
- try log in to Theatre Manager afterwards
Update Older Version of Postgres
|
Remember, do not attempt to try this unless you just made a backup of your database. Preferably, you should also have restored that backup on another machine for safety, logged into it using Theatre Manager to prove that you can restore a backup and that it has 100% integrity.
|
The steps are:
- Sign all users out of Theatre Manager and stop all TM Web Services
- Make a manual backup of the database using the terminal command php /Users/Shared/backupTM.php (and restore the backup to a 'test' database to ensure it works).
- Save the PG_HBA.CONF and the POSTGRESQL.CONF settings unique to this server
- Stopping the Postgres server
- Removing the old postgres server by running the un-installer found in the /Library/PostgreSQL/x.x directory.
- This will only uninstall postgres and the services
- Once complete, you will need to move (or delete) the /Library/PostgreSQL/x.x directory which now should contain only the 'data' folder.
- The 'data' folder is retained only for temporary safekeeping until you have installed the next version of Postgres and restored your data satisfactorily.
- Installing the new postgres server using the Theatre Manager postgres installer for OSX
- Reconfiguring the parameters for postgres for PG_HBA.CONF and the POSTGRESQL.CONF
- Restoring the main database from the backup
- Create the new database with the owner 'TheatreManager', and using encoding "UTF8'. If the TheatreManager user is not in the database, contact support right away and do not continue.
- Restore the backup of the database
- setting up the backup job again
- If you previously set up the hot standby server, you will need to follow the complete installation steps for and set it up again for the new version of postgres.
Replication is a feature of postgres and is automatically set up for cloud venues. Self service venues may set this up if they wish - the support team is unable to help you.
Removing Postgres
- Stop the postgres database using the
pg_ctl stop -m immediate' command
- When the server is stopped, use the un-install program in the /Library/PostgreSQL/x.x directory to get rid of it properly
- throw out the entire folder called /Library/PostgreSQL
- restart the mac