Ticket Management
Selling a ticket consists of four parts. Each ticket sales is associated to a patron record. Once the Patron is located the rvent or events the patron wants to purchase for can be selected. Tickets are added to the order and finally a payment is made.
You can download the Quick Reference Guides (less than 20 pages), Cheatsheets (1-2 pages) and Screencasts (online video demonstrations of the functions with narration) by clicking on the icon.
| Topic |
Reference Guide (pdf) |
Cheatsheet (pdf) |
Flash ScreenCast |
MP4 ScreenCast |
| Ticket Faces - Calculation Commands |
|
|||
| Buy a Ticket |
|
|
|
|
| Add Tickets to an Existing Order |
|
|
| |
| Buy a Season Subscription (from the order window) |
|
|
|
|
| Exchange or Refund Tickets |
|
|
|
|
| Refund a Ticket to a Donation |
|
| ||
| Past Event Ticket Exchange |
|
|


Selling a Ticket
 |
This section describes the ticket sales/ management processes in detail. Click if you would like to see the general features of the order window.
|
To sell a ticket to a patron, you perform the following steps:
- Click the Patron Button
 from the main Theatre Manager toolbar / ribbon bar.
The Contact List window opens.
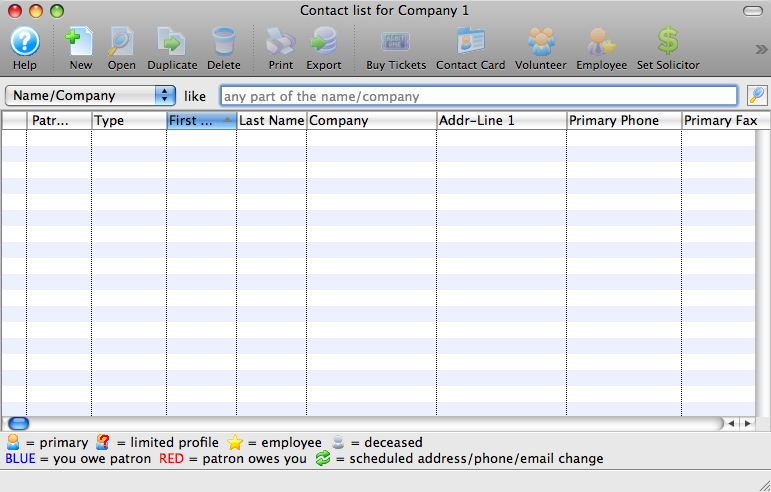
- Find the patron buying tickets in the contact list.
Single Click on the patron in the list to highlight. For more information on finding patrons click here.
- Click the Buy Tickets
 button
double click to open the patron window and click the Tickets
button
double click to open the patron window and click the Tickets  button at the bottom of the Patron window.
The Order Window opens.
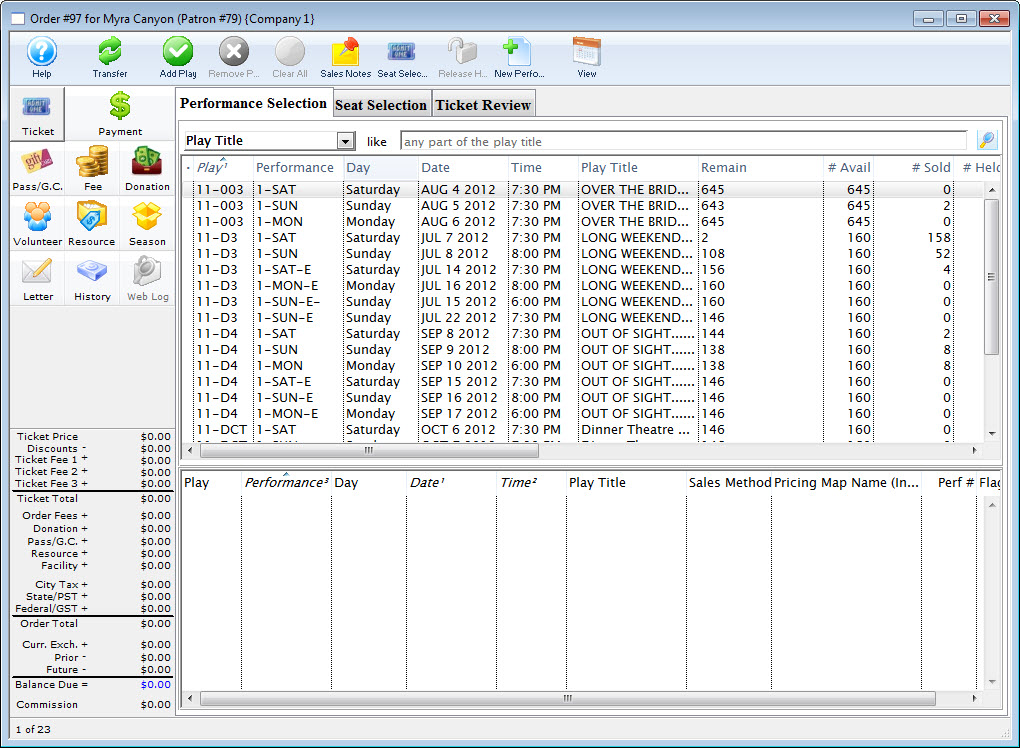
- Select the performance(s) the patron would like to buy tickets for.
Click here to learn how to search for performances.
- To select a single performance double click on it.
- For Mac users, to select several performances, hold down the <OPTION> key and single click on the desired performances.
- For Windows users, to select several performances, hold down the <CTRL> key and single click on the desired performances.
- To select several performances located together on the list, click on the first performance and while pressing down the <SHIFT> key, click on the last performance to be selected. All the performances between the first and last performance will be selected.
- Drag the selected performances to the bottom portion of the window, or on top of the Add button to include them to the selected performances.
- Click the Seat Selection
 tab.
tab.
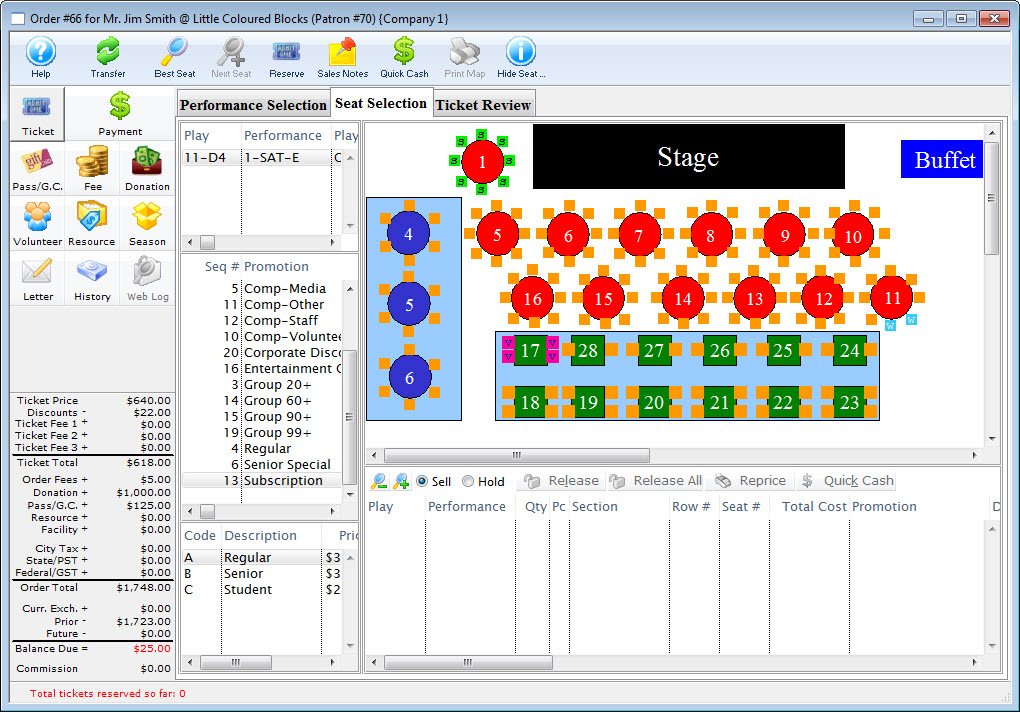
The Seat Selection window opens.
For more information on selecting tickets in a Graphic Maps click here or for Festival Seating click here.
- Select desired seats for each event.
- Click the Payment
 button.
To learn more about receiving payments click here.
| The following quick reference information is available for selling a Ticket |
Reference Guide (pdf) |
Cheatsheet (pdf) |
Flash ScreenCast |
MP4 ScreenCast |
Searching for Performances ( The Order Window )
|
To minimize mistakes, searching for performances to sell only shows future performances.
search by Performance Date, using a prior date if you really want to sell to a past performance. |
-
Select the field to search by from the look-up field on the left.
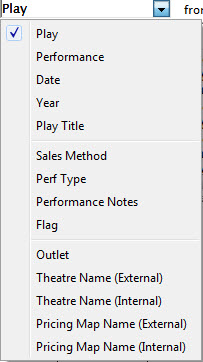
There are twelve options to search from.
Play / Event Code Performance Code Search by the Performance Code from the setup of Play/Event. eg. 1-SAT Date Search by the date of the performance. Useful for accessing past performances. Year Search by the Year the event took place. Play/Event Title Search by the Name of the Play/Event. Sales Method Search by the type of sales method set for the Play/Event. eg. Reserved, Festival, Course. Perf Type Search by Performance Type option set on each performance of an Play/Event. Click here for more information Performance Notes Search by the performance notes entered on the Play/Event. Flag Search by performance flag for plug in or web usage from the detail of a performance.
Outlet Search by the Outlet for the Performance. Theatre Name (External) Search by the External Theatre Name of the performance. Theatre Name (Internal) Search by the Theatre Name for the performance. Pricing Map Name (External) Search by the External Pricing Map Name of the performance. Pricing Map Name (Internal) Search by the Internal Pricing Map Name for the performance. - Enter the search criteria in the From and To fields.
In the example we have used a performance date criteria, this will allow a user with proper privileges to find past performances. For more information on user privileges click here.
- Click the Search
 button.
Theatre Manager searches for available performances for sale based on the supplied criteria. They appear in the upper display area of the Select Plays window. Click here to refer to the section Play and Dates for more information on play and series codes.
Example Searches
- Finding All Current Performances - you can be on most search options and if the search term is blank, just hit enter (or click the spyglass). Example, if searching by event code, make sure its is blank.
- Finding Play Titles - change the search to title and enter part of the event title
- Finding Past Performances to sell tickets to. Sometimes you need to sell tickets to an event in the past - either to correct a past mistake, or after doing a box office manually on the weekend and need to manually enter the tickets sold at door on a Monday following. To sell tickets to a past event, search by date and enter a date in the past that will find the performance of interest. As long as it is not closed, you will be able to sell a ticket.
- Select Play/Event Title from the Criteria List.
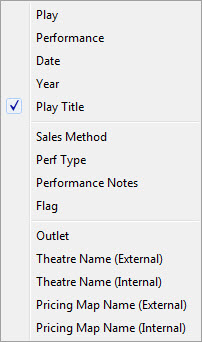
- Enter the play title if known or use a range to return a short list.

Click Search the
button.All matching plays will be returned in the main window.

For details on selecting events click here.
Selecting Performances
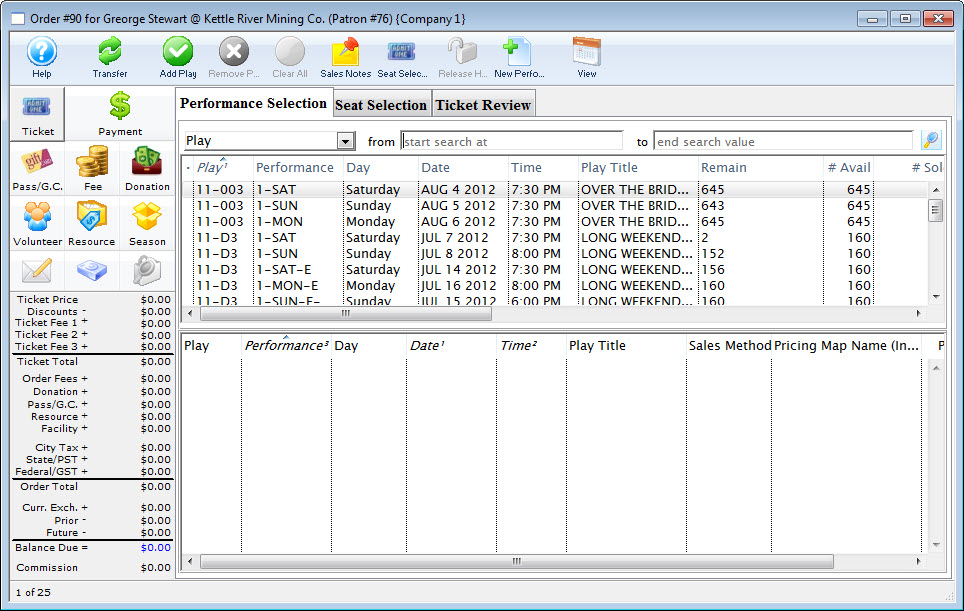
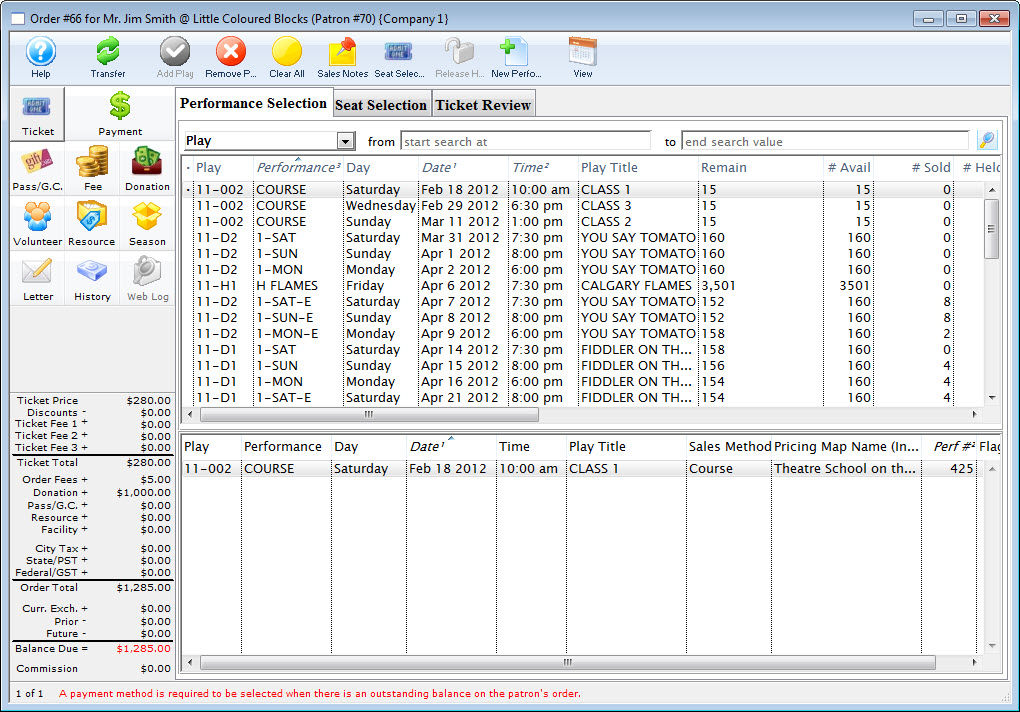
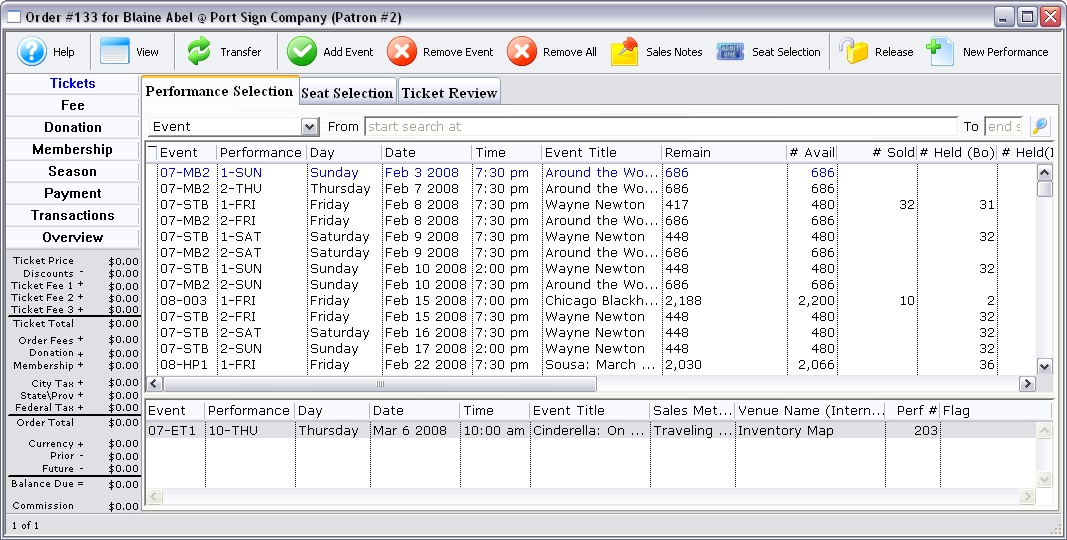
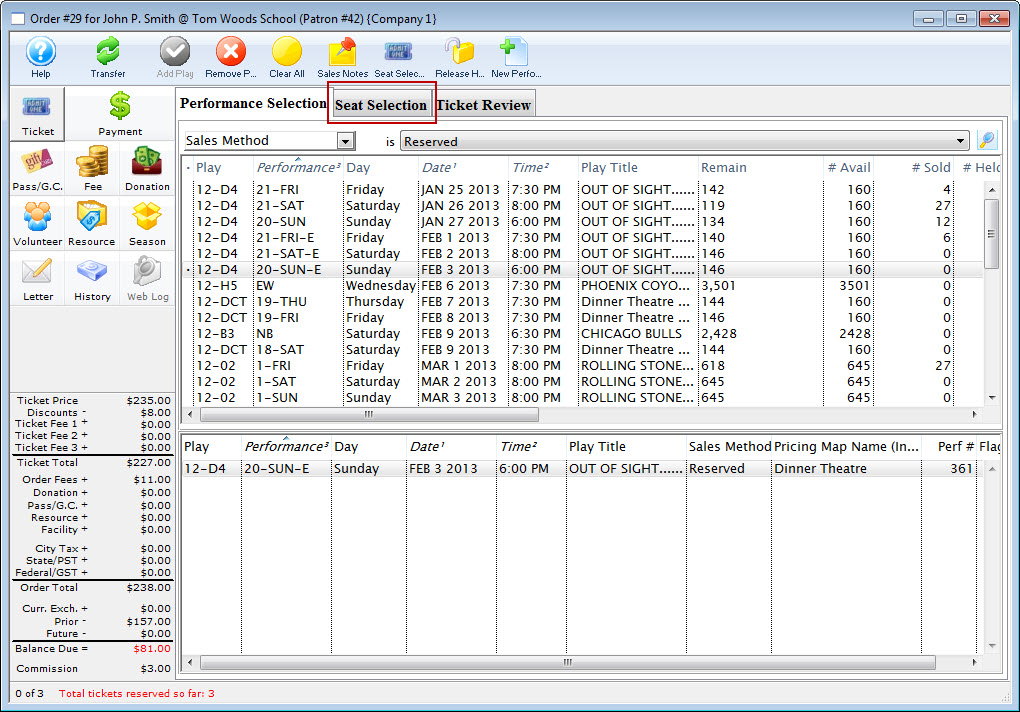
Performances are displayed in the Performance Selection tab of the Order window. Once a patron is selected and the buy button clicked, the performances to be purchased can be selected. To learn more about searching for performances click here.
-
Select a performance by single clicking on it.
-
Click the Add Play
 button.
 The performance will move to the basket in the lower portion of the screen and is selected for purchasing. Repeat the above steps as needed to add more performances. You can also double click on a single performance to add it to your basket.
To refer back to selecting multiple performances click here Step #4.
-
Click the Seat Selection
 to choose seats.
Performance Selection Buttons
|
Transfers an order for one patron to another. For more information on Transferring orders click here. |
|
Adds a performance to the basket for purchasing. |
 |
Removes a select performance from the basket. |
| Removes all performances in the basket. | |
 |
Displays the sales notes for a selected event. For information on adding sales notes click here. |
|
Opens the Seat Selection tab. For more information on selecting tickets in a Graphic Maps click here or for Festival Seating click here. |
 |
Releases held seats for the selected performance. |
 |
Creates a new performance. For information on creating new performances click here. |
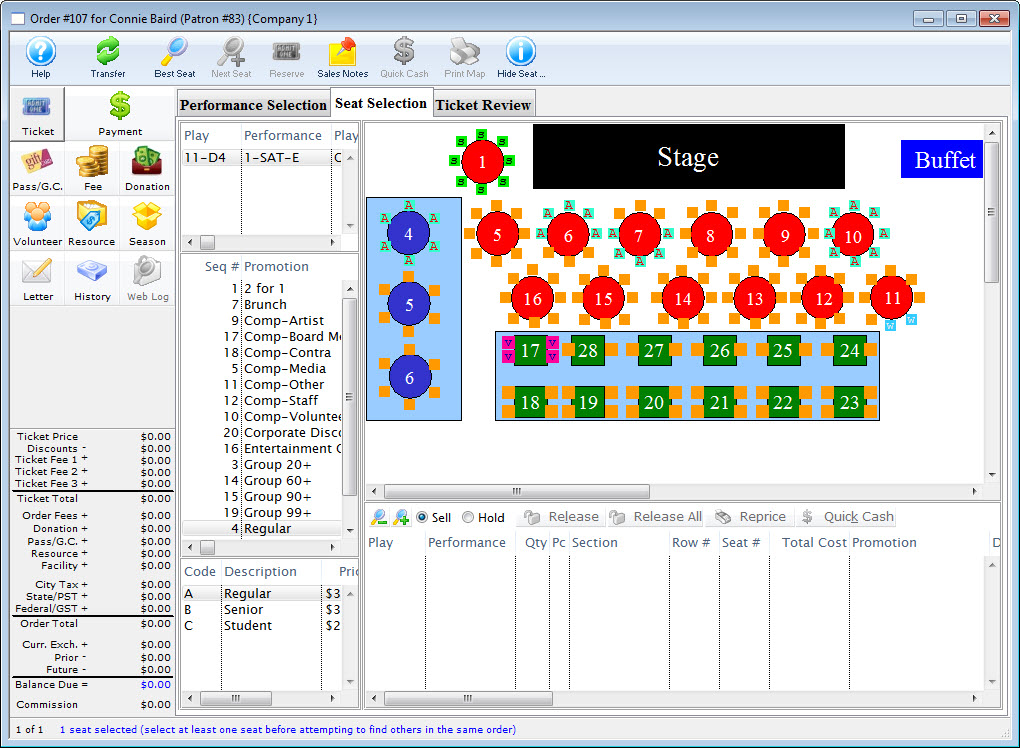
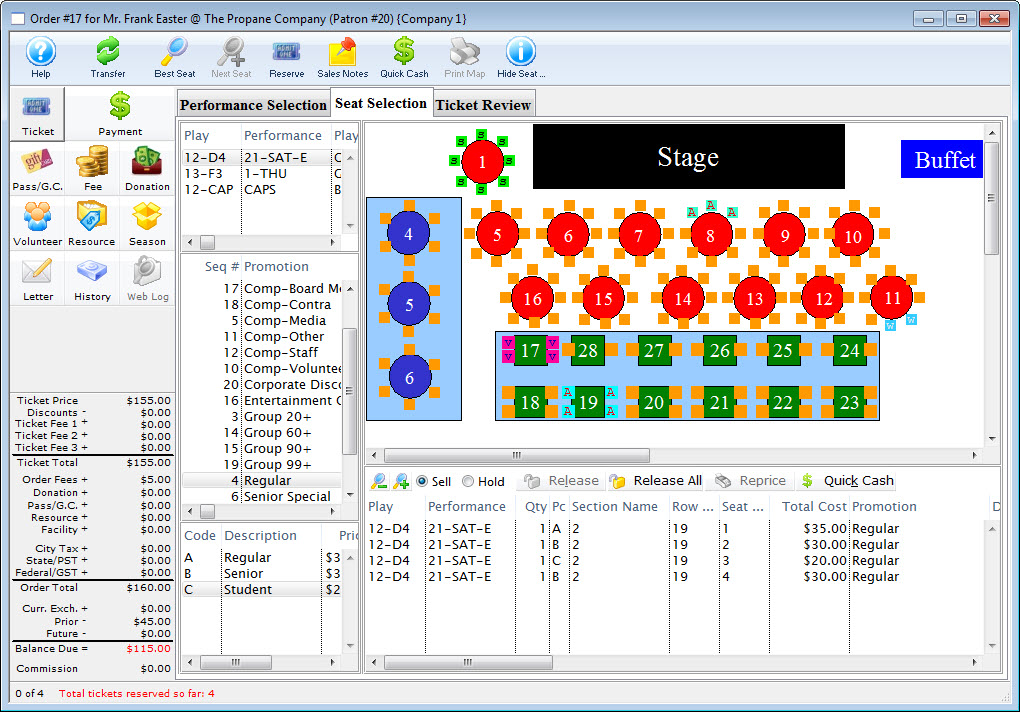
Reserved Seating Ticket Sales
To set Reserved Seating, you perform the following steps:
- Create a list of Performances in which to purchase tickets to.
Click here to learn how to create a list of Performances.
- Click the Seat Selection tab in the
Orders window.
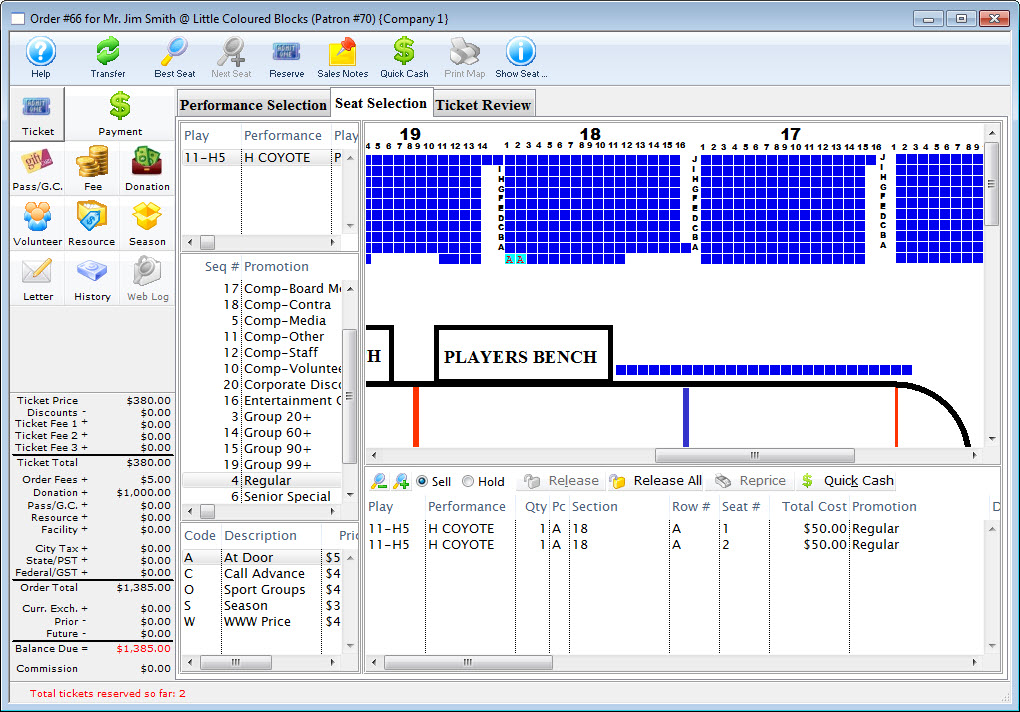
Notice that there is no access to the Quantity to Sell field used for festival seat sales. All seats are reserved using the theatre map.
- Select the Sales Promotion for which the tickets will be sold to.
- Select the Price Code for which the tickets will be sold to.

- Select the Available Seats to be sold.
This can be done either manually or automatically via the Best Seats feature. Click here for more information.
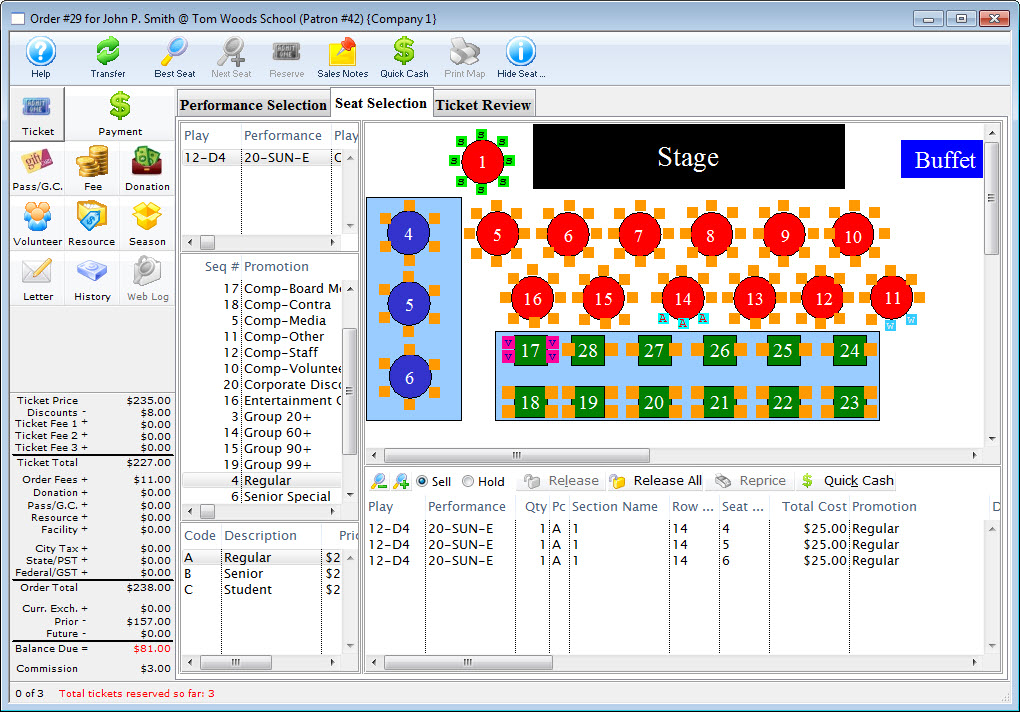
To select a single seat single click on it. To select several seats; click and drag the pointer of your cursor with the mouse across the seats of your choice. Reserved seats are highlighted with the price code that it was sold with. The letter which is displayed in the theatre map will be either the price code or promotion. This data is setup in the Box Office Tab of the System Preferences. Click here for more information.

All reserved seats are displayed in the purchase list on the lower portion of the window. When the user selects a second event to reserve seats into, the seats reserved for the first event remain in the list of reserved seats.

- Click the Payment
 button.
Click here to learn how to accept payments for tickets.
Ticket Sales Window |
|
| Transfers the ticket sale to the correct patron at the reserve seats window or after the tickets have been sold. Click here to learn how to transfer tickets to another patron. | |
 |
Opens the Best Seat Available search function. This feature is unavailable in Festival Seating. |
 |
Find the next Best Seat Available using the previous search criteria. This feature is unavailable in Festival Seating. |
 |
Reserves the current number of tickets selected. |
|
Allows the user to view the Sales Notes that apply to the play. |
 |
Accepts a cash payment for the exact amount owed and prints the tickets for the patron. The user is returned to the previous window. |
 |
Prints the current seating chart with the current "house dressing." This feature is unavailable in Festival Seating. |
 |
Turns on/off the tooltip showing the user the status of a seat on the Graphic Map. This feature is unavailable in Festival Seating. |
 |
The Ticket processing window. This is the window that the user is currently in. |
 |
The Fee processing window. Click here for more information. |
 |
The Donation processing window. Click here for more information. |
 |
The Membership processing window. Click here for more information. |
 |
The Season processing window. Click here for more information. |
|
The Payment Processing window. Click here for more information. |
 |
A record of the transaction. Click here for more information. |
| Play | The section at the top of the window displays all of the performances that tickets are being booked for. |
| Promotion | Select the sales promotion if applicable. The sales promotions determine if there is a discount or markup on the ticket(s) being sold. Click here for more information on setting up sales promotions. |
| Code | Displays all the price codes applicable to the performance. Click here for more information on pricing. |
| Quantity to Sell | The current quantity of tickets to be sold to the patron for the specified performance. This field is only available when selling Festival Seats. For reserved seating it is always set at one and the search must be used to reserve seats. |
| Create Tickets As | Select the type of ticket that will be printed. i.e. one ticket for each ticket sold or one ticket that will admit the total number of patrons. |
| Click to Confirm | Reserves the number of tickets that have been entered above. |
 |
Allows the user to switch between Sell and Hold modes. This feature is unavailable in Festival Seating. |
| Releases the selected ticket(s). Click here for more information. | |
 |
Releases all tickets that are currently reserved in the order. |
 |
Changes the pricing for the selected ticket(s). Click here for more information. |
| Tickets Selection | The bottom of the window displays the tickets booked for the current performance(s) highlighted in the performance section. |
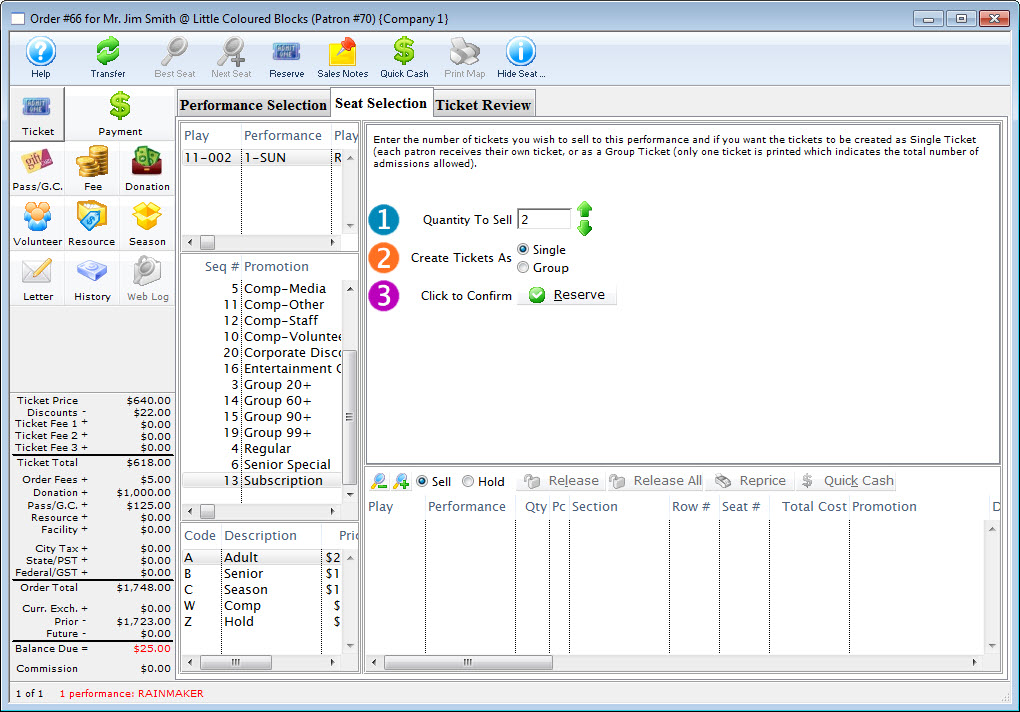
Festival Seating Ticket Sales
Festival Seating or General Admission does not require the selecting of seat on a graphic map. The process involves creating a buy list, select the number of tickets to purchase and reserving them.
To set up Festival Seating, you perform the following steps:
- Create a list of Performances in which to purchase tickets to.
Click here to learn how to create a list of Performances.
Ticket Sales Window

Transfers the ticket sale to the correct patron at the reserve seats window or after the tickets have been sold.Click here to learn how to transfer tickets to another patron. Opens the Best Seat Available search function. This feature is unavailable in Festival Seating. Find the next Best Seat Available using the previous search criteria. This feature is unavailable in Festival Seating. Reserves the current number of tickets selected. Allows the user to view the Sales Notes that apply to the play. Accepts a cash payment for the exact amount owed and prints the tickets for the patron. The user is returned to the previous window. Prints the current seating chart with the current "house dressing." This feature is unavailable in Festival Seating. Turns on/off the tooltip showing the user the status of a seat on the Graphic Map. This feature is unavailable in Festival Seating. 
The Ticket processing window. This is the window that the user is currently in.
The Fee processing window. Click here for more information.
The Donation processing window. Click here for more information.
The Membership processing window. Click here for more information.
The Season processing window. Click here for more information. The Payment Processing window. Click here for more information.
A record of the transaction. Click here for more information. Play The section at the top of the window displays all of the performances that tickets are being booked for. Promotion Select the sales promotion if applicable. The sales promotions determine if there is a discount or markup on the ticket(s) being sold. Click here for more information on setting up sales promotions. Code Displays all the price codes applicable to the performance. Click here for more information on pricing. Quantity to Sell The current quantity of tickets to be sold to the patron for the specified performance. This field is only available when selling Festival Seats. For reserved seating it is always set at one and the search must be used to reserve seats. Create Tickets As Select the type of ticket that will be sold. i.e. - Single: one ticket for each ticket sold. The is the best most sales. -or-
- Group: one ticket that will admit the total number of patrons. Normally this option is used for school groups of bus tours. Note that you cannot email group tickets to people since all print at home tickets are a single QR code to admit a single person.
Click to Confirm Reserves the number of tickets that have been entered above. Allows the user to switch between Sell and Hold modes. This feature is unavailable in Festival Seating. 
Releases the selected ticket(s). Click here for more information. Releases all tickets that are currently reserved in the order. Changes the pricing for the selected ticket(s). Click here for more information. Tickets Selection The bottom of the window displays the tickets booked for the current performance(s) highlighted in the performance section.
Best Available Seats
When you mapped and named your seats, Best Available seats were set up. There are standard rules Theatre Manager will apply when presenting the best Available seats. Depending on the seat configuration of your venue (in particular dinner theatre seating), your Seat Name file may have been setup for a two-pass approach to Best Available seating. For more information on the two-pass system click here.
To choose Best Available seats, you perform the following steps:- In the seat selection window, click the Best Seats button.
The Suggested Best Available Seats window opens.
-
Enter in the number of seats that the patrons wishes to buy.
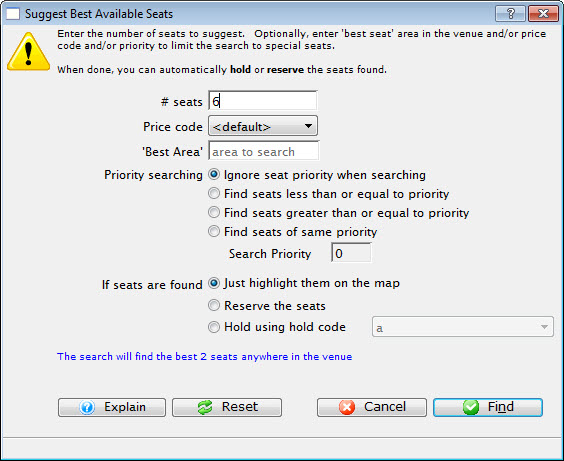
- Enter the number of seats. Optionally you can enter a Price Code Lookup and/or a Best Area to search.
Theatre Manager default seat lookup is two (2), you can edit the number as needed.
Leaving Price Code and Best Area blank allow the system to give the best available for all sections. This Best Area is alphabetical, and is determined by the Map Setup. Click here for more information on Map Setup.
For price Code and Best area, if you enter:
- nothing: the entire venue will be searched
- Best Area: only seats with a 'best area' starting with the same letters you type will be searched. This provides searching by area alone.
- Price Code: only seats that can be sold using that price code will be searched. This provides searching by price alone.
- Best Area AND Price Code: only seats that match both of the above conditions for area and price code will be searched to provide area and price searching.
- Select Priority Search and enter Minimum Seat Priority number is applicable.
Select an action for If Seats Found.
- Click the Find
 button to view suggested seats.
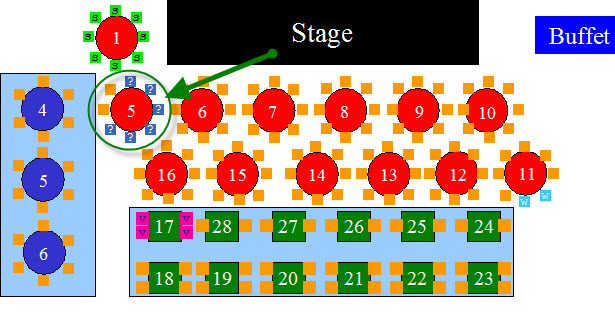
If the suggested seats are not on the visible portion of the Map (for large maps), the map will center on the seats and highlight them using a question mark icon.
- If the seats are not what the patron prefers, click Best Seats button again.
- Alternatively, click the Next Seat button
 it immediately identify the next best available seats.
- If the seats are acceptable click the Reserve button.
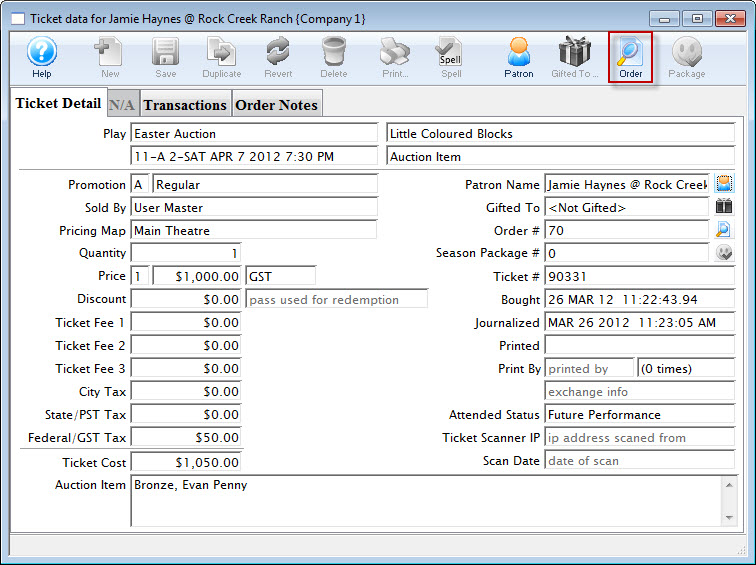
Auction Item Sales
The sale of auction items is similar to selling a ticket to a festival event. However, followint this process, you can enter the retail price and a description of the item sold to the patron.
You will first need to have an event set up in Theatre Manager to sell the Auction Items.
Refer to Setup for more information.
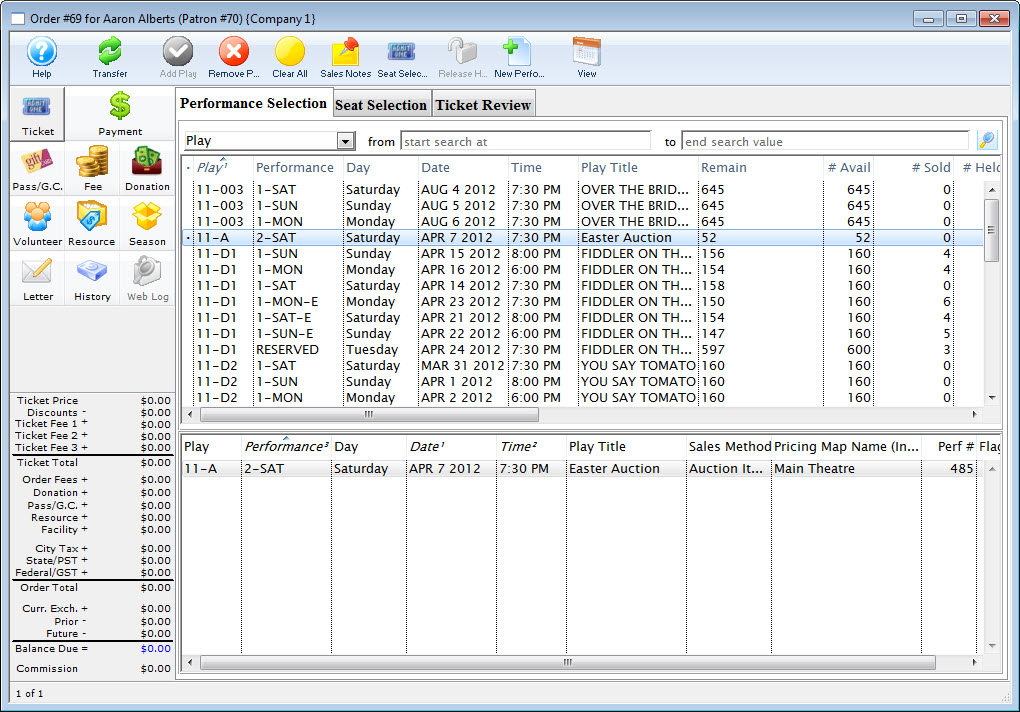
To sell an auction item, you perfiorm the following steps:
- Locate the Patron who has purchased the Auction item.
For more information on finding patrons click here.
- Click the Ticket
 button from the Patron window to proceed to buying to the Auction event.
 - Locate the auction item event and double click to add it to your shopping cart.
For more information on searching for events click here.
- Click the seat selection tab.
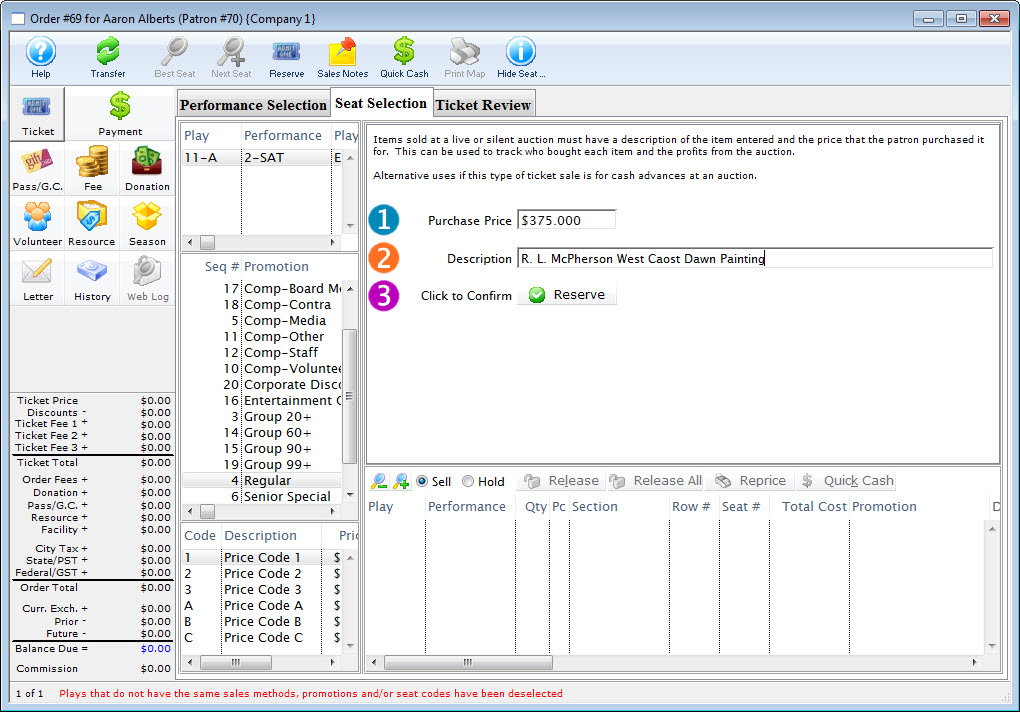
- Enter the purchase amount.
- Enter a description of the item: Lot #, Description.
- Click Reserve
 to add the sale to the order.
- Click the Payment
 Button to enter a payment, choosing On Account as the Method.
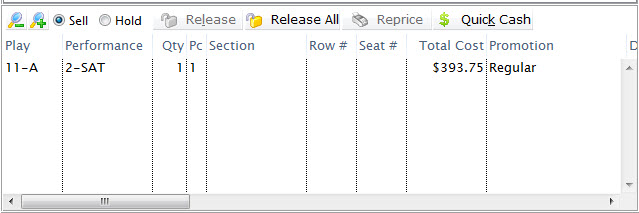
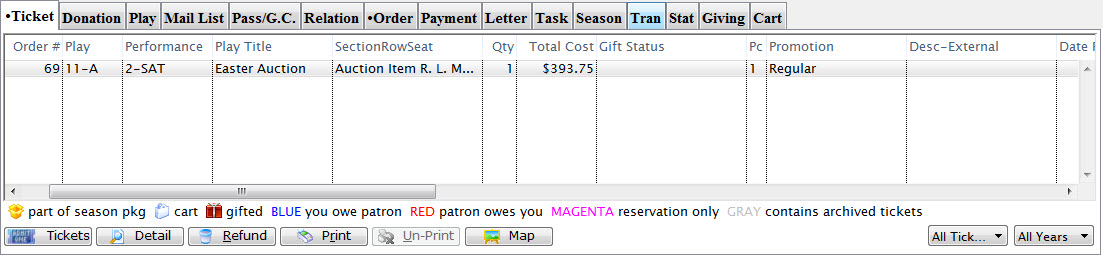
The Auction Item will appear in the patron Ticket Tab and the description you enter will appear in the Section/Row/Seat column.
You will now be prepared to Check Out your patrons after the Auction Event.
Auction Sale - Checking out the Patron
When an Auction Event has concluded you will need to settle-up with patrons when they collect the items they purchased. The following is one method that will expedite the process.
To quickly locate all the patrons, you perform the following steps:
- Click the Event
 button in the main Theatre Manager toolbar / ribbon bar.
The Event List window opens.
- Locate the desired auction event.
Click here for more information on searching for performances.
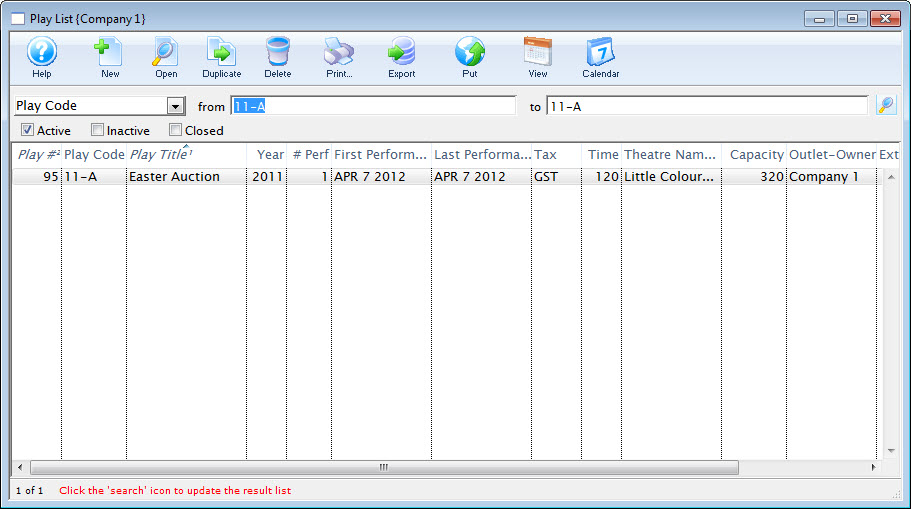
- Double click to open the Event Setup detail.
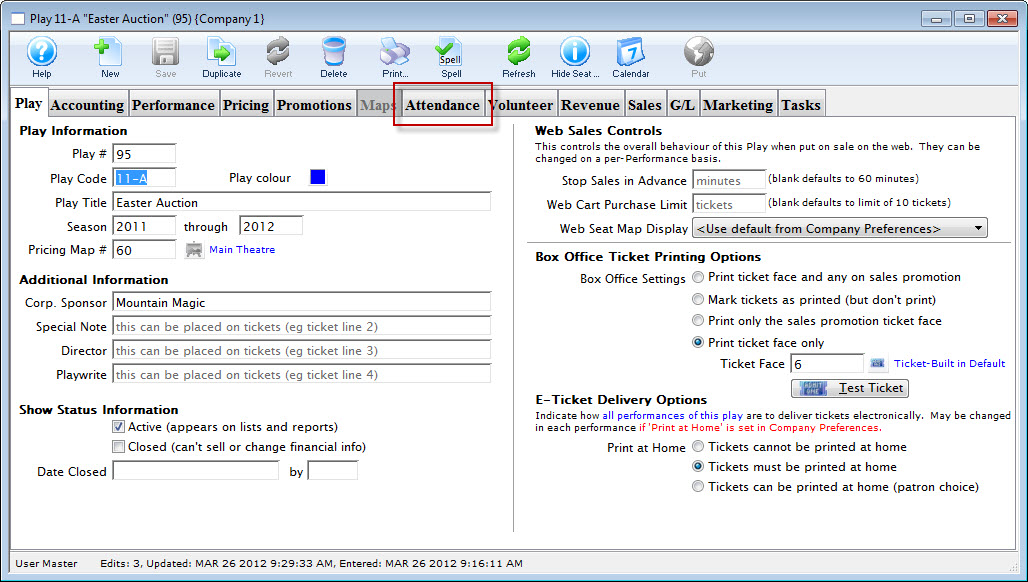
- Click the Attendance tab. Then highlight the Auction performance on the left.
A list of patrons opens. You can sort this list by patron last name for easier searching.
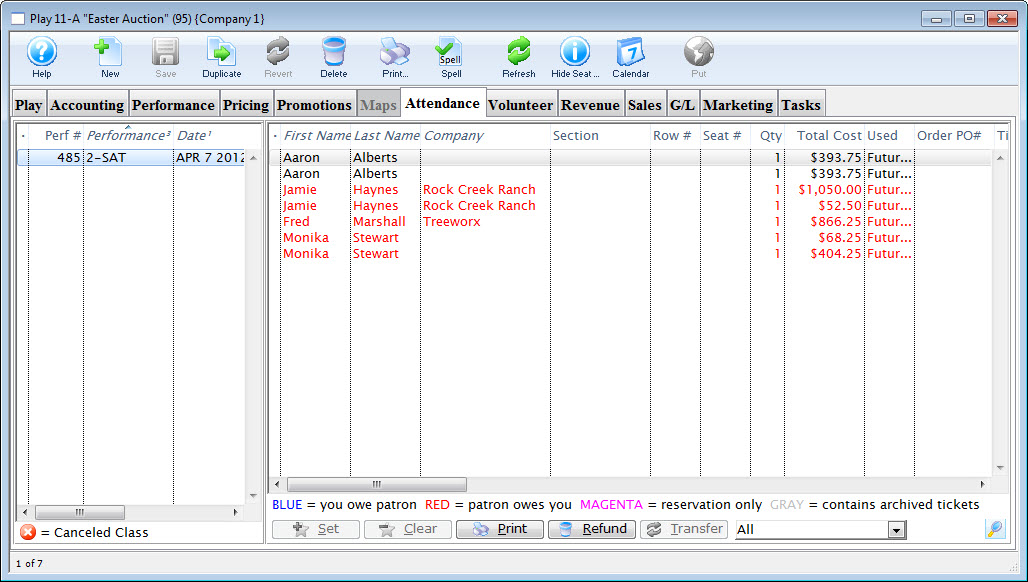
- Locate the Patron from the list and double click to show your detail of ticket [auction item in this case].
This is helpful, as it will display the auction item description entered during the sale.
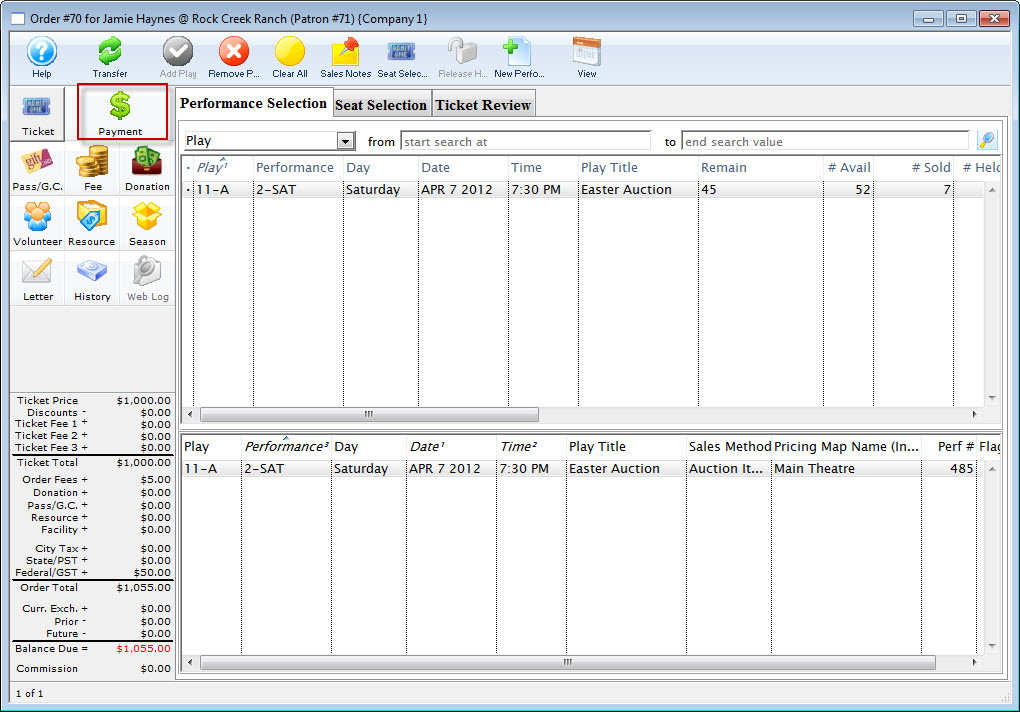
- Click the Order
 button.
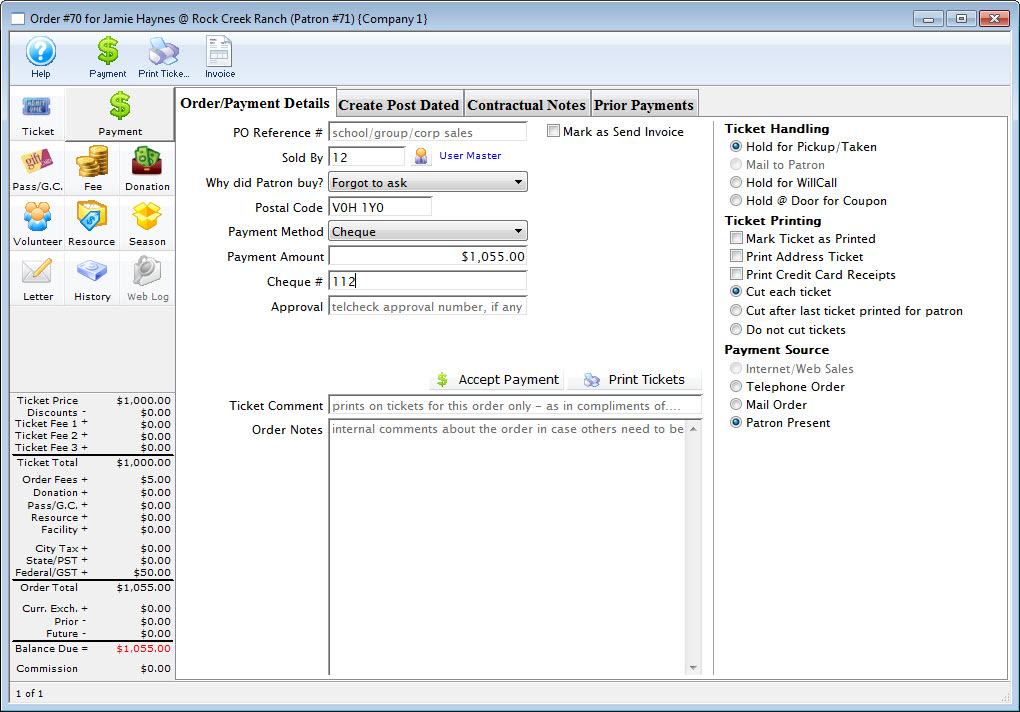
- Click the Payment
 button to enter the payment for the item and conclude the sale.
|
You can have two performances created in the Auction event, one for the purchase of the tickets to the event and one for the sale of the auction items. |
Locating a patron's seat sold by another outlet
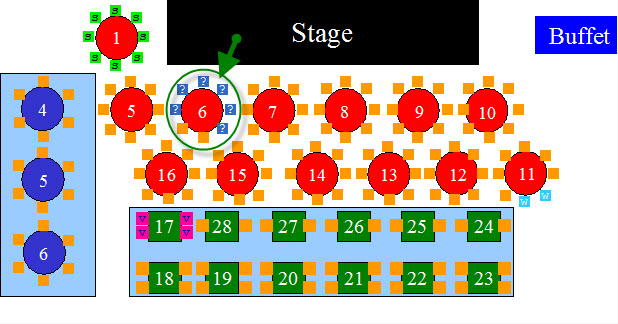
In the Outlet version of Theatre Manager, you may need to know where a particular patron is sitting to accommodate a seating request for a new buyer. In the attached picture, where you are selling tickets for somebody, they may say, 'I want to sit with Fred.'
To locate seats sold to a particular patron, you perform the following steps:
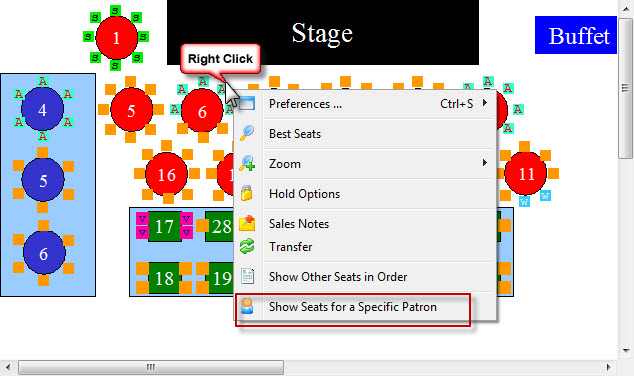
- Right click on the map, to open the Right Click menu.
- Select Show Seat for a Specific Patron.
- Click the Search button.
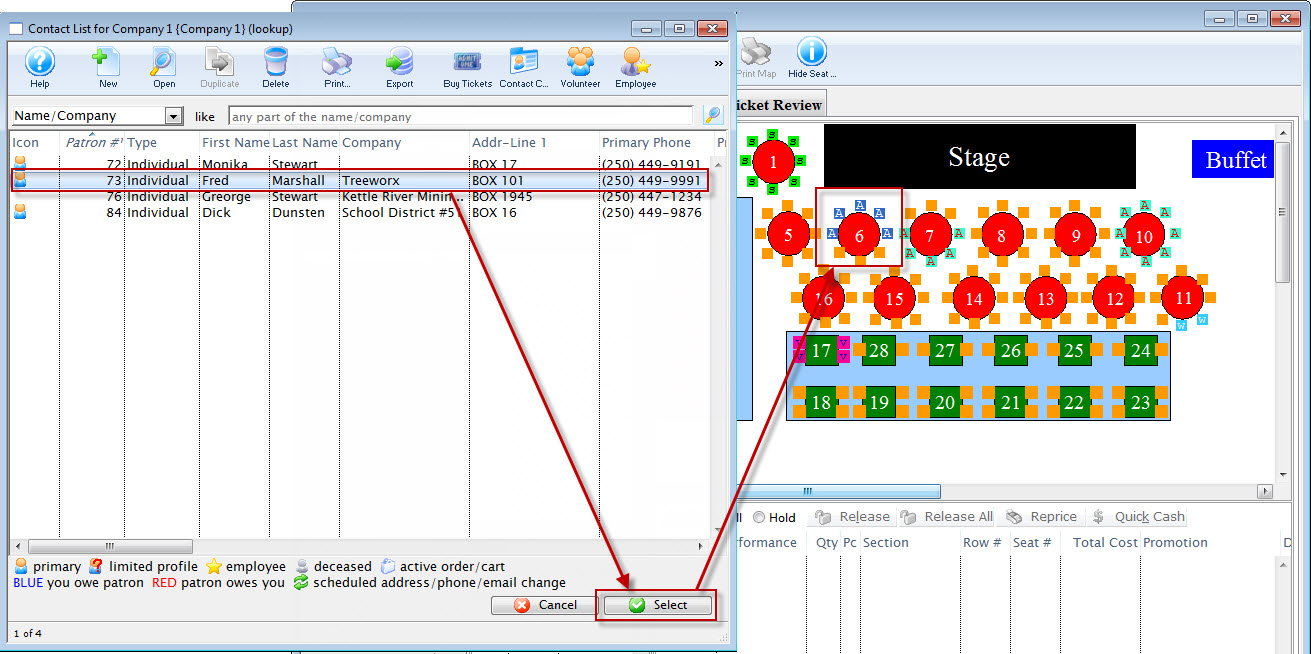
- Click on the name of the patron, and click the Select
 button.
The seats belonging to the selected individual blink and change color.
Alternatively: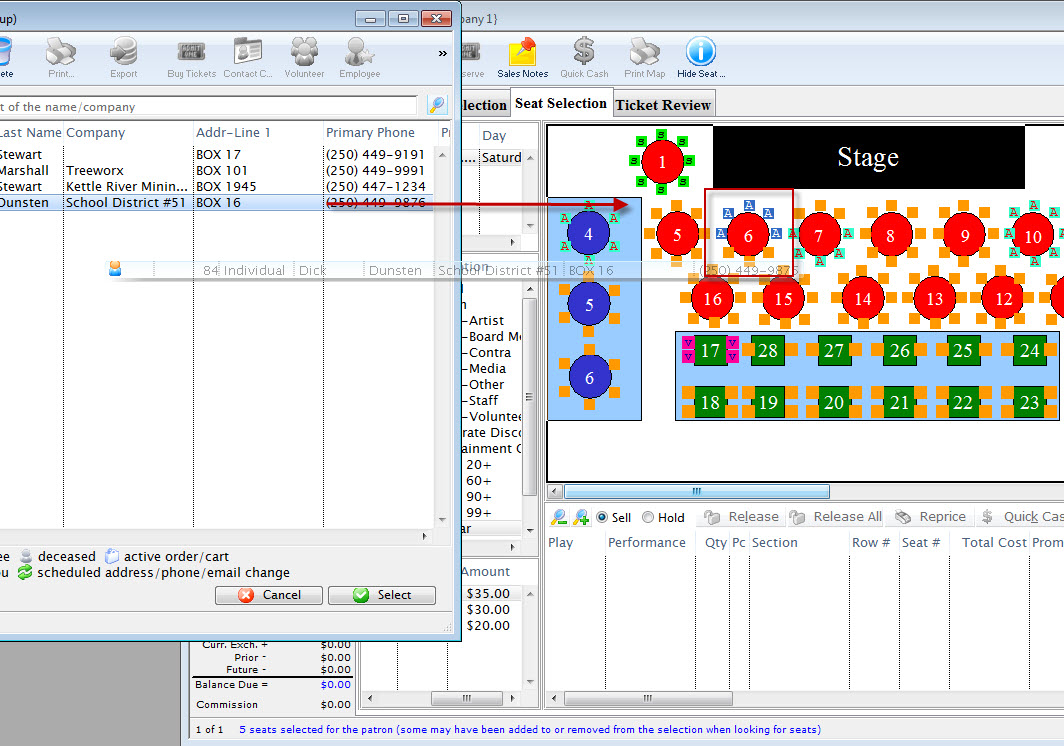
- Click on the name of the patron, and drag them onto the map.
The seats belonging to the selected individual blink and change color.
The Contact List opens.
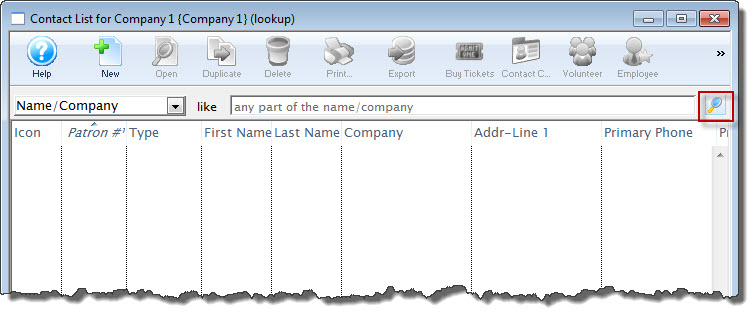
The list populates limited to people who have purchased a ticket to the specific performance -- and nobody else. You can use the standard search tools to search for the specific patron by name or search for all.
Releasing Reserved Tickets
If the tickets the user has reserved are not correct, and the user wishes to remove them from the purchase list, on a graphical map, seats can be released by double clicking them.
- Select the incorrect ticket(s) displayed in the purchased list.
- To select a single ticket, click on it.
- For Mac users, to select several tickets, hold down the <OPTION> key and single click on the desired tickets.
- For Windows users, to select several tickets, hold down the <CTRL> key and single click on the desired tickets.
- To select several tickets located together on the list, click on the first ticket and while pressing down the <SHIFT> key, click on the last ticket to be selected. All the tickets between the first and last ticket will be selected.

- Click the Release
 button.
The selected ticket(s) will be removed from the purchase list. This enables the ticket(s) to be sold to another patron. The following message will be displayed at the bottom of the window to show the ticket(s) has been released.

Traveling Troupe Ticket Sales
To sell a Traveling Troupe performance a performance must be created for the sale to be assigned to a patron. Click here for more information on creating a new traveling troupe event.
Once the event is available, to sell a Traveling troupe ticket, you perform the following steps:
- Open the Select Events(s) Window and search for a traveling troupe
Performance.
Click here for more information on Creating a Buy List.
- Select the traveling troupe performance.
- Click the Seat Select tab.
The Selection window for Traveling Troupe opens.

Purchase Price The cost of the traveling troup 
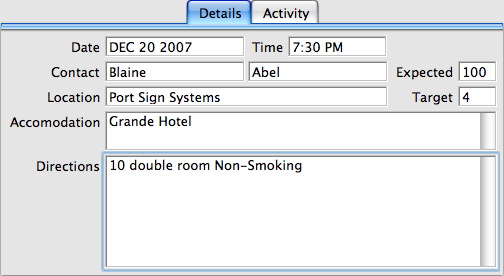
Shows details pertaining to the performance. Date Date the event will take place. Time Time of the event. Contact The contact person for the performance. Expected Estimated audience size. Location Venue or address of the event. Target Target audience age. Accommodations A note area for name, location, telephone and details of the accommodations. Directions Directions to the venue and or accommodations. 
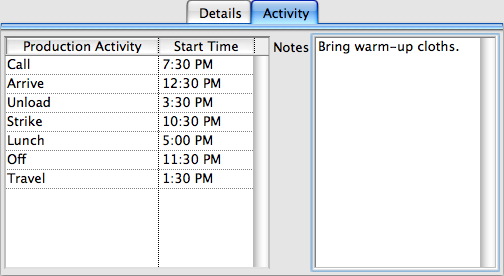
A list of activities and a timeline for the performance. Production Activity A list of potential activities pertaining to the performance. This list can be altered or added in the Code Tables. Click here for more information. Start Time Start time of an activity. Notes Overall notes about the run out. - Edit the fields as needed.
- Click the Reserve button.
This new performance will now appear in the lower portion of the buy window and the new performance will be added to the Buy List.
- If necessary, create additional Traveling Troupe performances at this
time.
There is a
New Performance button in the toolbar of the Order Window > Performance Selection Tab that allows you to create new performances for the traveling troupe "on the fly" from the sales window. Clicking the button opens the wizard to add one or more new performances of the event. Click here for more information on the performance wizard.Repeat steps 2-5.
- Click the Payments button
to accept payment.
Click here to learn how to accept payments.
* Note that the Calendar and Facility Management - Calendar of Events - Daily View will produce a report of the Traveling Troupe Itinerary entered during the sale.
Consignment Ticket Sales
Consignment ticketing is used when you sell tickets for a performance at another venue. The venue would give you a specific number of tickets for you to sell. To sell a Consignment performance, an event must be created for the sale to be assigned to a patron. Click here for more information on creating a new event.
The tickets are setup under plays and dates as any ordinary performance would be. For the GL Account setup you would likely setup accounts specifically for consignment sales. Once setup, add a performance to sell tickets toand select the amount to be sold as consignment. Once setup, the performance will be shown in the Buy list. The selling of consignment tickets is the same as selling regular tickets. Consignment ticket performances cannot be oversold. Only Festival Seating performances can be setup to be oversold.
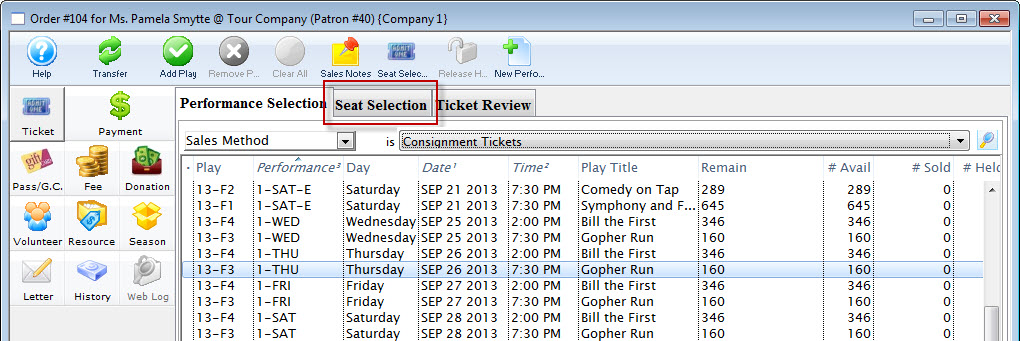
- Open the Select Events(s) Window and search for a consignment performance
Click here for more information on Creating a Buy List.
In some situations, you may wish to limit the list by searching only for consignment performances. To do so:
Change the Performance Search drop down to "Sales Method"
Choose "Consignment" from the list.
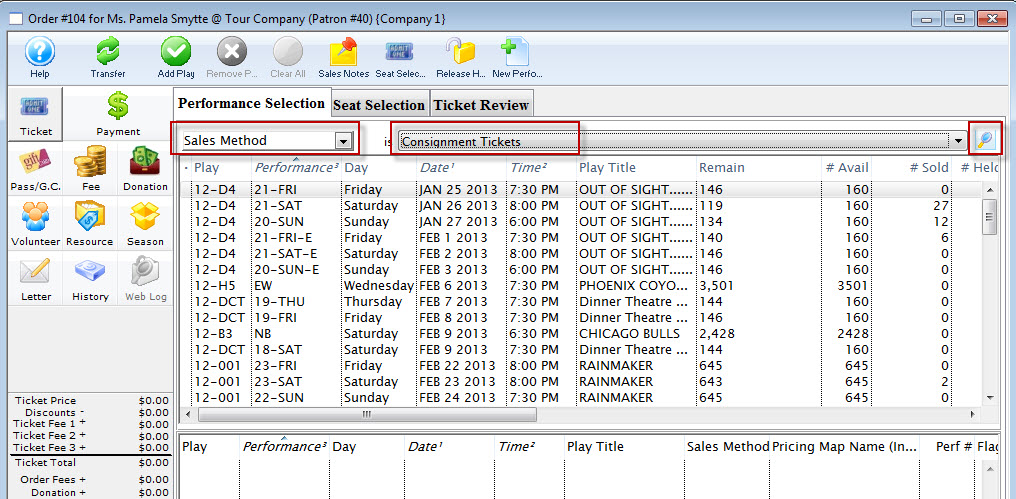
- Click the Find icon.
- Select the performance.
- Click the tab.
The Selection window for Consignment tickets opens.
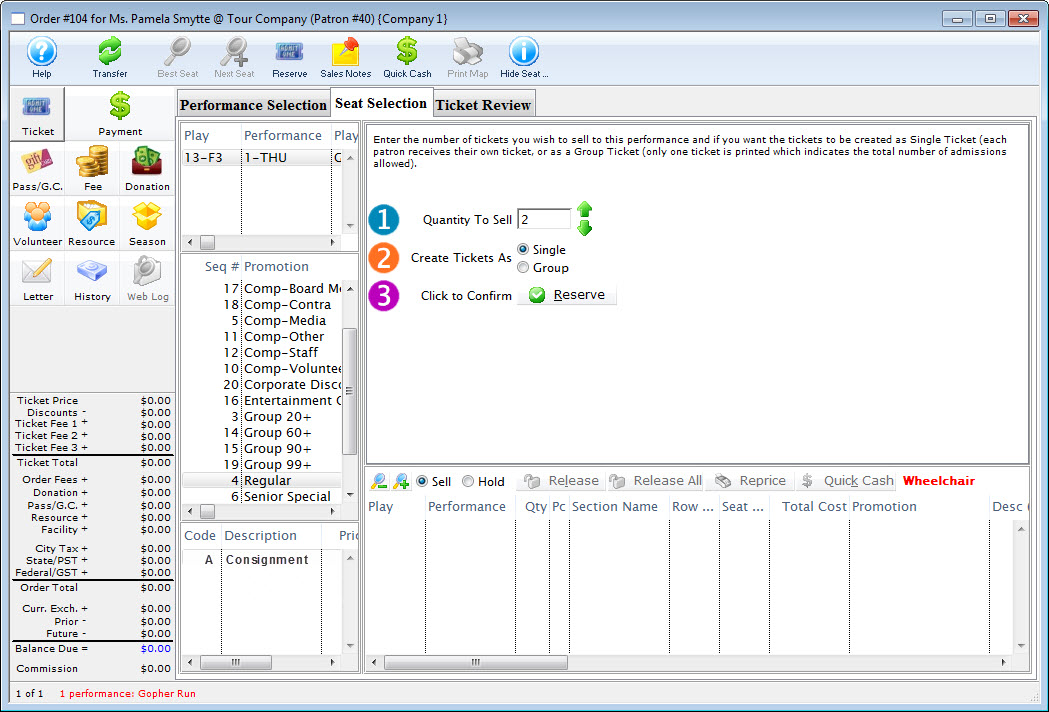
- Indicate how many tickets you wish to sell in
 Quantity To Sell.
- Click the
 button.
- Click the Payment button.
Click here to learn how to accept payments for tickets.
Parts of the Ticket Sales Window
| Transfers the sale to the correct patron at the reserve item window or after the items have been sold. Click here to learn how to transfer items to another patron. | |
|
Opens the Best Seat Available search function. This feature is unavailable in Consignment Sales. |
|
Find the next Best Seat Available using the previous search criteria. This feature is unavailable in Consignment Sales. |
|
Reserves the current number of items selected. |
|
Allows the user to view the Sales Notes that apply to the item. |
|
Accepts a cash payment for the exact amount owed and completes the sale. The user is returned to the previous window. |
 |
Prints the current seating chart with the current "house dressing." This feature is unavailable in Consignment Sales. |
|
Turns on/off the tooltip showing the user the status of a seat on the Graphic Map. This feature is unavailable in Consignment Sales. |
 |
The Ticket processing window. This is the window that the user is currently in. |
 |
The Fee processing window. Click here for more information. |
 |
The Donation processing window. Click here for more information. |
 |
The Pass G.C. processing window. Click here for more information. |
 |
The Season processing window. Click here for more information. |
|
The Payment Processing window. Click here for more information. |
| A record of the transaction. Click here for more information. | |
| Event/Play | The section at the top of the window displays all of the events that are being purchased. |
| Promotion | Select the sales promotion if applicable. The sales promotions determine if there is a discount or markup on the ticket(s) being sold. Click here for more information on setting up sales promotions. |
| Code | Displays all the price codes applicable to the performance. Click here for more information on pricing. |
| Quantity to Sell | The current quantity of items to be sold to the patron for the specified performance. This field is only available when selling Consignment, inventory Items or Festival Seats. |
| Create Tickets As | Select the type of ticket that will be printed. i.e. one ticket for each ticket sold or one ticket that will admit the total number of patrons. |
| Click to Confirm | Reserves the number of items that have been entered above. |
|
Allows the user to switch between Sell and Hold modes. This feature is unavailable in Consignment Sales. |
|
Releases the selected item(s). Click here for more information. |
|
Releases all items that are currently reserved in the order. |
|
Changes the pricing for the selected item(s). Click here for more information. |
| Tickets Selection | The bottom of the window displays the item(s) booked for the current item(s) highlighted in the performance section. |
Inventory Ticket Sales
To sell inventory (such as CD's, T-Shirts, mugs, hats) a performance must be created for the sale to be assigned to a patron. Click here for more information on creating a new event.
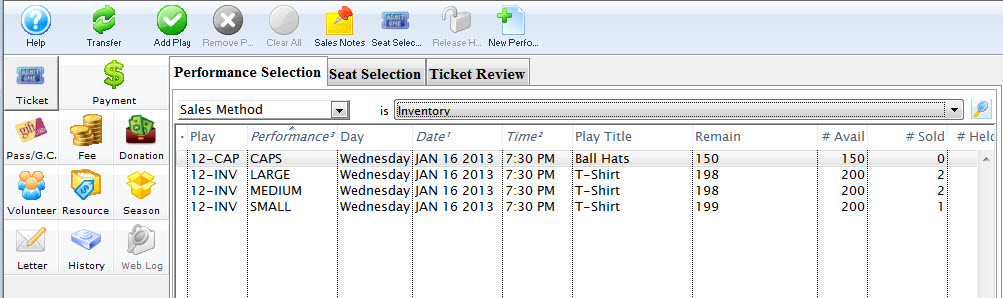
- Open the Select Events(s) Window and search for an inventory
Performance.
Click here for more information on Creating a Buy List.
In some situations, you may wish to limit the list by searching only for inventory items. To do so:
Change the Performance Search drop down to "Sales Method".
Choose "Inventory" from the list.
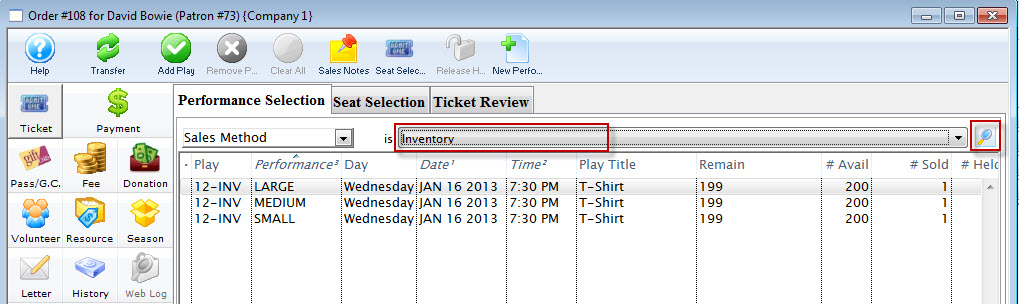
- Click the icon.
- Select the inventory item.

- Click the Seat Selection tab.
The Selection window for Inventory Sales opens.
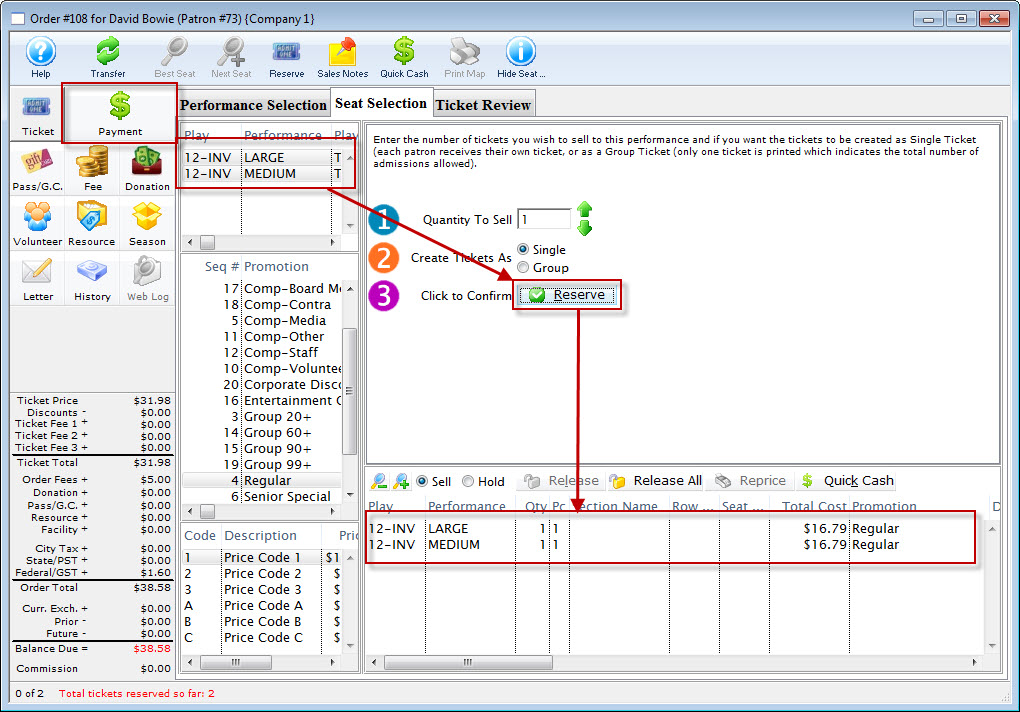
- Indicate how many of the item you wish to sell in Quantity To Sell.
- Click the Reserve button.
- Click the Payment button.
Click here to learn how to accept payments.
| Transfers the sale to the correct patron at the reserve item window or after the items have been sold. Click here to learn how to transfer items to another patron. | |
|
Opens the Best Seat Available search function. This feature is unavailable in Consignment Sales. |
|
Find the next Best Seat Available using the previous search criteria. This feature is unavailable in Consignment Sales. |
|
Reserves the current number of items selected. |
|
Allows the user to view the Sales Notes that apply to the item. |
|
Accepts a cash payment for the exact amount owed and completes the sale. The user is returned to the previous window. |
|
Prints the current seating chart with the current "house dressing." This feature is unavailable in Consignment Sales. |
|
Turns on/off the tooltip showing the user the status of a seat on the Graphic Map. This feature is unavailable in Consignment Sales. |
|
The Ticket processing window. This is the window that the user is currently in. |
|
The Fee processing window. Click here for more information. |
|
The Donation processing window. Click here for more information. |
|
The Pass G.C. processing window. Click here for more information. |
|
The Season processing window. Click here for more information. |
|
The Payment Processing window. Click here for more information. |
| A record of the transaction. Click here for more information. | |
| Event/Play | The section at the top of the window displays all of the events that are being purchased. |
| Promotion | Select the sales promotion if applicable. The sales promotions determine if there is a discount or markup on the ticket(s) being sold. Click here for more information on setting up sales promotions. |
| Code | Displays all the price codes applicable to the performance. Click here for more information on pricing. |
| Quantity to Sell | The current quantity of items to be sold to the patron for the specified performance. This field is only available when selling Consignment, inventory Items or Festival Seats. |
| Create Tickets As | Select the type of ticket that will be printed. i.e. one ticket for each ticket sold or one ticket that will admit the total number of patrons. |
| Click to Confirm | Reserves the number of items that have been entered above. |
|
Allows the user to switch between Sell and Hold modes. This feature is unavailable in Consignment Sales. |
|
Releases the selected item(s). Click here for more information. |
|
Releases all items that are currently reserved in the order. |
|
Changes the pricing for the selected item(s). Click here for more information. |
| Tickets Selection | The bottom of the window displays the item(s) booked for the current item(s) highlighted in the performance section. |
Creating an Inventory Item
There are a number of different methods to add inventory items to your Theatre Manager Database. In this method, you will see how to add items as Events/Plays.
To add an item to the database, you perform the following steps:
- Open the Event / Play list and click the New
 button.
Click here for more information New Events / Plays.
- Enter the basic Event / Play information, replacing it with your item to be added to inventory.
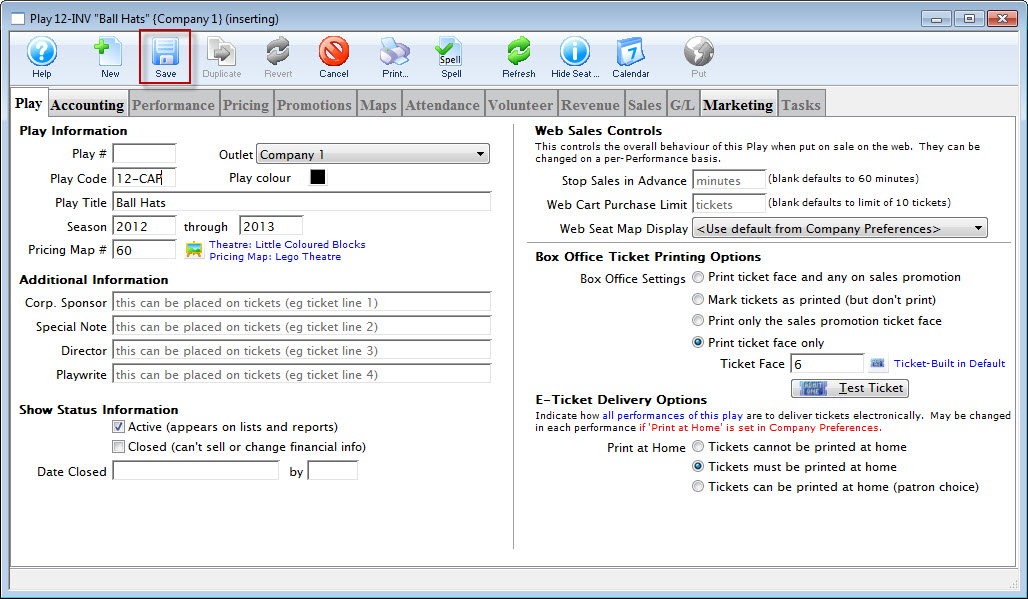
You will need to enter a map.
- Once you have completed entering the basic information, click the Save
 button.
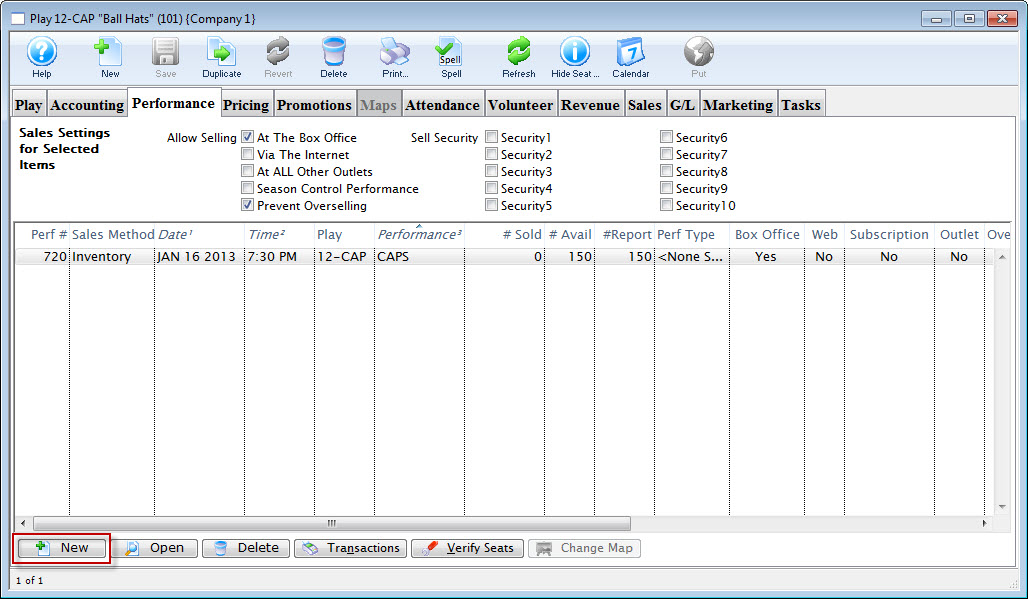
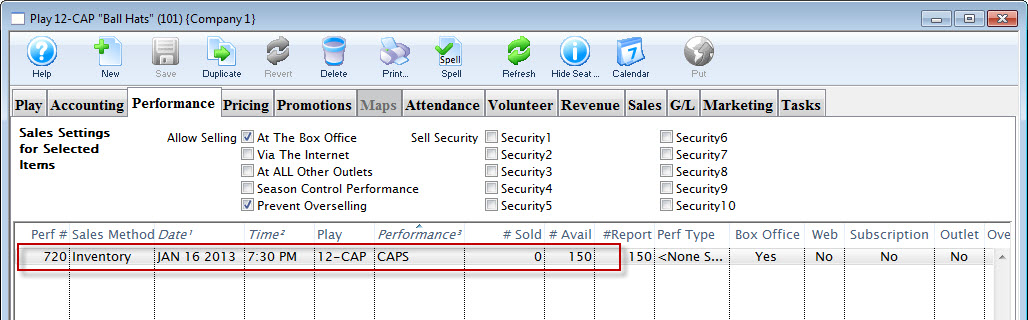
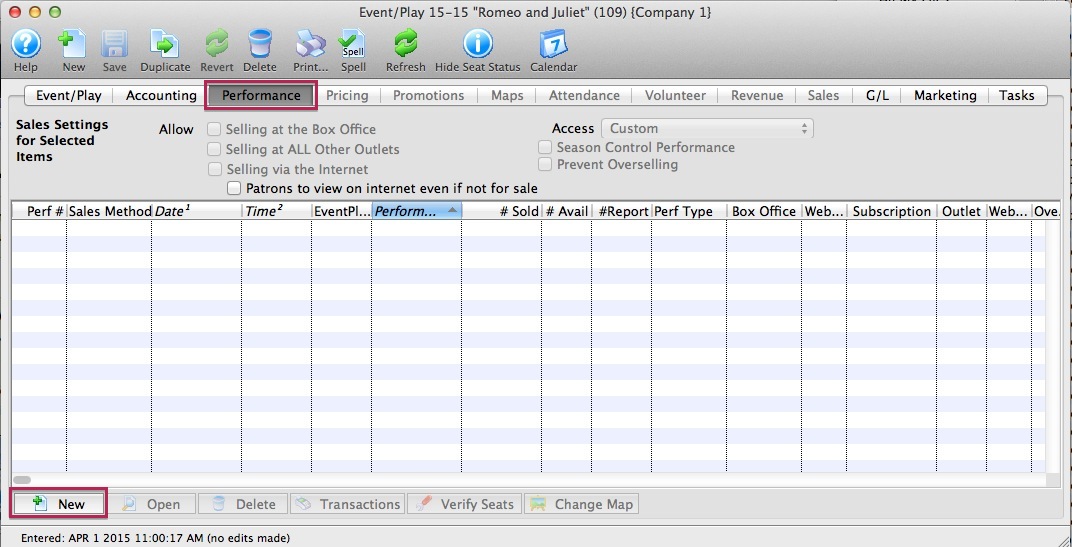
- Open the Performance Tab and click the New
 button.
The Adding Performance Wizard dialog opens.
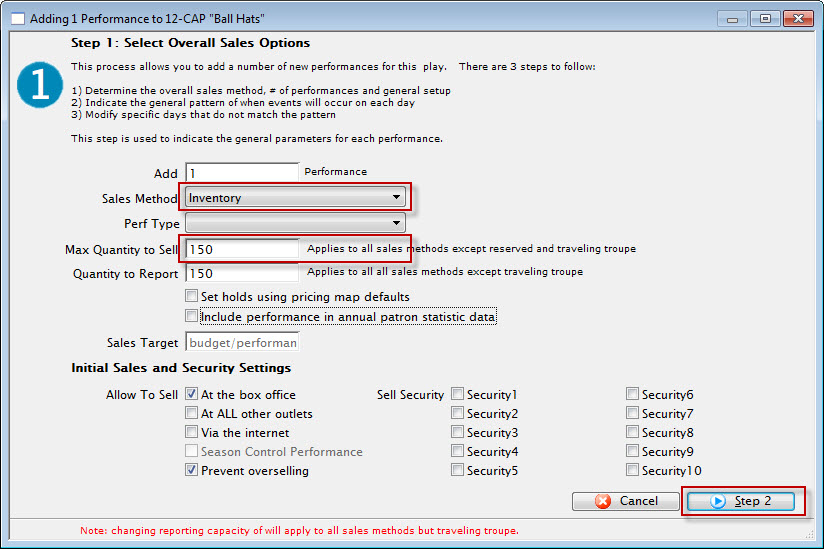
- Enter the Sales Method as Inventory and Enter the Quanity to Sell.
- Click the Step 2 button.
The Pattern of Days dialog opens.
- Click the Step 3 button.
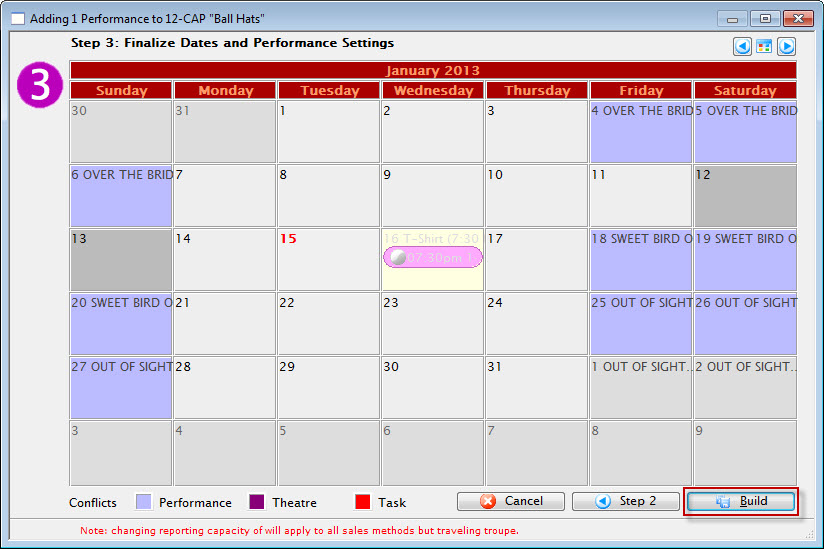
- Click the Build button.
The Confirmation dialog opens.
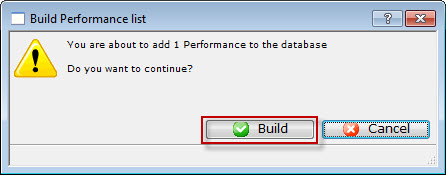
- Click the Build
 button.
You are returned to the Performance tab.
- Click the Pricing tab. Highlight the Price Code to edit and click the Edit Price button.
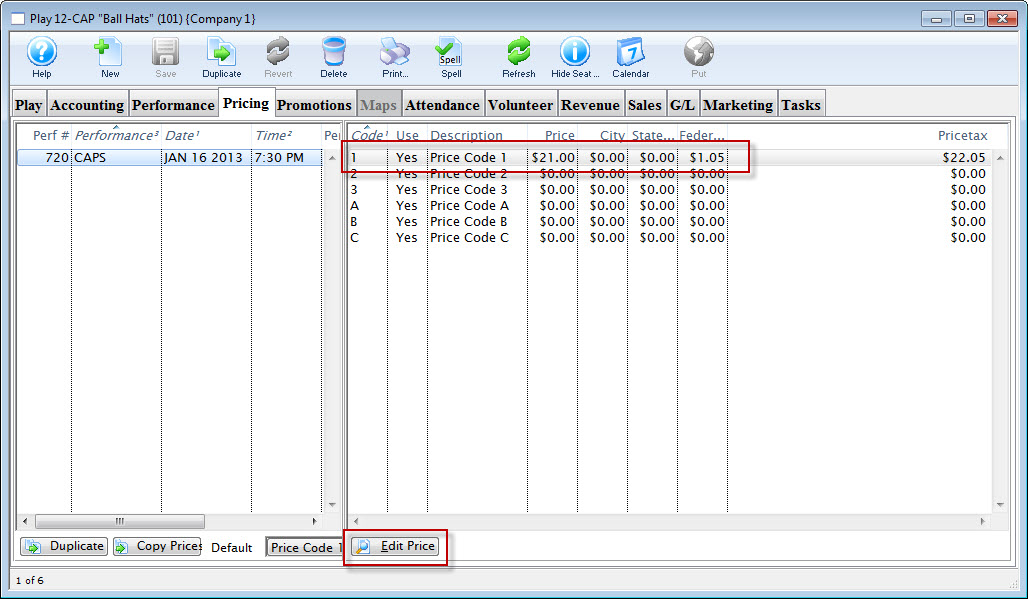
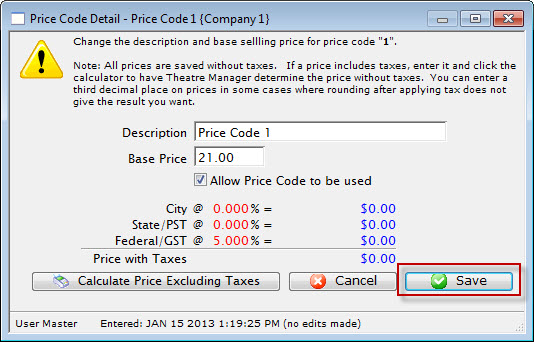
The price code details window opens.
- Make the required edits and click the Save
 button.
- In the Performance tab, double-click to opent the performance details.
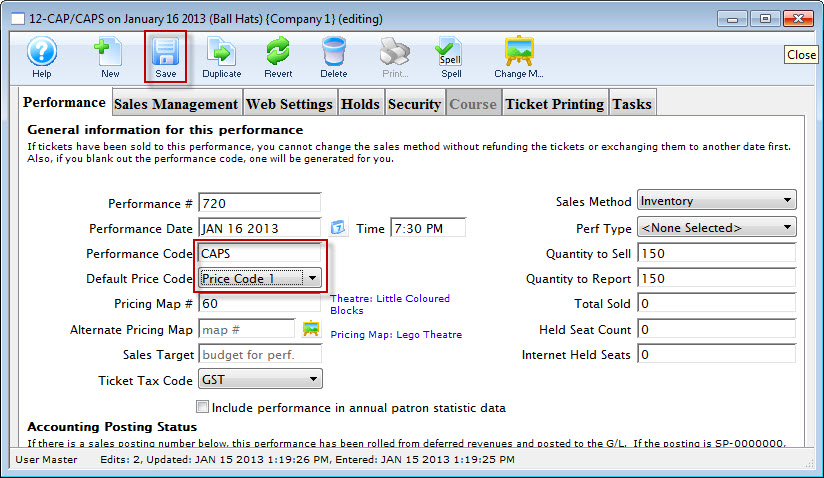
Review and makde changes as necessary. For example, you may want to change the Performance code to one that is more descriptive for an inventory item. In this example, CAPS.
- When you have completed the entery of the the details for your inventory item, click the Save button.
Your inventory item is now available for sale.
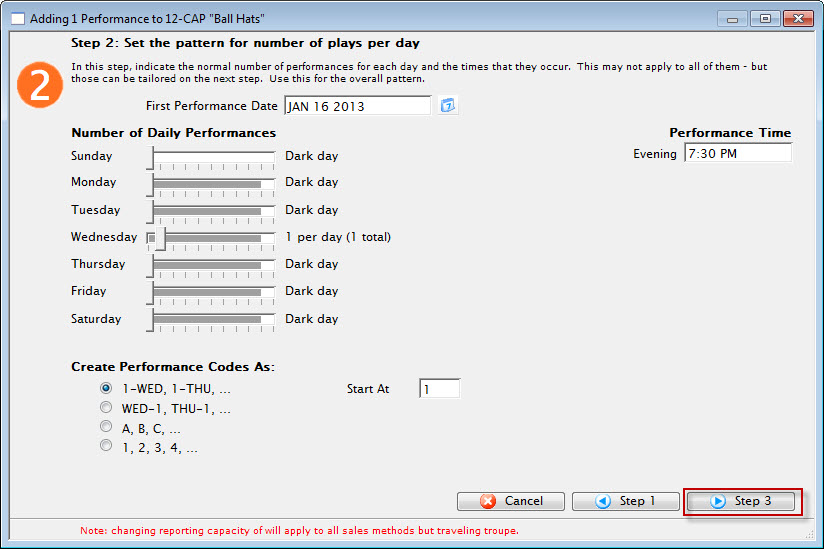
As you are entering an inventory item to be sold, you need to select only one day.
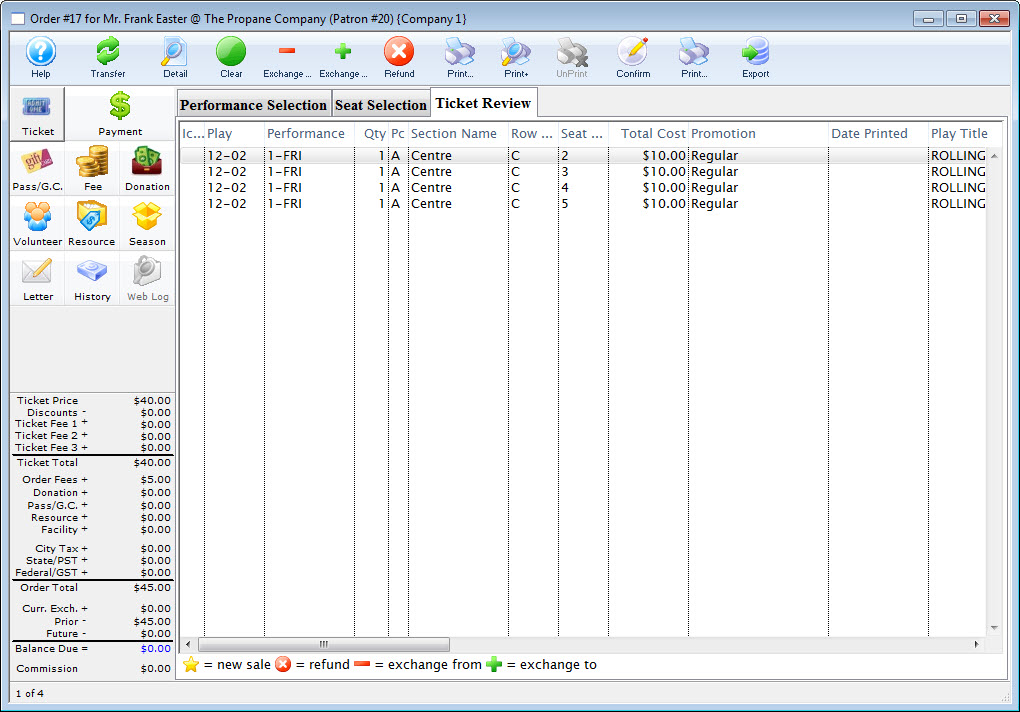
Ticket Review
The Ticket Review tab is often overlooked in the sales process, however when closing the sale, it is an important part in providing excellent customer service. using this tab, you can review the sale with the patron before proceeding on to other items in the order -- such as fees, donations and payments -- these can be affected by the contents of the order. A fee may be charged on some events and not others, or a "Ticket Round-Up" donation amount may be determined based on the overall price of the tickets. It is important to ensure the tickets selected are what the patron wishes to purchase.
The Ticket Review tab can be modified for the order in which the columns appear. Changing these will assist in the flow of the confirmation conversation with a patron on the telephone. You may wish to reorder the columns so they display in the following order to make them easier to read (but you can edit them to the order that works for you):
- Icon (this column is critical during exchanges and refunds as it indicates Exchange TO and Exchange FROM status)
- Event Title
- Performance Date
- Performance Time
- Section
- Row
- Seat
- Sales Promotion
- Price
And finally, when exchanging or refunding tickets, you need to examine the tickets in the Ticket Review tab to "Confirm" the exchange or refund. Therefore it is good to get in the habit of checking the Ticket Review tab during every sale.
For more on refunding tickets click here.
For more on exchanging tickets click here.
After selecting the seats in the Seat Selection tab, click on the  tab.
tab.
Parts of the Ticket Review tab
 |
Opens the Ticket Detail window for the selected ticket. For more on the Ticket Detail window, click here. |
| Click this button to reset the ticket status to its original state (New, Refund, Exchange From, or Exchange To). | |
 |
Click the Exchange From button to indicate the tickets that will be Exchanged From, meaning the tickets the patron is giving back to the box office. Using the Exchange Wizard will mark these tickets as Exchange From for you. For more information on the Exchange process, click here.
Click the Exchange To button to indicate the tickets that will be Exchanged To, meaning the tickets the patron is purchasing from the box office. Using the Exchange Wizard will mark these tickets as Exchange To for you. For more information on the Exchange process, click here. |
 |
Click this button to indicate the tickets that will be Refunded, meaning the tickets the patron is giving back to the box office for a refund or donation credit. Using the Refund Wizard will mark these tickets as Refund for you. For more information on the Refund process, click here. |
|
Prints the selected ticket(s). |
 |
Opens the Batch Print of Unprinted Tickets function to print a large group of tickets. For more on Batch Printing, click here. |
 |
Click this button to immediately confirm the exchanges and refunds as indicated by the icons in the ticket window. |
| Icon | The status of the ticket (New, Refund, Exchange From, Exchange To) |
| Event Title | The title of the event as indicated on the Description tab of the Event setup. |
| Date | Date of the performance. |
| Time | Time of the performance. |
| Section | Theatre Section for the ticketed seat. For General Admission events, this column will be blank. |
| Row | Theatre Row for the ticketed seat. For General Admission events, this column will be blank. |
| Seat | Theatre Seat for the ticketed number. For General Admission events, this column will be blank. |
| Promotion | The Sales Promotion used on the selected ticket. For more information on Sales Promotions, click here. |
| Total | Per ticket price, including taxes and fees. |
| Qty | Quantity of tickets. For Reserved Admission performances, this will always be "1." For General Admission tickets, sold a a "group" this will be the actual quantity of tickets sold. |
| Performance | The performance series code. |
| PC | The Price Code associated with the ticket. For more information on Price Codes, click here. |
| Gift Status | If the ticket was given or received as a gift, its status will be listed here. For more information on gifting tickets, click here. |
| Date Printed | If the tickets were previously printed, the date they were printed appears here. |
| Other fields | Other fields show a breakdown of ticket cost, fees, performance sequence numbers, and order number. |
Correcting Prices on Ticket Sales
If the tickets reserved contain an incorrect price code or sales promotion, there is a quick way to make a corrections. This procedure is the same for all reservation methods.
To correct pricing on ticket sales, you perform the following steps:
- Select the tickets purchased that contain the incorrect
prices.

- Correct the Sales Promotion or Price Code as needed.

- Click the Prices button.
The selected tickets will be updated to reflect the correct price code and sales promotion. A message will appear at the top of the window confirming the price change.

Exchanging Tickets
Exchanging tickets can be performed for Festival, Reserved or Traveling Troupe sales, exchanging from one performance to another within the same event, or across events, or from a higher price to a lower price ticket, and from a lower price to a higher price ticket. Theatre Manager calculates the differences of ticket prices, adds on an optional exchange fee and presents the final cost of the ticket exchange. There are no restrictions when exchanging tickets. The only condition when exchanging tickets is the tickets selected must exist within the same order number.
The program has security controls that can be set up for each employee or as an organization default. Click here for more information on the controls. Some of the controls are:
- Allowing exchanges for performances of past performances. Click here.
- Allowing exchanges for printed tickets. Click here.
- Collecting or not collecting the difference in money for higher priced tickets. Click here.
- Refunding or not refunding the difference in money for lower priced tickets. Click here.
| The following quick reference information is available for Exchanging or Refunding Tickets |
Reference Guide (pdf) |
Cheatsheet (pdf) |
Flash ScreenCast |
MP4 ScreenCast |
Changing the Price and/or Sales Promotion of Sold Tickets
The following steps outline how to change the price or sales promotion of a ticket after they have been sold. You may need to do this if:
- The tickets were sold for the wrong price or promotion in the first place
- You need to fix the price on the tickets because they were paid for using pass that you are trying to refund. This is important if there is a limited number of redemptions allowed per event/performance on the pass. Getting a redemption back means fixing the price and then returning the pass.
- Find the patron that requires the price change.
Click here to learn how to find patrons.
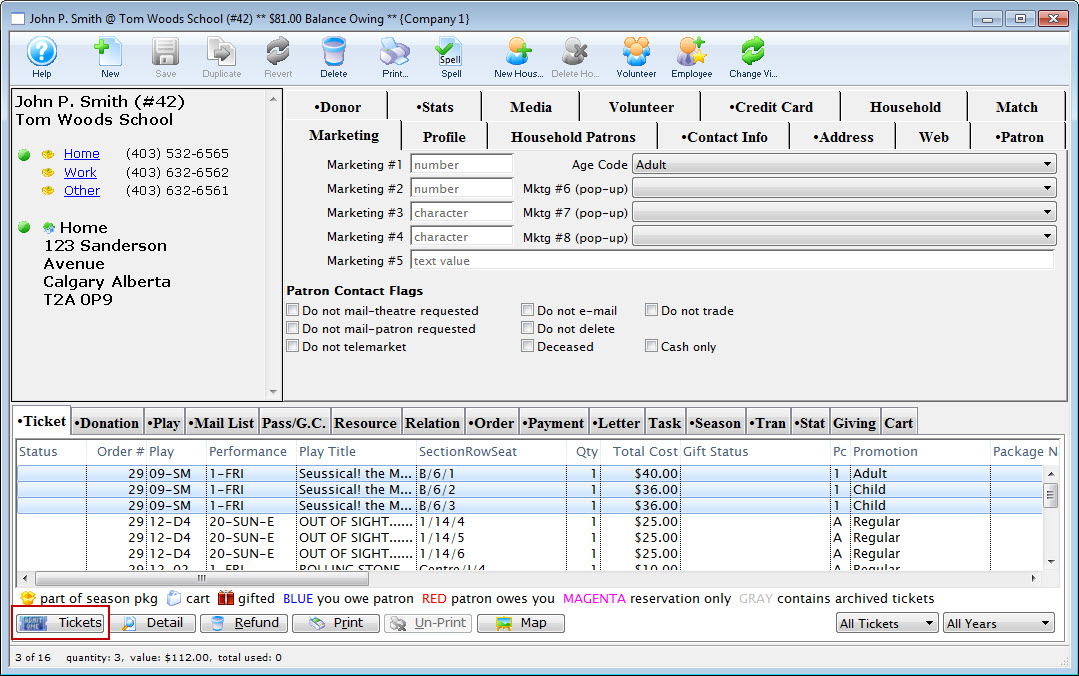
- Highlight the tickets that require the price change.
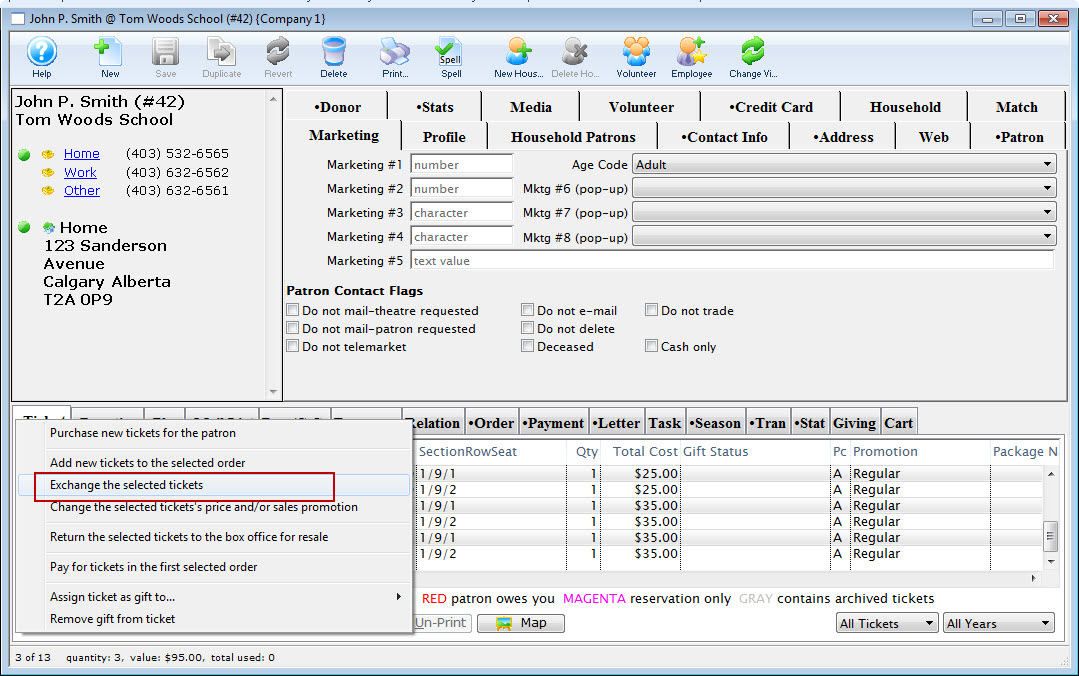
- Click the Tickets button.
- Select "Change the selected ticket's price and/or sales promotion" from the pop up window.
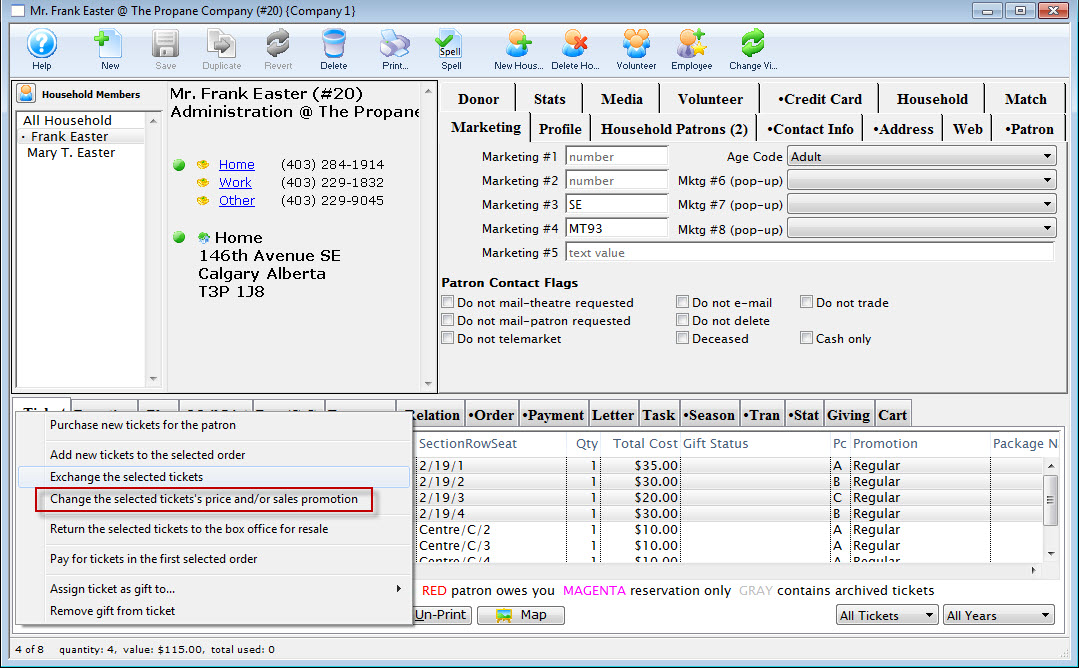
The Seat Selection window opens and the selected tickets are highlighted in the right-hand bottom corner section of the window.
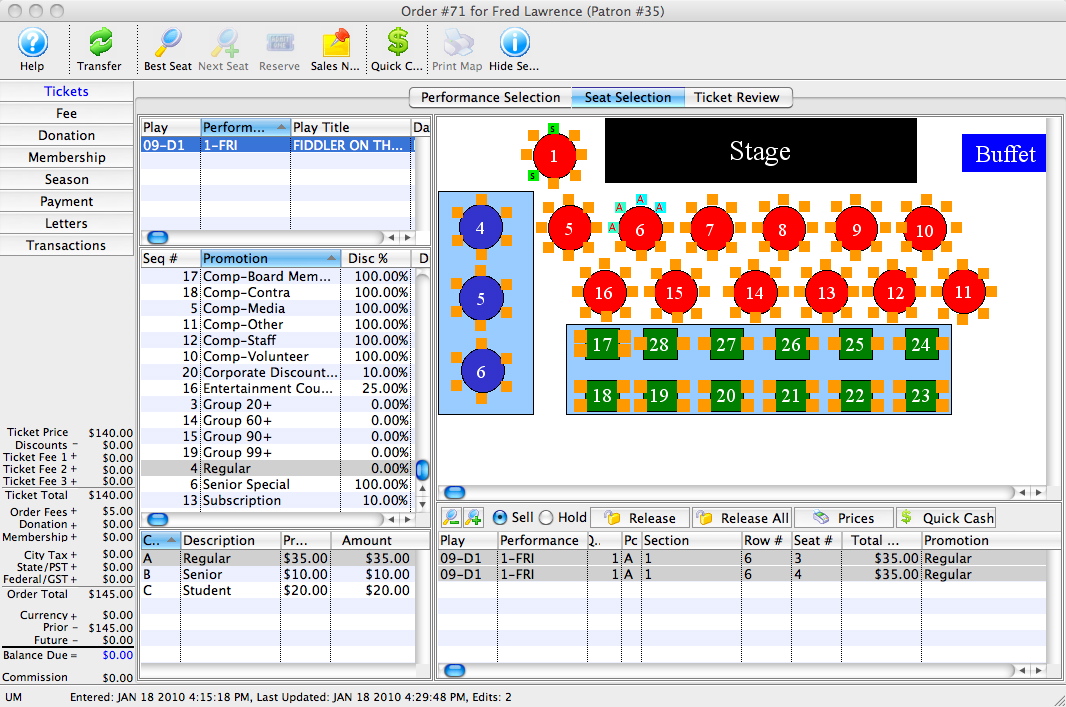
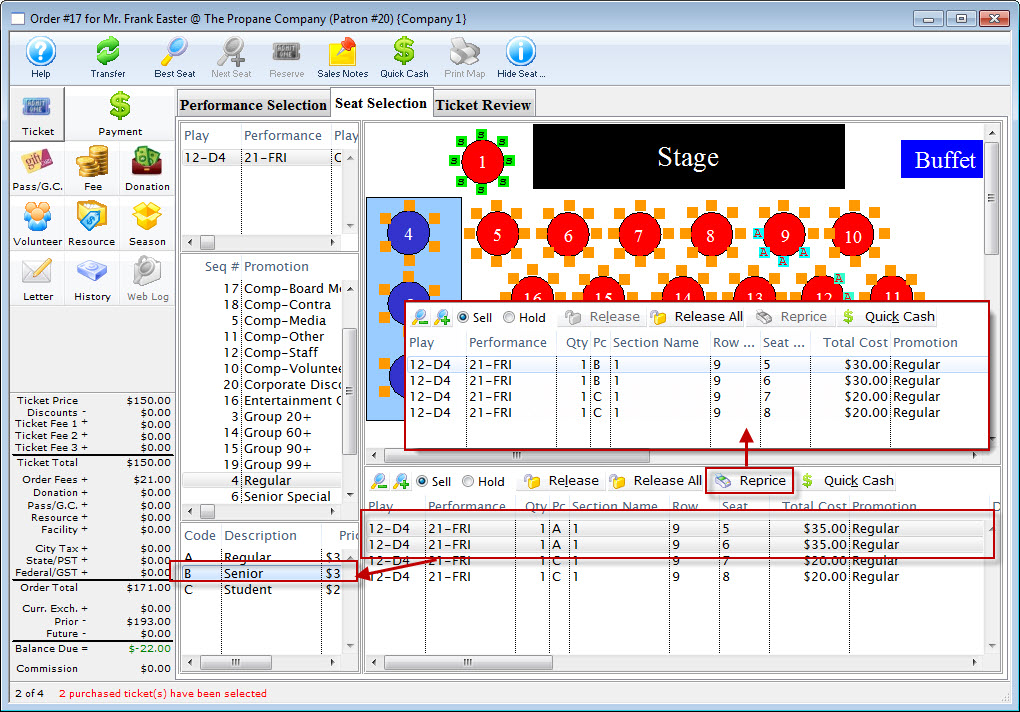
- Select the Promotion and/or Price Code you wish to change the tickets to on the left-hand side of the screen.
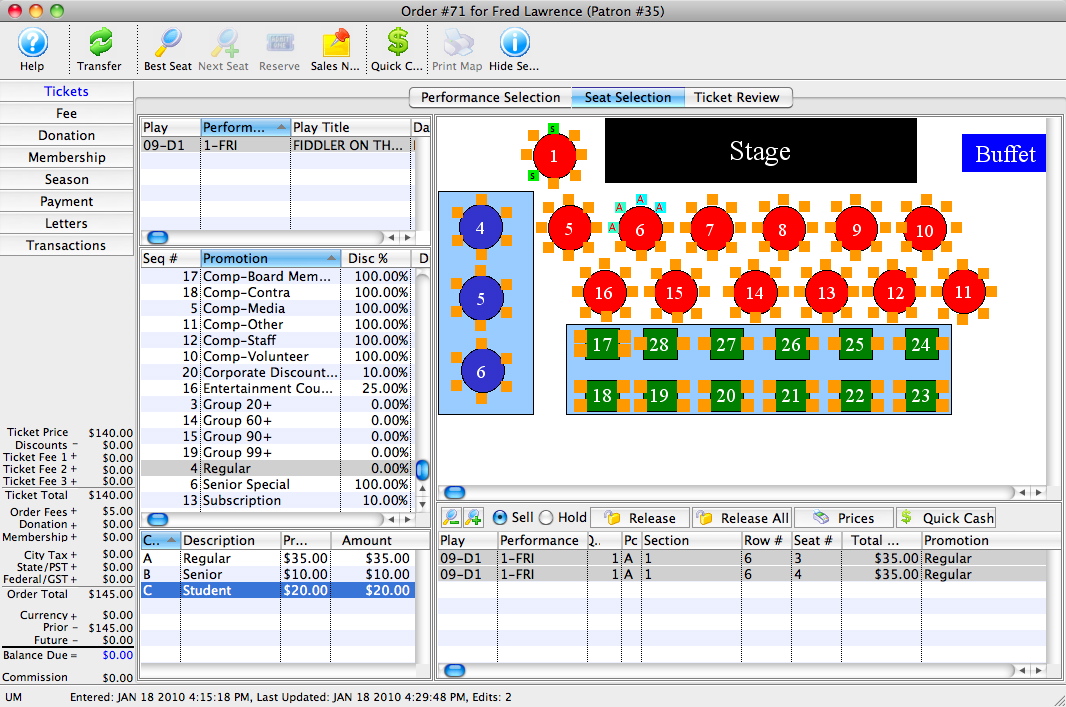
- Click the Prices
 button.
The prices of the tickets will change based on the Promotion and/or Price code you selected in the previous step.
- Click on the Payment button.
- Enter a Payment method to either collect or refund the price difference on the tickets.
Exchanging Hints
Techniques to Reduce Errors during Exchanges
Errors can occur during a ticket exchange when:
- The differences in the price of the original ticket and the replacement ticket is not collected or refunded correctly.
- The amount not refunded or collected is waived by Theatre Manager. Click here for more information on Waived Amounts.
- The ticket base price and sales promotion for the replacement ticket does not match the ticket base price and sales promotion of the original ticket.
It is recommended to:
- Use the Quick Exchange process for festival ticket exchanges when there is no difference in the price of the original tickets and the replacement tickets.
- Turn off automatic waiving to prevent accidental waiving of the difference between the price of the original tickets and the replacement tickets when an incorrect replacement ticket was purchased.
Use Quick Exchange
Quick exchange is a fast exchange procedure that automatically applies the same price and sales promotion on a replacement ticket as was on the original ticket.
- When the original ticket and the replacement ticket are not of the same value a warning appears indicating there is a difference in ticket values.
- The operator is not required to select the price code or the promotion code during the exchange.
- The price and promotion code on the original ticket is automatically applied to the replacement ticket.
- The operator can cancel the Quick Exchange and complete a regular exchange, if required.
- If quick exchange is used and an amount is accidentally waived, a regular exchange can be used to reverse the waived amount.
Turn Off Automatic Waiving
Turning off automatic waiving requires the employee to decide if any difference between the original tickets and the replacement tickets is to be refunded or collected. Select both checkboxes to collect money for higher priced tickets and to refund money for lower priced tickets.
To examine the current settings:
- Access to the Company Preferences is through the Setup menu.
- Select the Box Office tab.
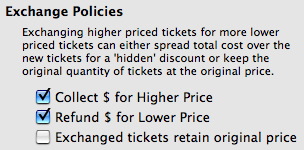
When the settings for Collect $ for Higher Price and Refund $ for Lower Price are deselected, the price difference in the exchange process is automatically waived. Change the setting to allow the employee to decide to waive, collect, or refund the price difference in the exchange.
| The following quick reference information is available for Exchanging or Refunding Tickets |
Reference Guide (pdf) |
Cheatsheet (pdf) |
Flash ScreenCast |
MP4 ScreenCast |
Ticket Sales - Uneven Exchange
An uneven ticket exchange is when the number of tickets that are being exchanged 'from' is less then the number of tickets that are being exchanged 'to'. This can occur if a patron is exchanging 2 tickets for a HIGH priced night into a LOW priced performance, and also request an additional ticket for their friend at the same time.
Exchanging higher priced tickets for a greater quantity of lower price tickets can cause Theatre Manager to either:
- Spread the total cost over the new tickets for a 'hidden' discount
-or-
- keep the original quantity of tickets at the original price and charge more for the additional tickets.
If the 'hidden' discount is not what the organization want to happen and the organization would like the patron to pay the full purchase price for the additional ticket, there is a setting in the Box Office Tab of Company Preferences that allows exchanged tickets to retain original prices when performing an uneven ticket exchange.
The following table shows examples of what Theatre Manager will do if the flag is OFF (cost is spread over new tickets) or ON (tickets retain original price). The results vary depending on the settings for 'Refund $ for lower priced tickets' and 'Collect $ for higher priced tickets'
| Scenario | Examples | Retain original Price Flag | Refund $ for lower priced tickets | Collect $ for higher price tickets | Result |
|---|---|---|---|---|---|
| Waive price difference for more lower priced tickets | 2 HI @ $50 for 3 LOW @ $30 | OFF | OFF | n/a | Patron pays nothing.
The the cost is spread over new tickets. The Patron pays $0.00 for the
additional ticket purchased. In effect, the price difference is 'waived'
between the 3 tickets ($10.00 price difference / 3 tickets = $3.33
additional per ticket). Transactions generated are:
|
| Waive price difference for higher priced tickets | 2 LOW @ $50 for 2 HI @ $60 | OFF | n/a | OFF | The patron pays $0.00 for the additional ticket purchased. In effect, the price difference is
'waived' between the 2 tickets ($20.00 price difference / 2 tickets =
$10.00 less per ticket). Transactions generated are:
|
| Collect price difference for more lower priced tickets | 2 HI @ $50 for 4 LOW @ $30 | OFF | n/a | ON | Patron pays $20.00 for the price difference. In this case, because the "Exchange tickets
retain original price" is turned OFF and the total $ value of the tickets
purchased is higher than the returned tickets, the patron is just paying
the total difference between the original and new tickets. Transactions
generated are:
|
| Refund price difference for lower priced tickets | 2 HI @ $50 for 2 LOW @ $30 | OFF | ON | n/a | Patron gets a refund of $40.00. The patron gets a refund for the difference between the
original priced tickets and the new tickets. Transactions generated
are:
|
| Collect price difference on all higher priced tickets | 2 LOW @ $50 for 3 HI @ $60 | n/a | n/a | ON | Patron pays $80.00. The patron just pays the price difference for the two higher priced tickets, plus the additional ticket. The flag "Exchange tickets retain original price" has no effect as the new
tickets are higher priced than the original tickets. Transactions
generated are:
|
| Collect only for new additional ticket | 2 HI @ $50 for 3 LOW @ $30 | ON | n/a | ON | Patron pays $30.00. The original ticket values of $50.00 each is transferred to the new tickets and the patron just pays for the additional ticket. The flag "Exchange tickets retain original price" does have an effect as the new tickets are were originally at a lower price than
the original tickets. Transactions generated are:
|
Click here, to view the above table in a printable pdf file.
When does "Exchange Tickets retain original price" have an effect?
The following conditions must be true:
- The flag "Exchange tickets retain original price" must be ON.
- The total number of new tickets must be greater then the number of original tickets exchanging 'from.'
- No 'waiving' of $ Refund or $ Collect must be taking place.
- All new tickets must each have a quantity of 1 (i.e. no group festival tickets).
- There must be at least one ticket price 'lower or equal to' in the original tickets than the new tickets being purchased.
|
When on the payment window, if the organization chooses to 'waive' the price difference for any reason (i.e. not to refund $ or not to collect higher $), then the "Exchange tickets retain original price" flag is ignored. Theatre Manager will revert to the standard calculations of 'waiving' $ based on evenly distribution between all of the tickets that have a $ total cost associated with them (i.e. excluding complimentary tickets) |
How does Theatre Manager know which new tickets to 'retain original price' when doing an uneven exchange?
Theatre Manager will prompt the user with a list of the new tickets the patron has just purchased asking the user to choose the tickets that the organization wants to have retain the original price.
Can an uneven exchange to 2 or more different events be done at one time?
Yes. However, the user may only wish to do this if all the ticket prices between the performances are the same. For example:
- Event A - $40.00
- Event B - $50.00
Then the patron made a ticket exchange and bought an extra ticket for:
- Event A - $40.00
- Event A - $40.00
- Event B - $30.00
Theatre Manager would indicate that this is an 'uneven ticket exchange' and ask the user to select the 2 tickets that should 'retain the original price'. The user would select:
- Event A - $40.00 *** selected ***
- Event A - $40.00
- Event B - $30.00 *** selected ***
After all the processing the ticket value on for tickets would end up like:
- Event A - $50.00
- Event A - $40.00 - this one does not change as it was not *** selected ****
- Event B - $40.00
The ticket cost for Event A and Event B have been reversed. This is because during the processing, Theatre Manager will 'retain the original cost' as closely to the 'original cost' as possible. Meaning, the NEW ticket with lowest price, will get the lowest price of the original set of tickets. Then the next NEW ticket with the lowest price will get the next lowest price of the original set of tickets, and so on.
In this case, doing an uneven exchange involving different events at the same time is not recommended unless all of the ticket prices are the same. If this is happening, it is then recommended to do each set of tickets for each event separately to ensure that the ticket revenue gets allocated to the proper event.
Exchanging tickets when the new tickets involve complimentary ($0.00 valued) tickets
When complimentary tickets are involved in a ticket exchange and there is 'waived' revenue in effect, Theatre Manager will automatically ignore using those complimentary tickets in the evenly distribution of the 'waived' revenue between the tickets. Only the tickets that have a $ value, will be used in the 'waived' revenue reallocation.
However, if all the new tickets are complimentary (i.e. exchanging from 2 priced tickets to 2 complimentary tickets) then Theatre Manager will use all of the complimentary tickets in the 'waived' revenue allocation. As a result, all the complimentary tickets will have revenue allocated to them.
Full Ticket Exchange
Full Exchange gives the user full control over the entire procedure. In effect, the patron is purchasing new tickets to replace the selected tickets. At any time throughout the process, the user can back out from performing the exchange and the original tickets will still be sold to the patron. To perform a full ticket exchange, you perform the following steps:
- Find the patron wanting to exchange tickets.
Click here to learn how to find patrons.
- Highlight the tickets to be exchanged.
- Click the Ticket button and select Exchange the selected tickets.
The Select Plays Window will open allowing the creation of a Buy List.
- Select the list of performances that the patron is going to exchange
the tickets for.
Click here to learn how to create a Buy List.
- Click the Seat Selection tab.
The Ticket Sale Window will open with the information for the selected performance.
- Select the tickets that the patron wants to exchange the original tickets
for.
The red seats indicating the location of the previous seats.
Click here for more information on Festival seating. Click here for more information on Reserved seating.
- Click the Ticket Review tab.

- Click the Confirm
 button to
complete the ticket exchange.
button to
complete the ticket exchange.
The tickets that the patron is exchanging will appear with a red minus symbol and the new tickets will appear with a green plus symbol.
- Click the Payments button.
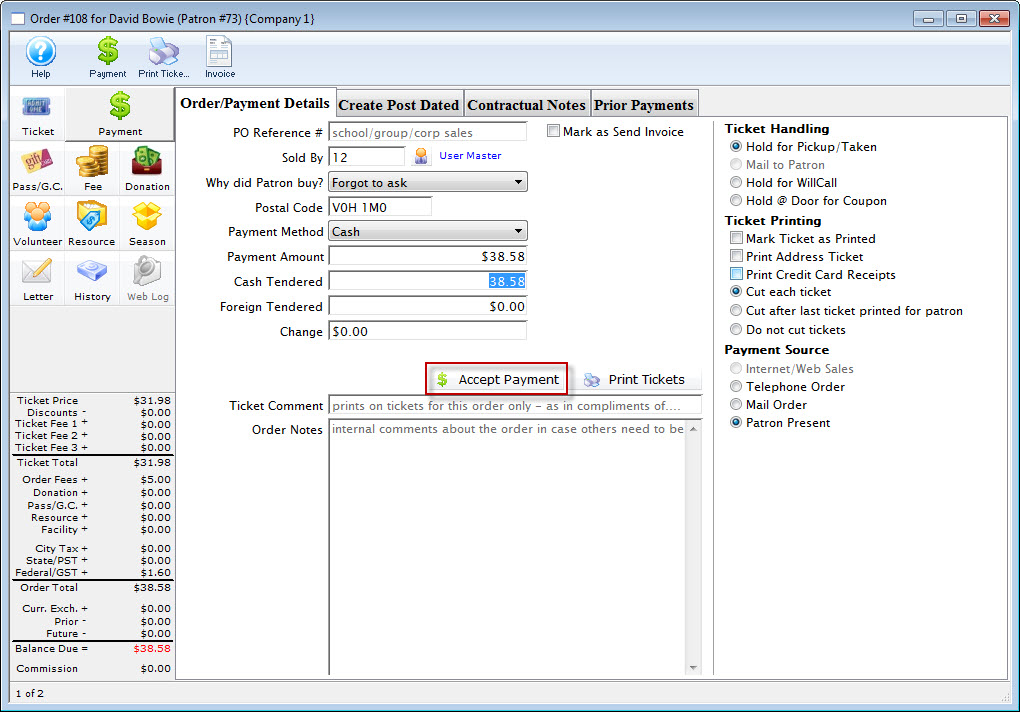
Click here for more information on creating a payment. In the example the patron owes $32.10 to cover the upgrade of the exchanged tickets.
- Click the Accept Payment
 or
Print Tickets
or
Print Tickets  button.
Clicking Accept Payment will finalize the exchange while clicking Print Tickets will finalize the exchange and print the new tickets. The original tickets will be returned to inventory if either button is clicked which allows them to be purchased again.
| The following quick reference information is available for Exchanging or Refunding Tickets |
Reference Guide (pdf) |
Cheatsheet (pdf) |
Flash ScreenCast |
MP4 ScreenCast |
Past Event Ticket Exchange
Exchanging tickets from a past event to a future event is similar to a full exchange. The Full Exchange process gives you full control over the entire procedure. In effect, you are purchasing new tickets to replace the tickets about to be exchanged. At any time throughout the process, you can back out from performing the exchange and original tickets will still be sold to the patron.
To create a past event ticket exchange for a patron, you perform the following steps:
- Find the patron you are exchanging the past tickets for.
Click here to learn how to find patrons.
- Highlight the tickets to be exchanged.
- Click the Ticket button and select Exchange the selected tickets.
A warning dialog opens.
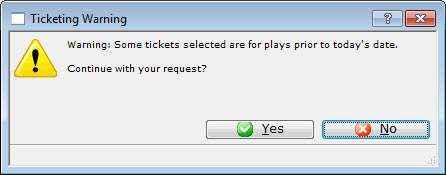
-
Click the Yes
 button.
The Select Plays Window opens to locate the Play you are exchanging to.
- Select the list of performances the patron is going to exchange the tickets for.
Click here to learn how to create a Buy List.
- Click the Seat Selection tab.
The Ticket Sale Window opens with the information for the selected performance.
- Select the tickets that the patron wants to exchange the original tickets for.

Red seats indicate the location of the previous seats.
Click here for more information on Festival seating. Click here for more information on Reserved seating.
- Click the Ticket Review
 tab.
tab.
- Click the Confirm button to
complete the ticket exchange.
The tickets the patron is exchanging will appear with a red minus symbol and the new tickets will appear with a green plus symbol.
- Click the Payments button.
Click here for more information on creating a payment. In the example the Patron owes $32.10 to cover the upgrade of the exchanged tickets.
- Click the Accept Payment
 or
Print Tickets
or
Print Tickets  button.
Clicking Accept Payment will finalize the exchange while clicking Print Tickets will finalize the exchange and print the new tickets. The original tickets will be returned to inventory allowing them to be purchased again.
| Quick reference information for Past Event Ticket Exchange |
Flash ScreenCast |
MP4 ScreenCast |
Waived Amounts
During a ticket exchange if the difference between the price of the original ticket and the replacement ticket is not collected or refunded, it is deemed that the amount difference is "waived." This may occur if a patron has a weekend ticket and exchanges for a less expensive weekday performance or if a patron has less expensive weekday performance and upgrades to a weekend performance.
Usually, the difference is not refunded when the new ticket costs less and the difference is collected when the replacement ticket is more expensive. The difference in prices may not equal since the value of the original ticket's base price or sales promotion is different than the replacement ticket's base price or sales promotion. In most cases, it is caused from the base price being different.
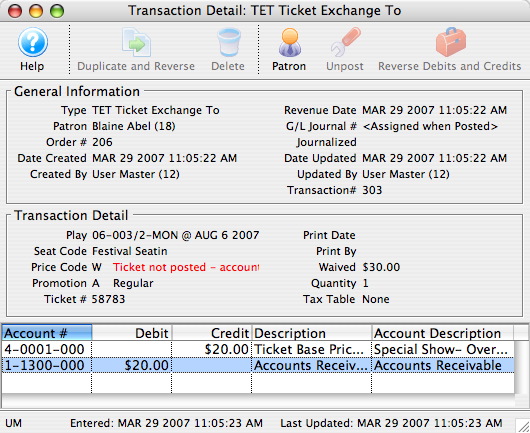
The transaction detail for a ticket exchange displays the waived amount for each individual ticket. The value displayed for the waived amount excludes taxes. A negative waived amount indicates revenue which was not refunded to a patron. A positive waived amount indicates revenue which was not collected from a patron.
Ticket revenue reports general ledger revenue reports display the actual revenue collected from the original sale. The general ledger revenue is not affected by waived amounts because the amount is not actually paid to or collected from patrons.
If the original ticket price was $20.00 and the patron exchanged the ticket for a $50.00 ticket thus waiving the $30.00 difference, the ticket price for the replacement ticket will be $20.00 and the general ledger will also indicate $20.00 was received as revenue. Even if the patron chooses to purchase a less expensive ticket, the end result is that the patron paid $20.00 for the ticket.
Waived amounts do not need to be created during an exchange. If the difference in price between the original ticket and the replacement ticket (the amount that would have been waived) is not going to be refunded or collected, enter the amount due as an exchange fee (positive or negative). The amount that would have been waived is then classified as an exchange service charge. The net amount could then be tracked in the exchange service fee general ledger account and maintains the amounts not refunded or collected from patrons. If actual exchange service charges are collected from patrons, this amount would also be accumulated within the same general ledger account.
Adding/Exchanging/Refunding Social Distance Tickets
- the initial ticket sale
- adding tickets to the current order (to add more adjacent tickets while preserving the existing tickets in the order)
- or refunding a ticket to remove the ticket from the order
If it is not possible to add a ticket to the order, you can always refund the tickets and purchase again in the same order to move the patron to a different location.
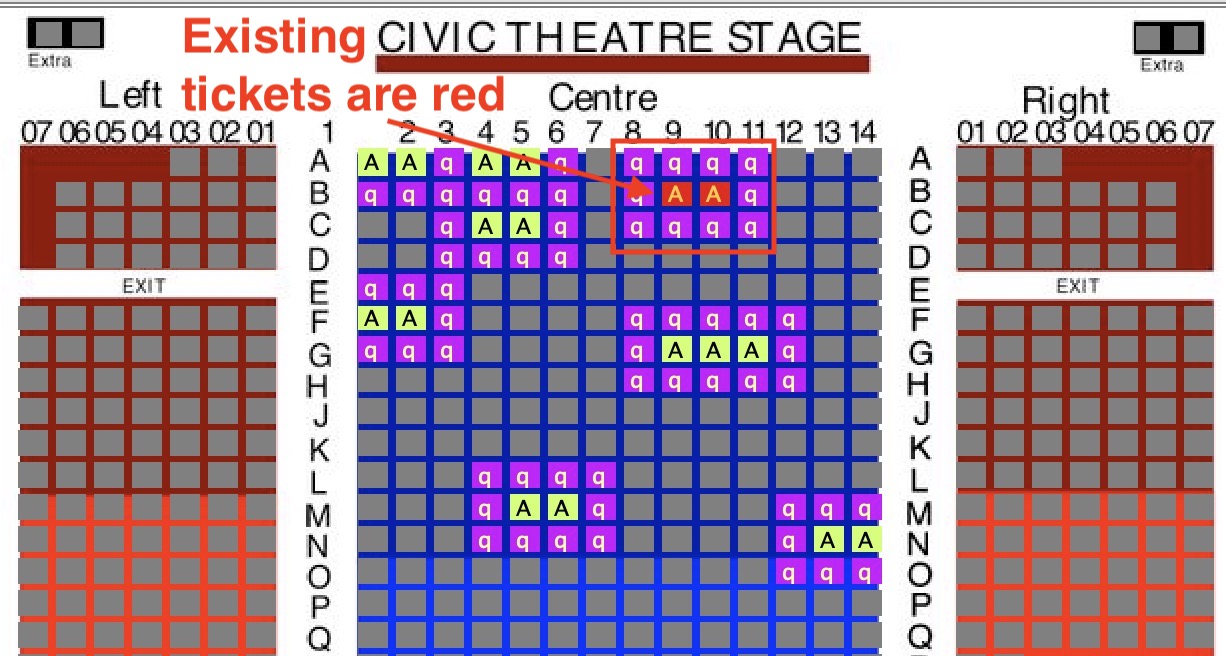
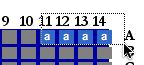
Example of adding tickets to an existing social distance order
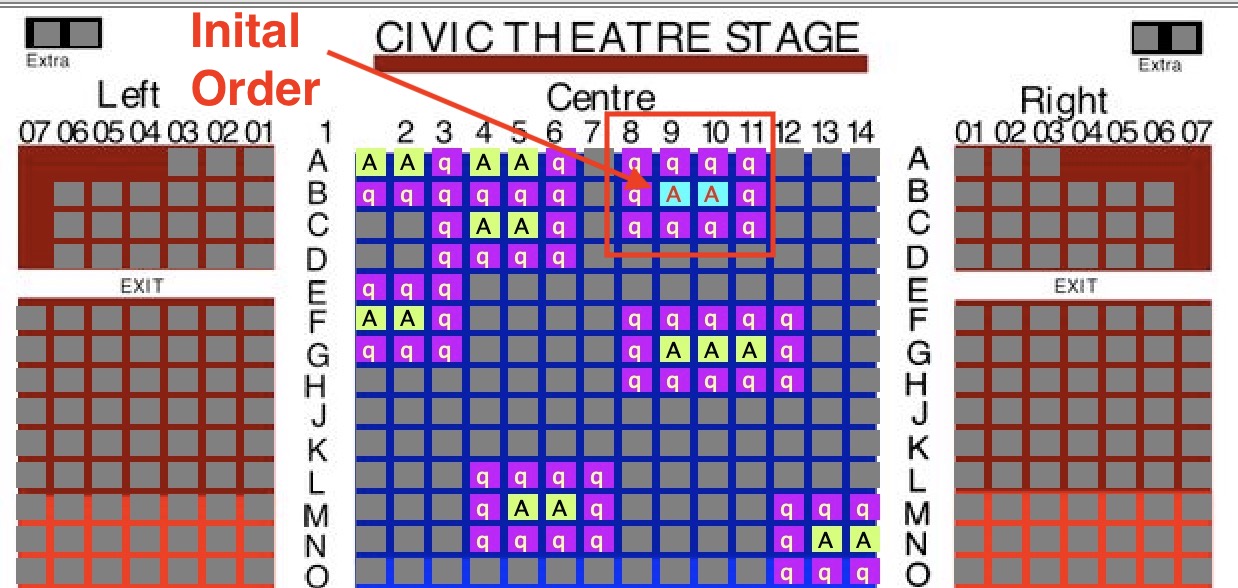
Using the example (to the right), it shows the original purchase that a patron made for tickets in a socially distanced venue. They have:
- Seats B9 and B10 sold to them in the front centre of the venue
- Social distance holds all around those seats that were created by Theatre Manager
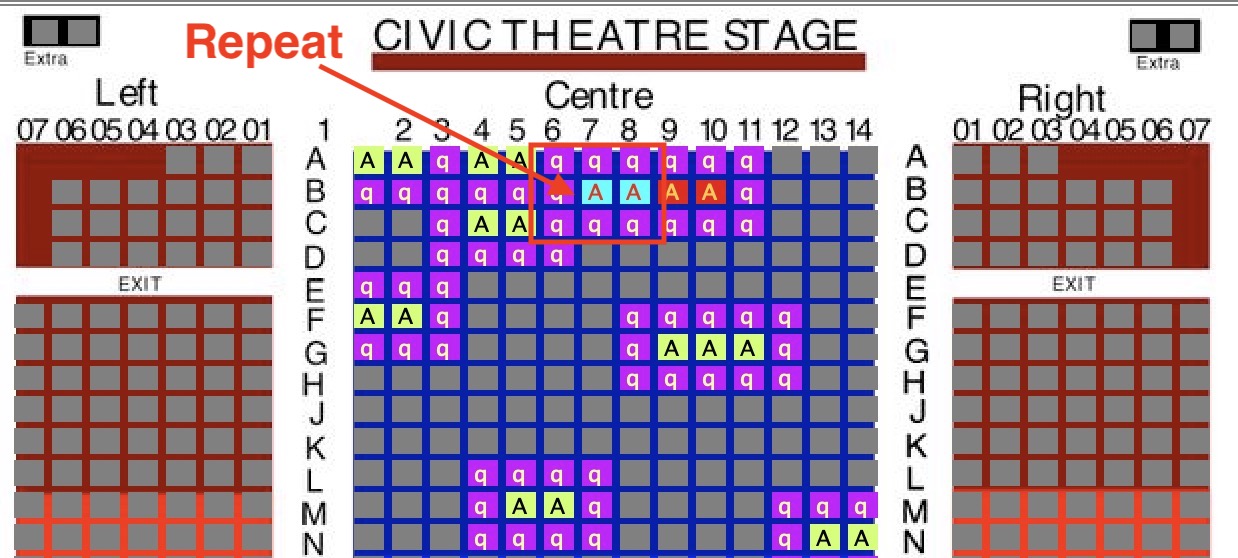
Highlight the seats on the order
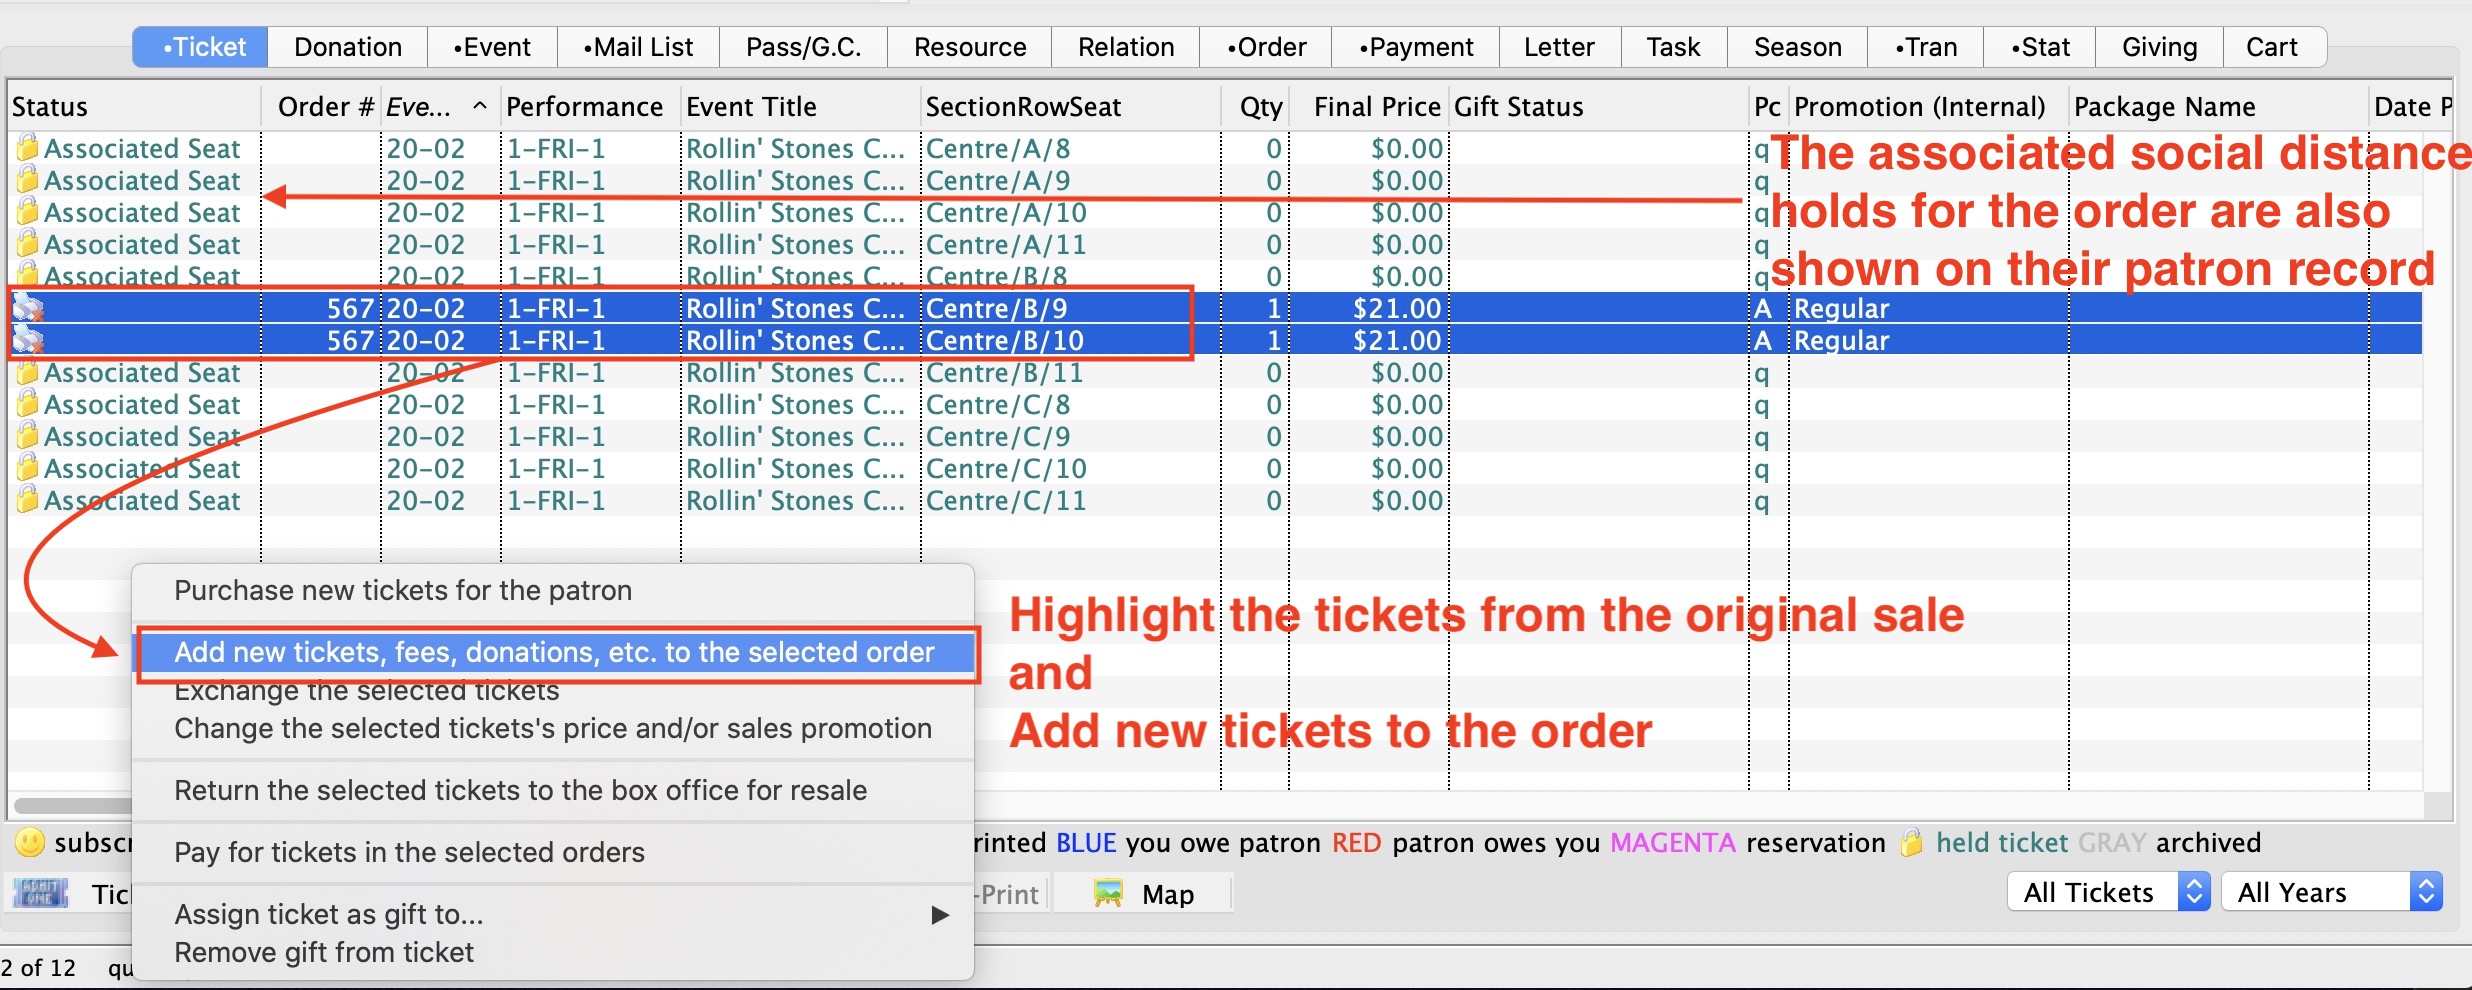
If the patron calls in and asks to add a ticket o the order, you do the same thing as you normally would:
- Highlight all the tickets that are in the order (see above image)
- Click the tickets button
- Select Add tickets to order from the drop down menu
- and when the list of events is shown, make sure to pick the same performance
Hold down the Command (on Mac) or Control (on PC) Key and click the social distance hold that belongs to the patrons order - this will be the seat that you add to the order.

Repeat for as many additional tickets as the patron requires. The social distance seats will be extended. If you make a mistake and want to release the additional tickets and start over, just release the unwanted ticket by:
- Double clicking on it
- using the release or release all buttons at the bottom of the map
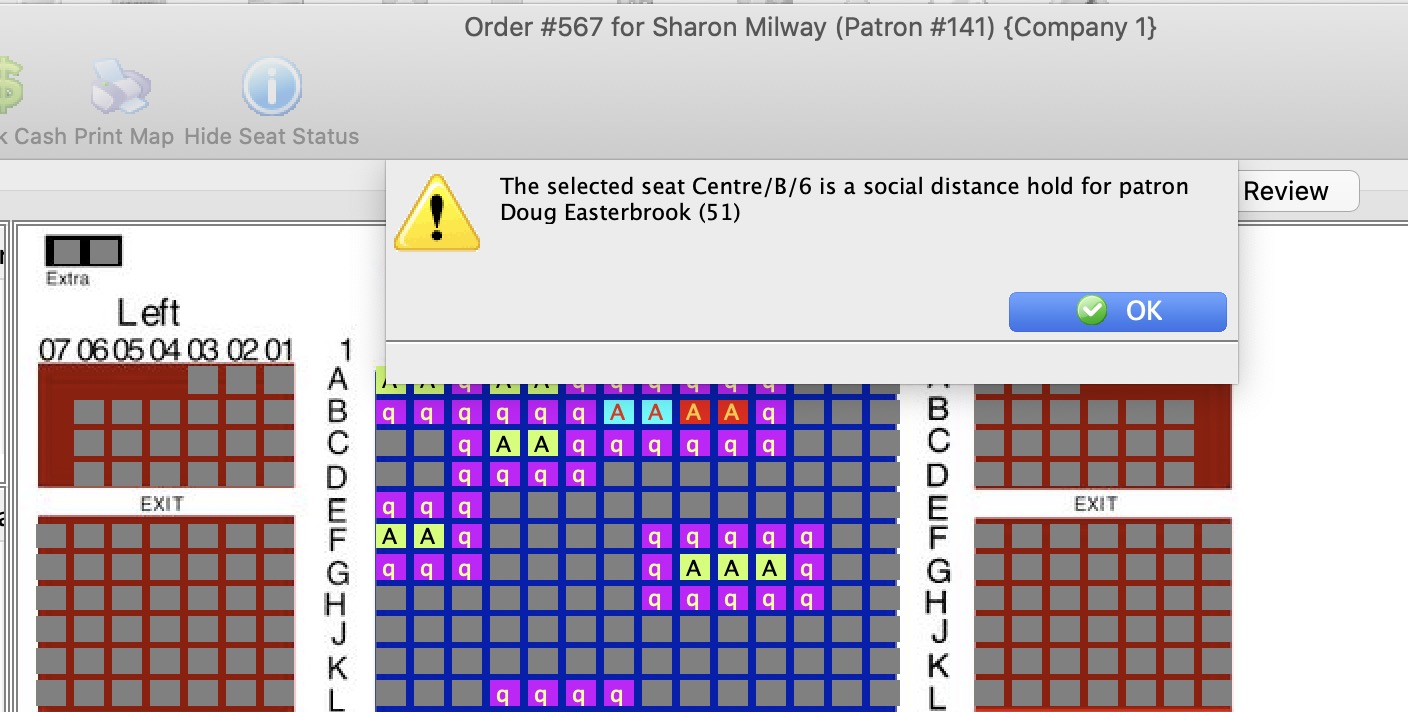
Overriding Social distance seats that cause a conflict
If you try to take some social distance seats that cause a conflict, you will be informed that the seats belong to some other patron's bubble and you will not be able to have those seats.
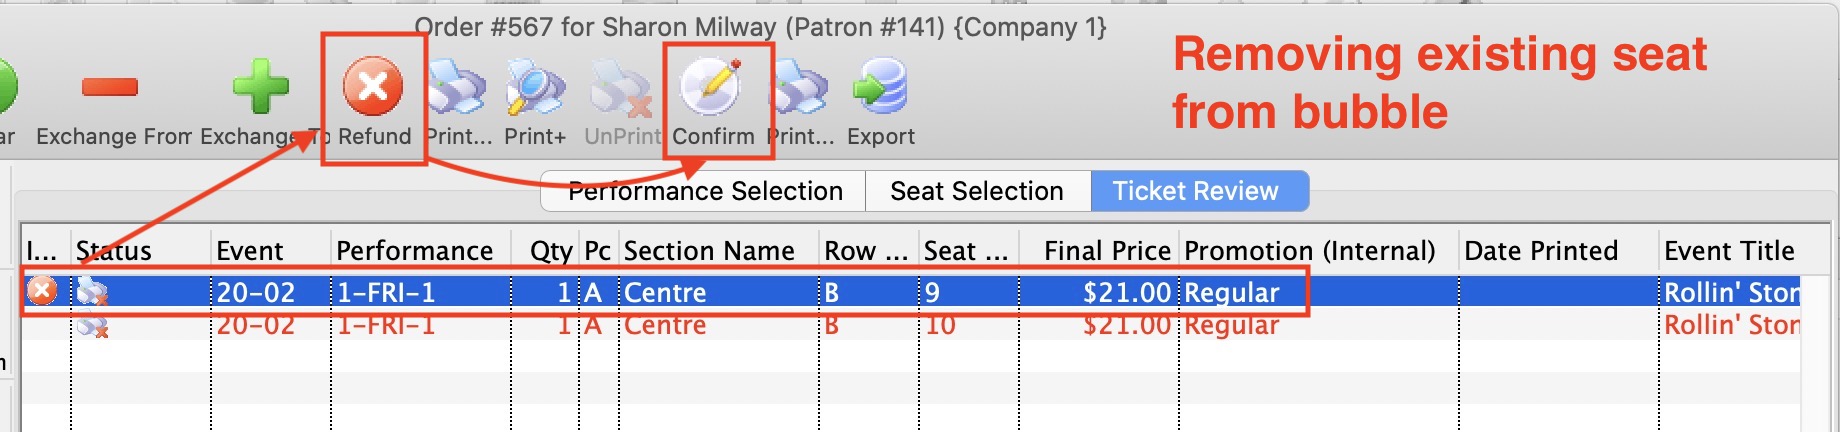
What about removing a social distance seat from the bubble
Removing a social distance seat is also easy. In the confirmation window, you can simply mark one or more seats as 'refund' and confirm them. Those seats will be removed from the order and the social distance bubble with other seats will be maintained.
Example: If the patron had 3 seats and wanted to add one and move over 1 seat, then you would:
- Add two seats one one side of the order (the patron now has 5 tickets)
- on the confirmation window, remove one of the original edge seats (they will now have 4)
- the final result is what you wanted, 4 tickets and moved over one
Gifting Tickets
Gifting Tickets During Purchase
Tickets can be gifted to another household member or another patron during the initial ticket sale. To gift a ticket, you perform the following steps:
- Add or select the purchaser in the database.
Click here for information on finding a patron in the database.
- Select the "Buy Tickets" option.
- Pick the Performance in the Performance Selection tab.
- Choose the seats in the Seat Selection tab.
- In the Ticket Review Tab, highlight the ticket(s) to be gifted and right-click or control-click to bring up the Context Menu.
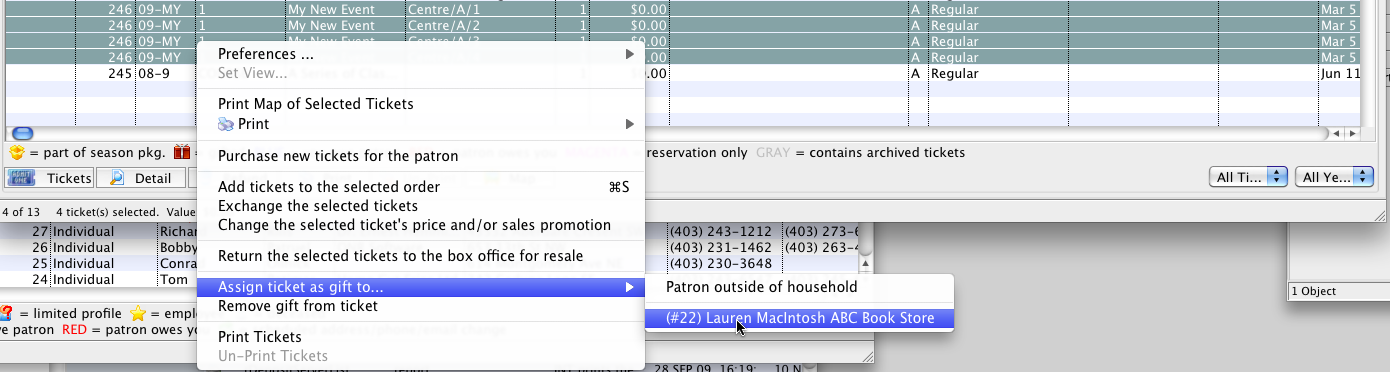
- Select "Assign ticket as gift to..."
You have the option to assign the tickets to household members or to a "Patron outside of household"
If you want to assign one ticket to one household member or patron and another ticket to a different household member or patron, you just have to do them one at a time.
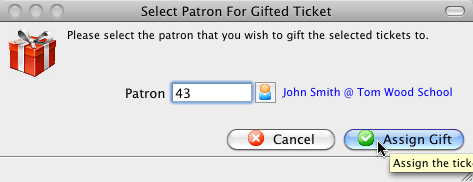
If you select a Patron outside of the household, a window opens to enter the patron number or use the lookup to find a patron in the database:
- Proceed to the Payment screen to finish the transaction.
| The following quick reference information is available for selling a Ticket |
Reference Guide (pdf) |
Cheatsheet (pdf) |
Flash ScreenCast |
MP4 ScreenCast |
Gifting Tickets From the Patron Window
- Select the patron who purchased the tickets from the database.
Click here for more information.
- On the Tickets Tab, highlight the ticket(s) to be gifted and right-click or control-click to bring up the Context menu.
- Select "Assign ticket as gift to..."
You have the option to assign the tickets to household members or to a "Patron outside of household"

If you want to assign one ticket to one household member or patron and another ticket to a different household member or patron, they have to be done one at a time.
If you choose a Patron outside of the household, a window opens for you to enter the patron number or use the lookup to find a patron in the database.
Viewing Gifted Tickets
There are multiple ways to view gifted tickets.
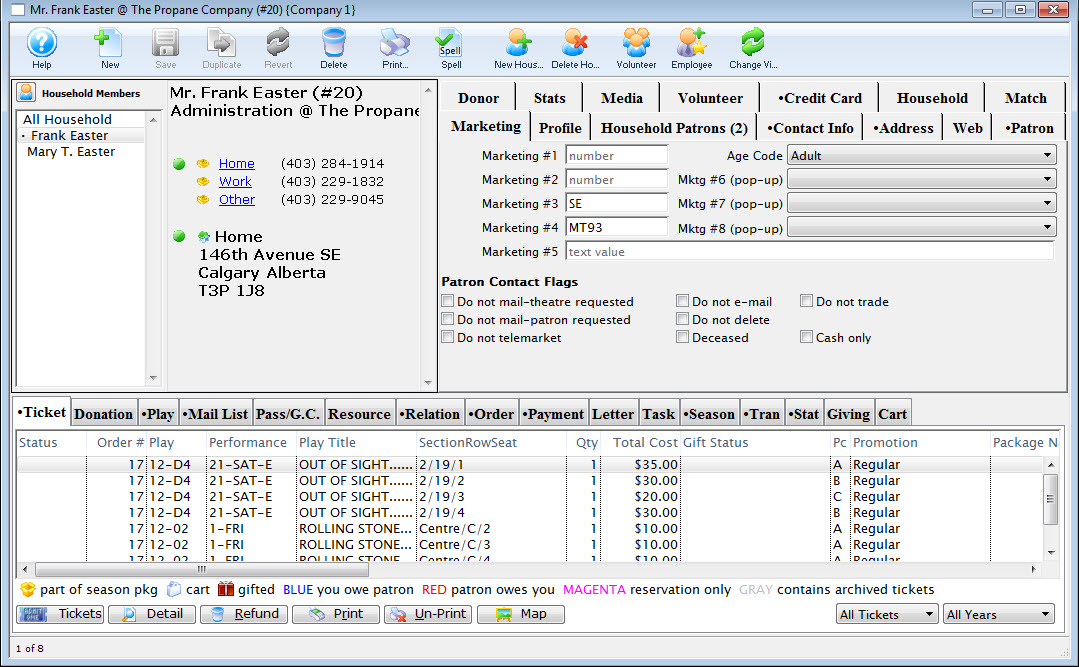
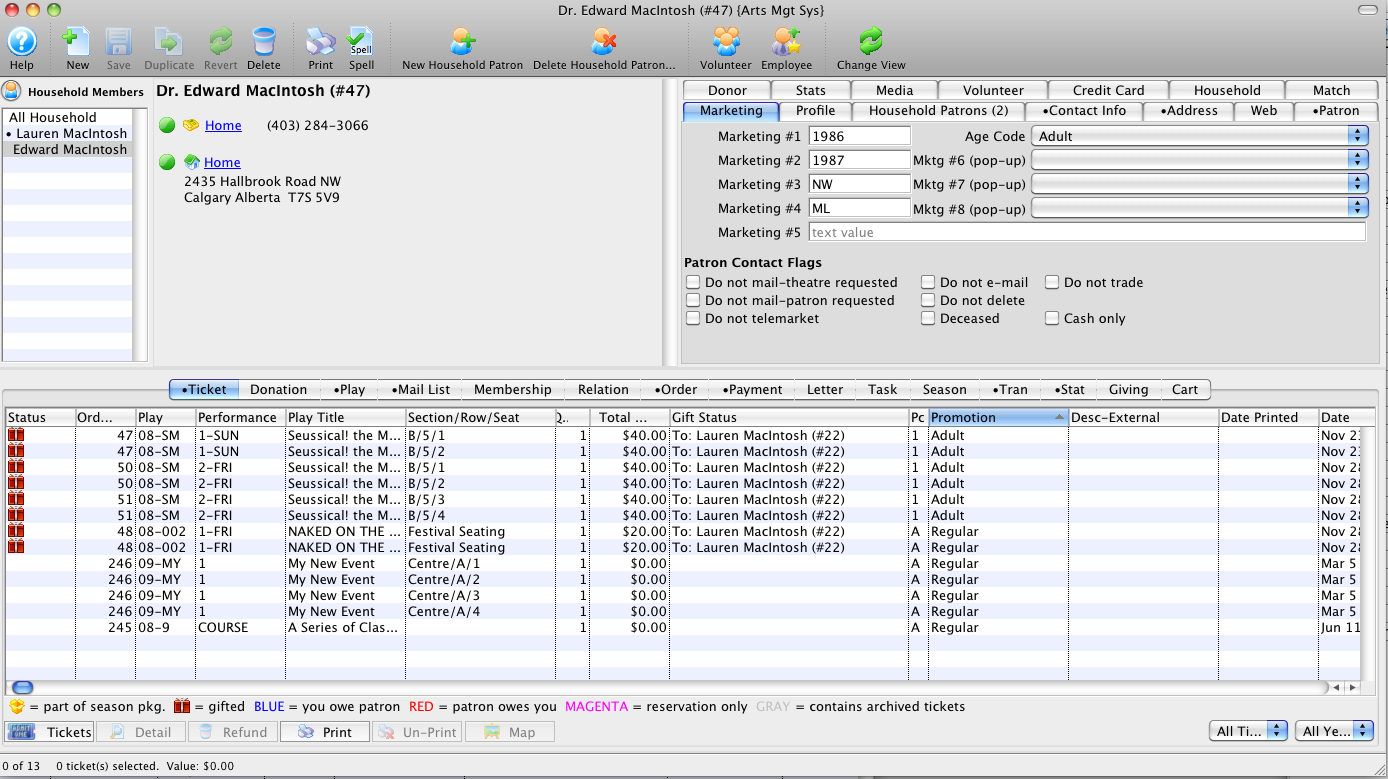
There is a column called Gift Status in the Tickets Tab of the purchaser's Patron Window that shows Gifted Tickets:
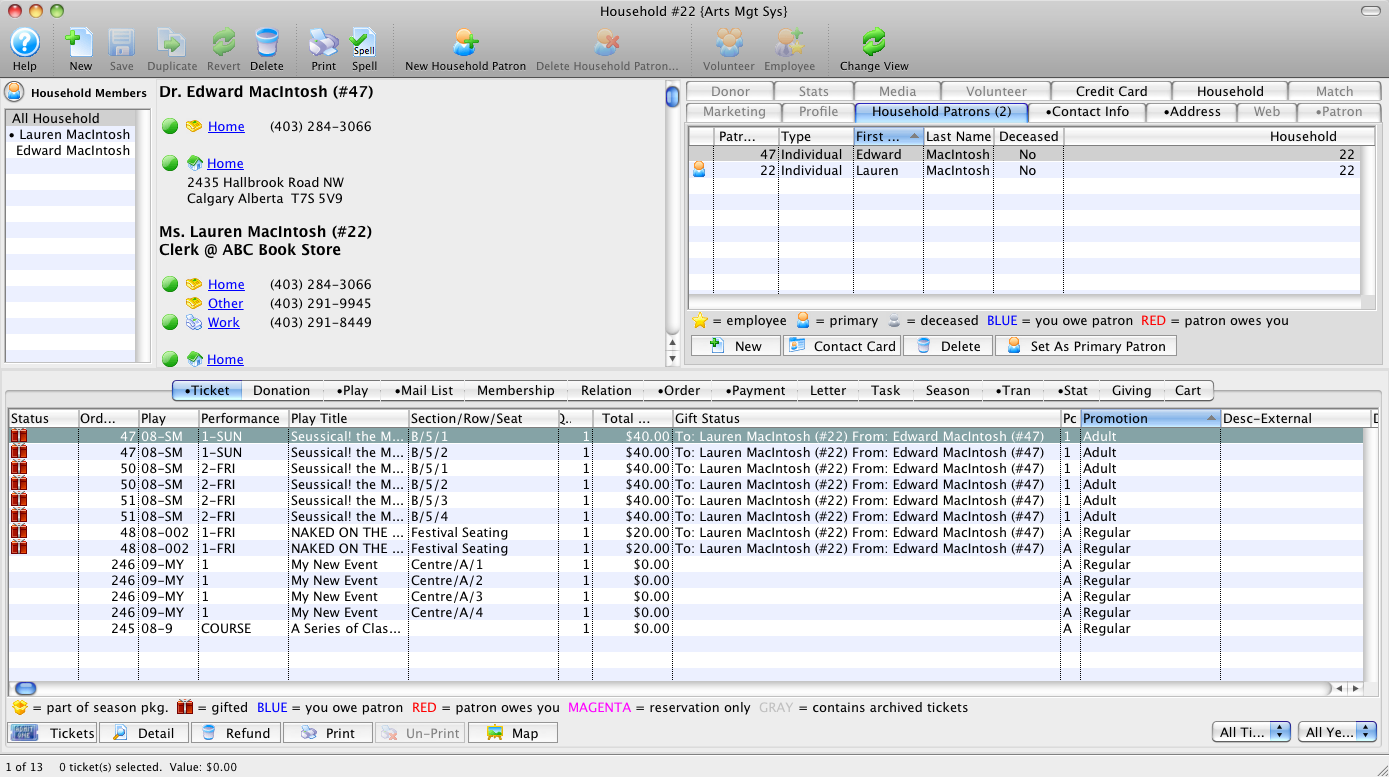
And the same column in the receiver's Patron Window shows:

The Household view shows more Gifted Tickets detail:
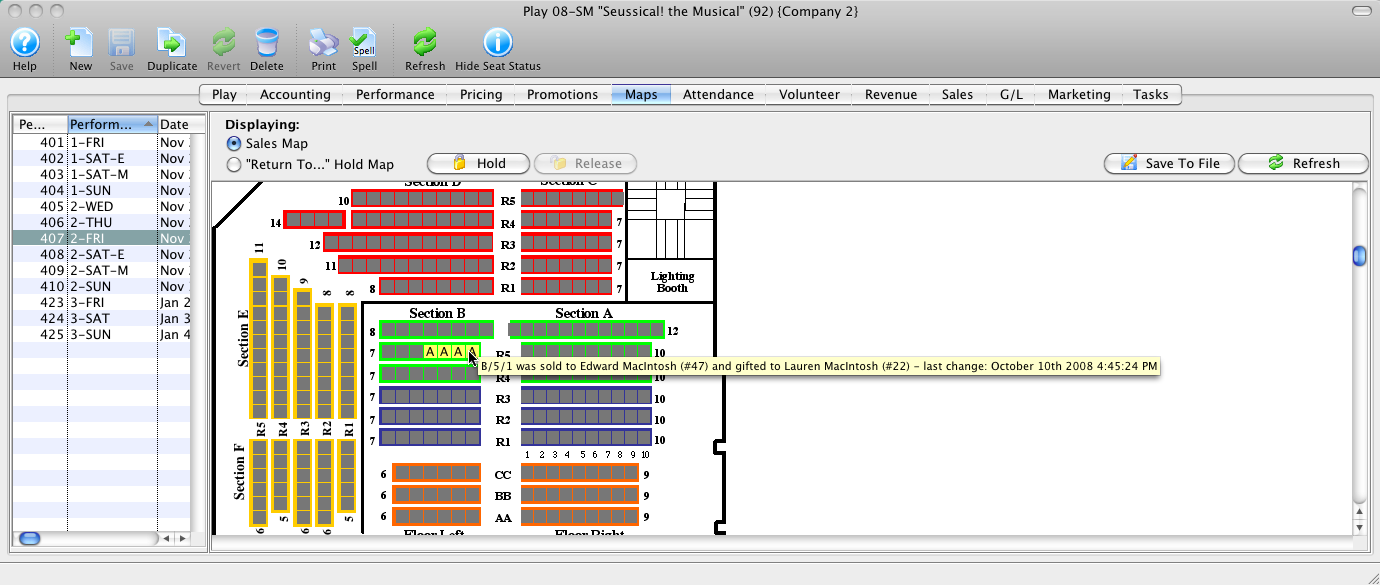
The Attendance Tab of the Play or Event Window will show the receiver's name and the gifted status:
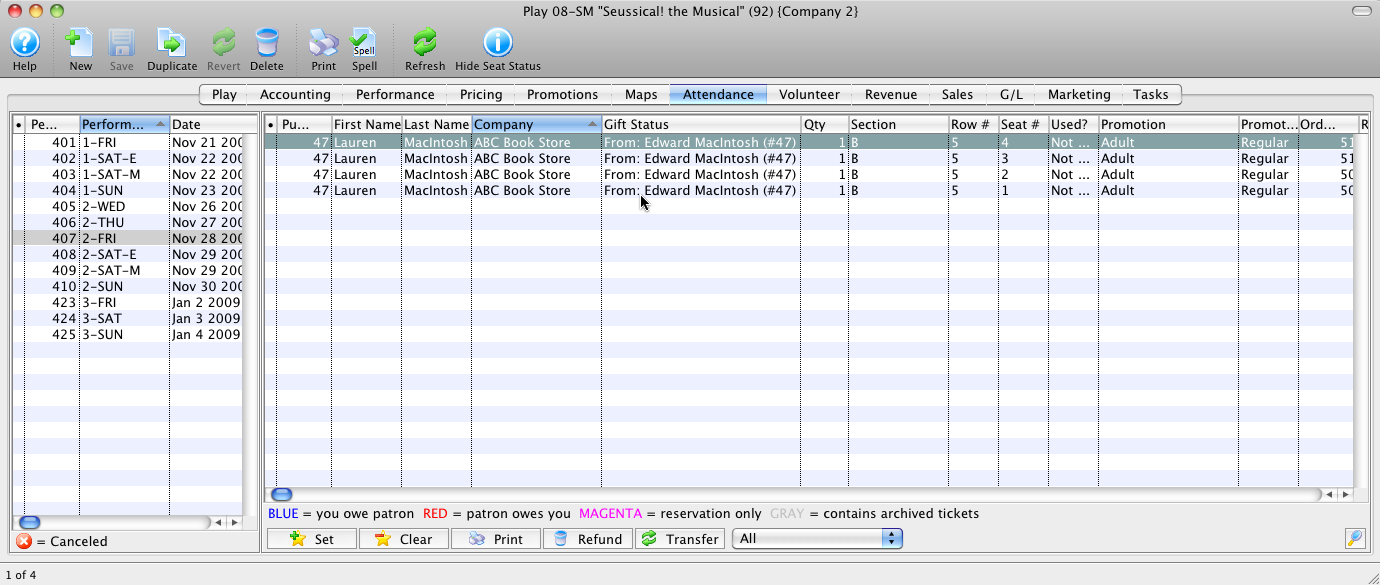
The Maps Tab of the Play or Event Window will show the Gifted Ticket status when the mouse hovers over the seats in question:
Holding Seats
You can place holds on seats based on performance or a group of performances. We recommend using this feature as an alternative to selling the seats to a specified house account. This process puts the tickets on hold and avoids creating transactions. Your revenue reports and ticket analysis reports will also reflect a truer status of the sales picture.
Rules for Holding Tickets
- There are privileges in the employee record indicating which hold codes they can hold or release. An employee who has this privilege, can hold and release any seats with those hold codes at any time. For more information, refer to Employee Settings-Box office tab
- There is a privilege which allows only releasing seats. If an employee has this privilege, they can release seats at any time from the Ticket Sales to Patron window or from the Plays Window.
- There is also a default setting for auto release of tickets prior to a performance. For example if this is set to 15 minutes then 15 minutes before the play the held seats will be released for general sale.
- There are three ways to hold seats for shows:
- While Selling tickets:
- While in Show setup on the Maps Tab
- During subscription setup where you want to hold all seats in events that pertain to subscriber seats
Rules for releasing seats
|
The return to hold process is designed around protecting subscriptions seats, development and other special holds - by making sure they go back to the hold they were originally set at. |
The following process is how Theatre Manager decides when to release a previously held seat:
- All seats track what the original hold code for the ticket, (if any).
- If a ticket is refunded, the seat is put back on the original hold (if there was one).
- If there was no original hold, then tickets are returned to hold according to the return to hold map settings
- If you manually remove the holds before selling a ticket:
- the ticket no longer has an original hold code and
- when refunded at the box office, it will be available for sale (subject to the return to hold on the pricing map)
Holding Seats for a Performance
Holding Seats for a Performance
There are several situations that may call for holding seats within a Performance.
- there are promoter, artist, media or complimentary tickets negotiated within the contract
- the venue requires house seats to assist with potential issues arising the night of the show
- sight lines prevent seats from being sold
- space is needed in the venue for a sound board, lighting board or video equipment
- seats in a particular section will be held and released based on demand or audience size
- social distancing is required
Holding Seats
- Find the event / play you want to hold seats for.
Click here to learn how to find an event / play.

- Open the event / play.
- Select the Maps tab.

- Highlight the Performance(s) on the left side of the window.
Should you need to hold seats for multiple performances at a time simply select multiple date/times from the list on the left side of the window.

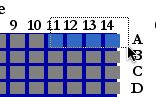
- Select the seats to be held.
Highlight the seats to be held by clicking and dragging the mouse over the seats. Multiple seats in different sections can be selected by holding down the Shift key on the keyboard. Selected seats will appear as a solid blue.

- Click the Hold button above the map.
Clicking the hold button will provide a menu of hold letters to choose from.

- Select the desired hold letter.

Once the hold letter is selected the seats will be held with that letter on the map for those performances selected on the left. All holds appear as lower case letters on the map. Changing the hold colour can be done in the Box Office tab of Systems Preferences by a Master User.

Holding Seats in the Order Window
Holding Seats in the Order Window
- Create a Buy List
Click here to learn how to create a Buy List. Once the Buy List is complete click Seat Selection tab
 in the Orders window.
Click here for a detailed description of this window and it's functions.
- Select the Hold option located below the map and above the basket were purchased seats appear.
- Select the seats to be held.
Selected seats will appear as a solid blue. Multiple seats in different sections can be selected by holding down the Shift key on the keyboard.

- Click the Hold button located to the right of the Hold option.
Clicking the hold button will provide a menu of hold letters to choose from.
- Select the desired hold letter.

Once the hold letter is selected the seats will be held with that letter on the map for those performances selected on the left. All holds appear as lower case letters on the map. Changing the hold colour can be done in the Box Office tab of Systems Preferences by a Master User.

Holding Seats for a Specific Patron
|
Any seat held for a specific patron will appear in their patron window on the ticket list - and you can book the seats from there. |
Holding Seats While Selling Tickets
To hold seats for a specific patron, while you are selling tickets, you perform the following steps:
- Create a Buy List
Click here to learn how to create a Buy List. Once the Buy List is complete click Seat Selection tab
in the Orders window. Click here for a detailed description of this window and it's functions.
- Select the Hold Option.
Select the seats to be held.
- Press the Hold <image hold button> button and select "Hold Seat
for Patron."

This will open an additional window letting the user set the parameters of the hold.
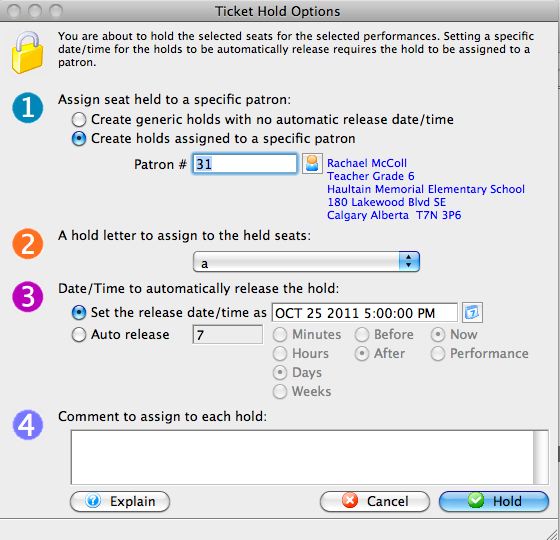
- Step 1 - Enter information about the hold.
A choice between a generic hold and a hold for a specfic patron can be entered.
- Step 2 - Choose a hold letter to use.
Often the Box Office will have a predetermined hold letter used for all patron holds for users to be able to quickly reference the graphic map.
- Step 3 - Set the criteria in regards to the release of the hold.
A date and time can be set to auto-release the hold.
- Step 4 - Assign any comments to the hold.
Comments will appear in the tooltip when the mouse is hovered over the held seat.
Freeing Seats While Selling Tickets
- Create a Buy List.
Click here to learn how to create a Buy List. Once the Buy List is complete click Seat Selection tab
in the Orders window. 
Click here for a detailed description of this window and it's functions.
-
Select the held seats to free.
To sell the held seats, hold <CTRL> (Windows) or <OPTION> (Mac) and select the seats to sell them directly.
- The seats will now appear in the shopping cart.
The seats are now available to be sold. If the seats are released, the seats will not return to their previous hold status.
Festival Seating - Holding and Releasing Seats
Seats can be held on a performance basis (or group of performances). We recommend using this feature as an alternative to selling the seats to a specified house account.
To hold seats for festival seating, you perform the following steps:
- Open the Play Setup Window.
- Find the play you wish to release tickets for.
- Select the Performance Tab.
- Select the performance(s) you wish to hold tickets for and Add
 the setup window.
- On the right side, enter the number of seats that you wish to hold.
- Click the Save button at the top of the window and then close the window.
Releasing Held Seats in a Festival Seating Performance
- Open the Play Setup Window.
- Find the play you wish to release tickets for.
- Select the Performance Tab.
- Select the performance(s) you wish to release tickets for and Add the setup window.
- On the right side, reduce the number of seats that are held by the amount that you wish to release.
- Click the Save Button at the top of the window and then close the window.
Holding Seats in a Venue Map
Holding Seats in a Venue Map
Holding seats allows for placing a restriction on the seats within the venue without having to assign or sell the seat to a patron. Often seats need to be held for a reserved seating performance prior to tickets going on sale to the general public. Examples of holds would be:
- there are promoter, artist, media or complimentary tickets negotiated within the contract
- the venue requires house seats to assist with potential issues arising the night of the show
- sight lines prevent seats from being sold
- space is needed in the venue for a sound board, lighting board or video equipment
- accessible seating for patrons who require such seating
- seats in a particular section will be held and released based on demand or audience size
- social distancing is required
Seats can be held in venue map and are applied to events built using that map. The steps below outline how to hold seats in a venue map:
- Locate and open the Venue.
For details on how to locate a venue please click here. To open a venue select it from the list and click the Open button at the top of the window or double click on the venue in the list.

- Open the desired Map.
Locate the map in the right column. Select the map and click the Open button at the bottom of the list or double click on it to open the map.

- Select the Graphic Map tab.

- Highlight the seats to be held.
Highlight the seats to be held by clicking and dragging the mouse over the seats. Multiple seats in different sections can be selected by holding down the Shift key on the keyboard. Selected seats will appear as a solid blue.

- Click the Lock to hold the seats.
The hold seats lock is located on the left side of the Graphic Map tab. The button may be below the default window size. Resize the window to see this option.

- Choose the desired hold letter.
Pick a hold letter to be applied to the selected seats.

Once the hold letter is selected the seats will be held with that letter on the map. All holds appear as lower case letters on the map. Changing the hold colour can be done in the Box Office tab of Systems Preferences by a Master User.

Refunding Tickets
Theatre Manager calculates the refund amount from the ticket prices the tickets were sold for, calculates a portion of the exchange fee, adds in the order fee and presents the user with the final cost of the ticket refund. The portion of the exchange fee is only calculate if the tickets selected for refund were part of an exchange. If they were not on the payment window the exchange fee will not be refunded. The only condition when refunding tickets is the tickets selected must exist within the same order number. There are security controls within Theatre Manager that can be set up for each employee or as an organization default. Click here for more information on the controls. Some of the controls are:
- Allowing refunds for performances of past performances.
- Allowing refunds for printed tickets.
- Refund ticket when higher performance security and refund tickets when lower performance security.
- Allowing order, exchange, and ticket fees to be refunded.
To refund a patron's tickets, you perform the following steps:
- Find the patron wanting to refund tickets.
Click here to learn how to find patrons.
- Highlight the tickets to be refunded.
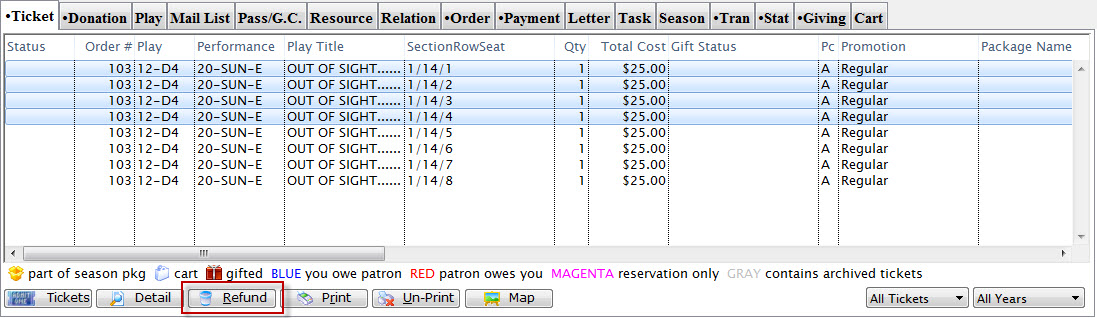
- Click the Refund
 button.
The Ticket Refund window opens, displaying the full refund amount. The Donation Button can be used to quickly turn the amount of the refunded tickets into a donation. Click here for more information on creating a donation from a ticket refund.
Click here to see the Refund to a Donation Screencast.
 - Click the Confirm button.
- Click the Payment button.
The Payment window opens.
- Select the Refund Method.
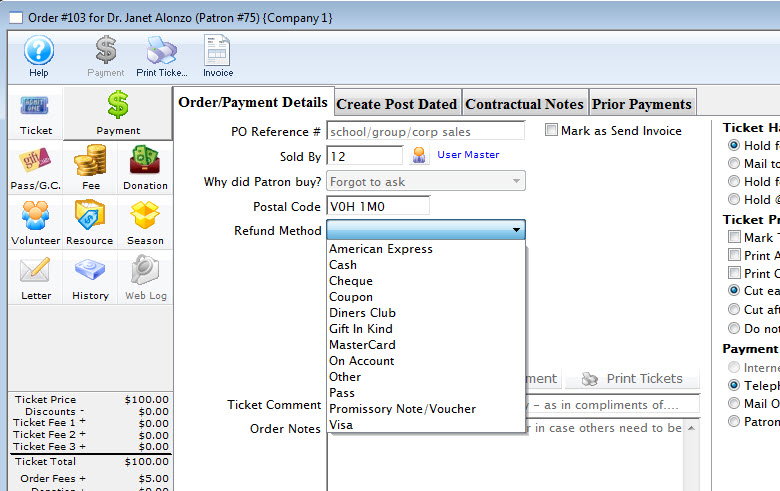
- Enter any relevant information.
Order comments should be entered when refunds are issued indicating the reason for the refund and the supervisor who authorized the refund. This information will assist in reviewing the daily activity to insure the refund was processed correctly and was authorized.
To not refund the order or exchange fee remove them in the fees window.

- Click the Accept
 button.
Theatre Manager will return the ticket for resale and return the user to the Patron Household Window.
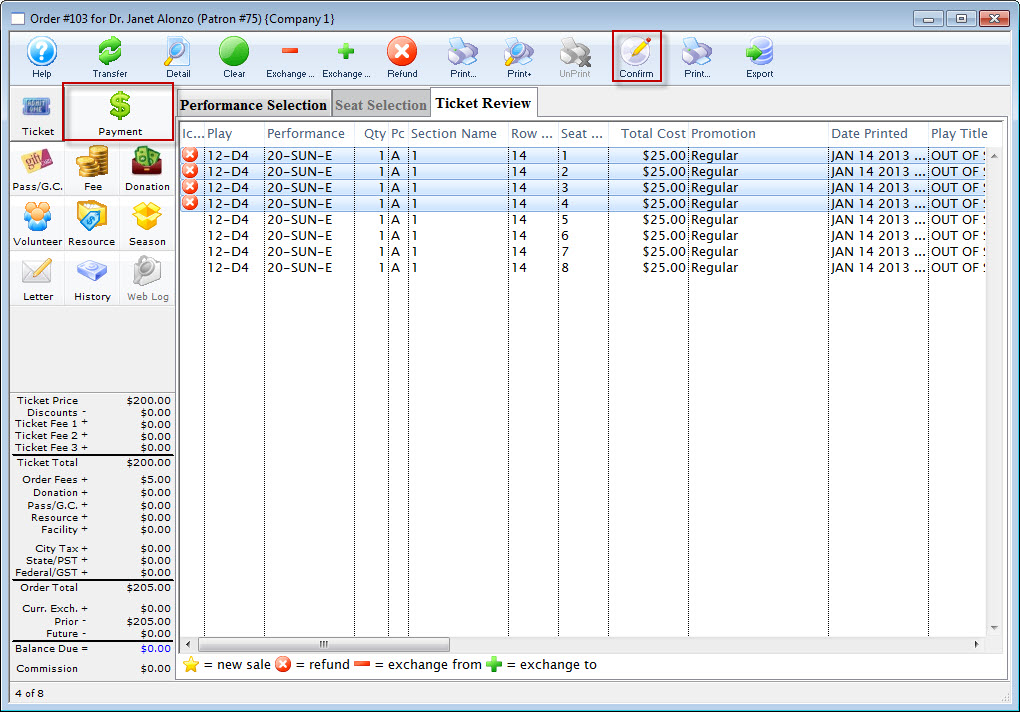
| The following quick reference information is available for Exchanging or Refunding Tickets |
Reference Guide (pdf) |
Cheatsheet (pdf) |
Flash ScreenCast |
MP4 ScreenCast |
Refunding Tickets to a Gift Certificate
To refund a ticket to a gift certificate, you perform the following steps:
- Find the patron wanting to refund tickets.
Click here to learn how to find patrons.
- Int the Patron record, highlight the tickets to be refunded.
- Click the Refund button.
The Ticket Refund window opens displaying the full refund amount. You can use the Donation button can be used to quickly turn the amount of the refunded tickets into a donation.
Click here for a detailed description of this window and it's functions.
- Click the Confirm button.
- Click the Membership / Pass / GC button.
The Membership window opens.
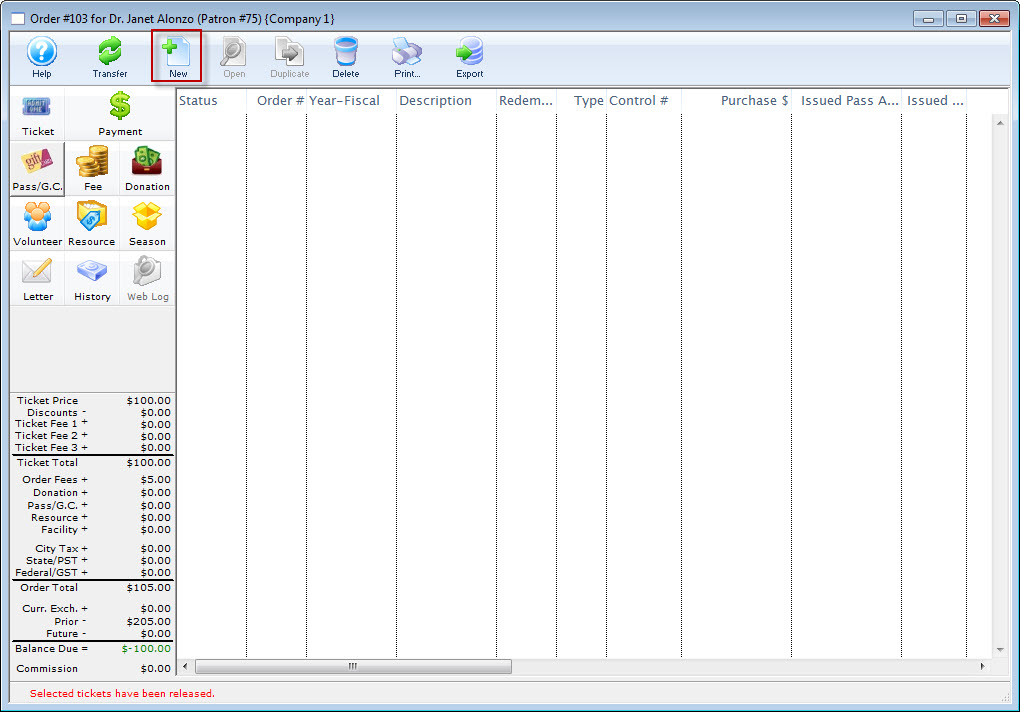
- Click the New button.
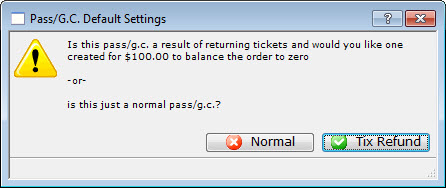
A confirmation dialog opens, asking "Is this pass/g.c. a result of returning tickets and would you like one created for $100 to balance the order to zero, or is this just a normal pass/g.c?"
- Click the Tix Refund
 button.
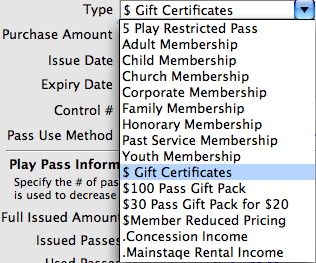
The Pass G.C. Detail window opens. Click here, for more information on this window.
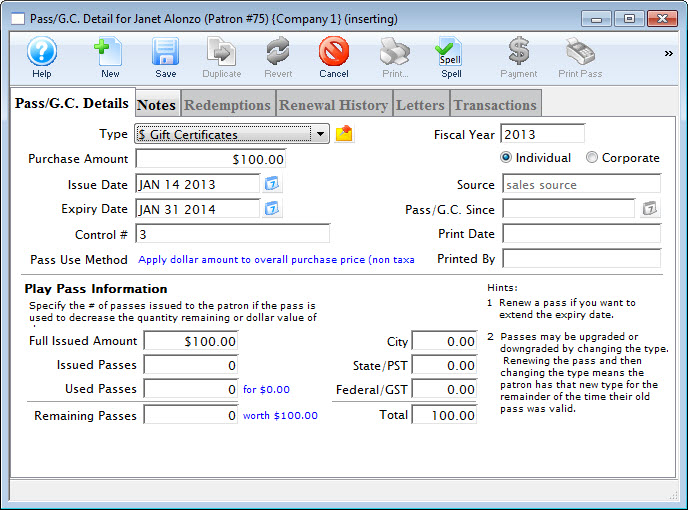
- Enter the amount of the refund the patron wishes to be used for gift certificates.
- Enter any other information as needed.
- When complete, click the Save button.
You are returned to the Membership window and the certificate amount is subtracted from the refund total.
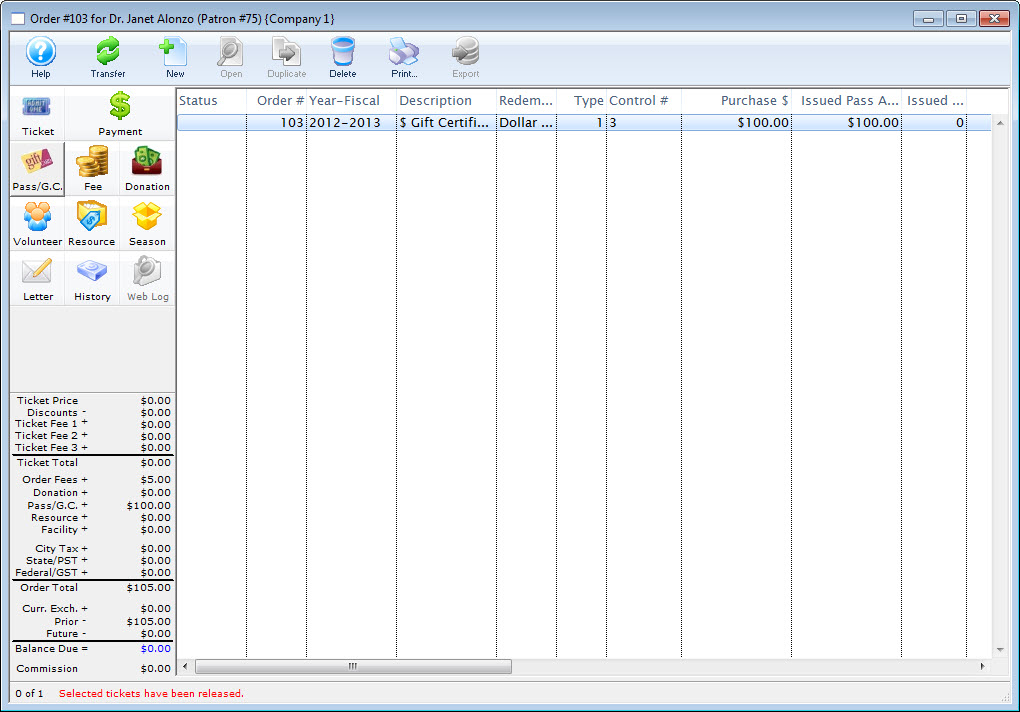
The tickets are returned for resale and the gift certificate is added to the Patron's account.
Refunding a Sale From the Ticket List Window
To refund a sale from the Ticket List window, you perform the following steps:
- Open the Ticket List Window.
Choose Setup >> Batch Functions >> Unprint a batch of tickets.
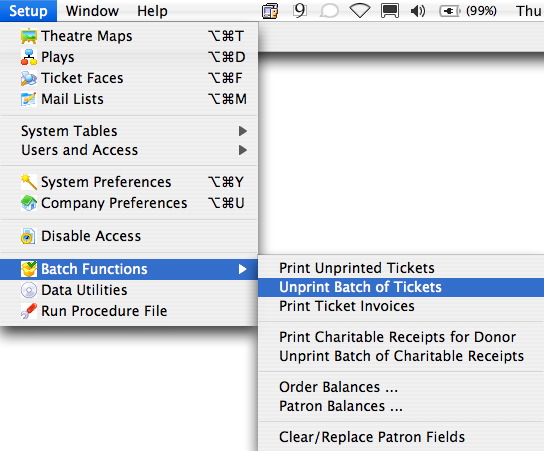
The Ticket List Window opens.

- Select a search range and click the Search
 button.
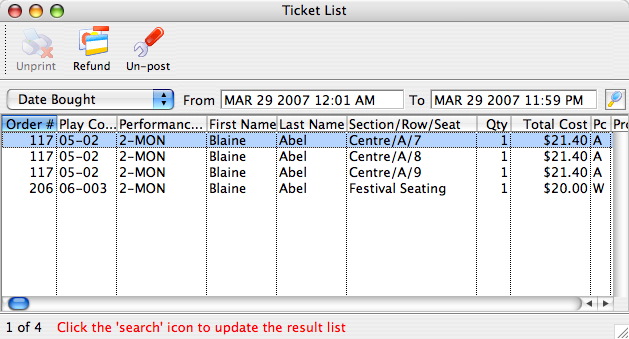
- Select the tickets the patron wishes to refund.
Do this by single clicking the tickets.

- Click the Refund
 button.
The Ticket Refund window opens displaying the full refund amount.
You can use the Donation Button to quickly turn the amount of the refunded tickets into a donation. Click here for more information on creating a donation from a ticket refund.
Click here for a detailed description of this window and it's functions.
- Select the Refund Method.
- Enter any relevant information
Order comments should be entered when refunds are issued explaining the reason for the refund and the supervisor who authorized the refund.
This information assists in reviewing the daily activity and insures the refund was processed correctly and was authorized.
To refund the order or exchange fee, you will need to remove them in the fees window.
- Theatre Manager will return the ticket for resale and return the user to the Patron Window.
Refunding from the Play and Dates Window
Note: You can also do mass refunds from Setup->Batch Functions->UnPrint or Refund a Batch of tickets. The advantage on the Unprint Batch of Tickets window is that you can select tickets by patron, event, and more.
 |
Before you do any refunding, please make sure to set up gift certificates and donation campaigns to track refunds appropriately if you are not giving money back.
Do not leave the order on account. |
|
Theatre Manager will generate a refund using the same payment method that was used for the original order. If an order used multiple payment methods, and one of those methods was a previously deposited credit card, Theatre Manager will refund the entire amount to the same credit card. A refund will include
Theatre Manager will NOT refund any Order Fees that are part of the order since they could be for a myriad of reasons that are not related to the tickets being refunded. |
|
You can use this feature iteratively. Examples:
|
|
You may need to contact your merchant provider to determine if you:
|
|
NOTE: IF YOU ARE PCI SCHEDULE C OR SCHEDULE D: POST DATED/RECURRING PAYMENTS ONLY AND HAVE NOT TURNED ON MERCHANT PROFILES, CREDIT CARDS ARE NOT STORED IN YOUR DATABASE.
An attempt will be made to link the card to a prior authorization to refund without needing the credit card. If that fails, you will need to use a refund method like Gift Certificate or Donation in step 3 below - any refund method other than Credit Card |
To refund tickets through the Attendance tab of the Event setup, you perform the following steps:
- Open the Plays and Dates window.
- Click the
 Tab.
Tab. - Click on the desired performance on the left side.
This will show a complete list of all patrons who bought tickets to the performance.
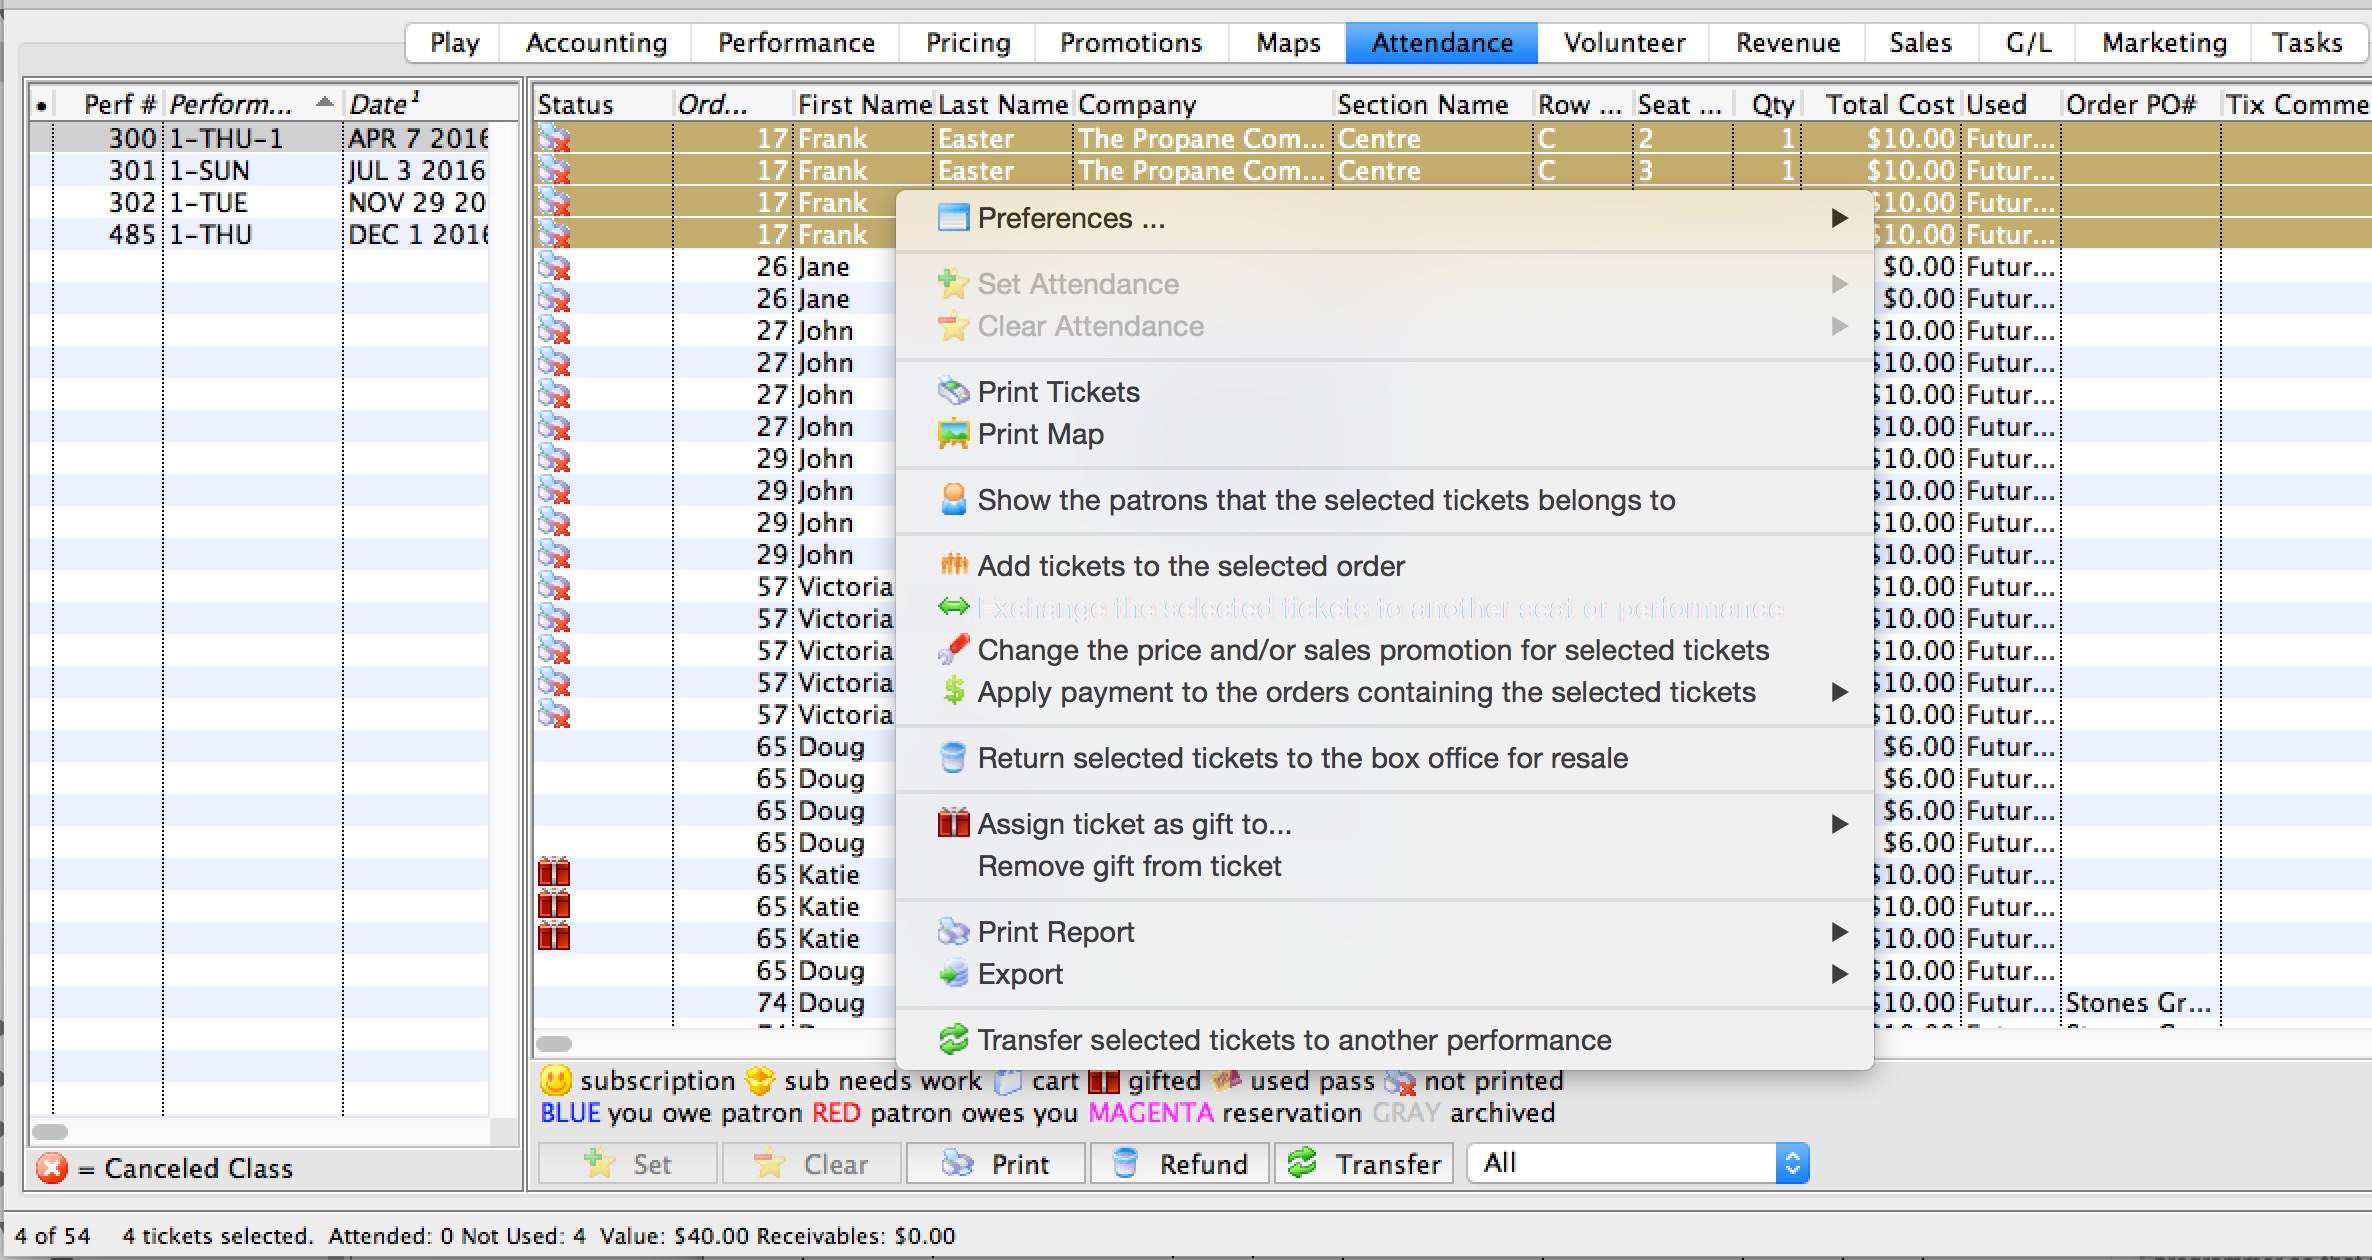
- Select the patron's ticket(s) to refund.
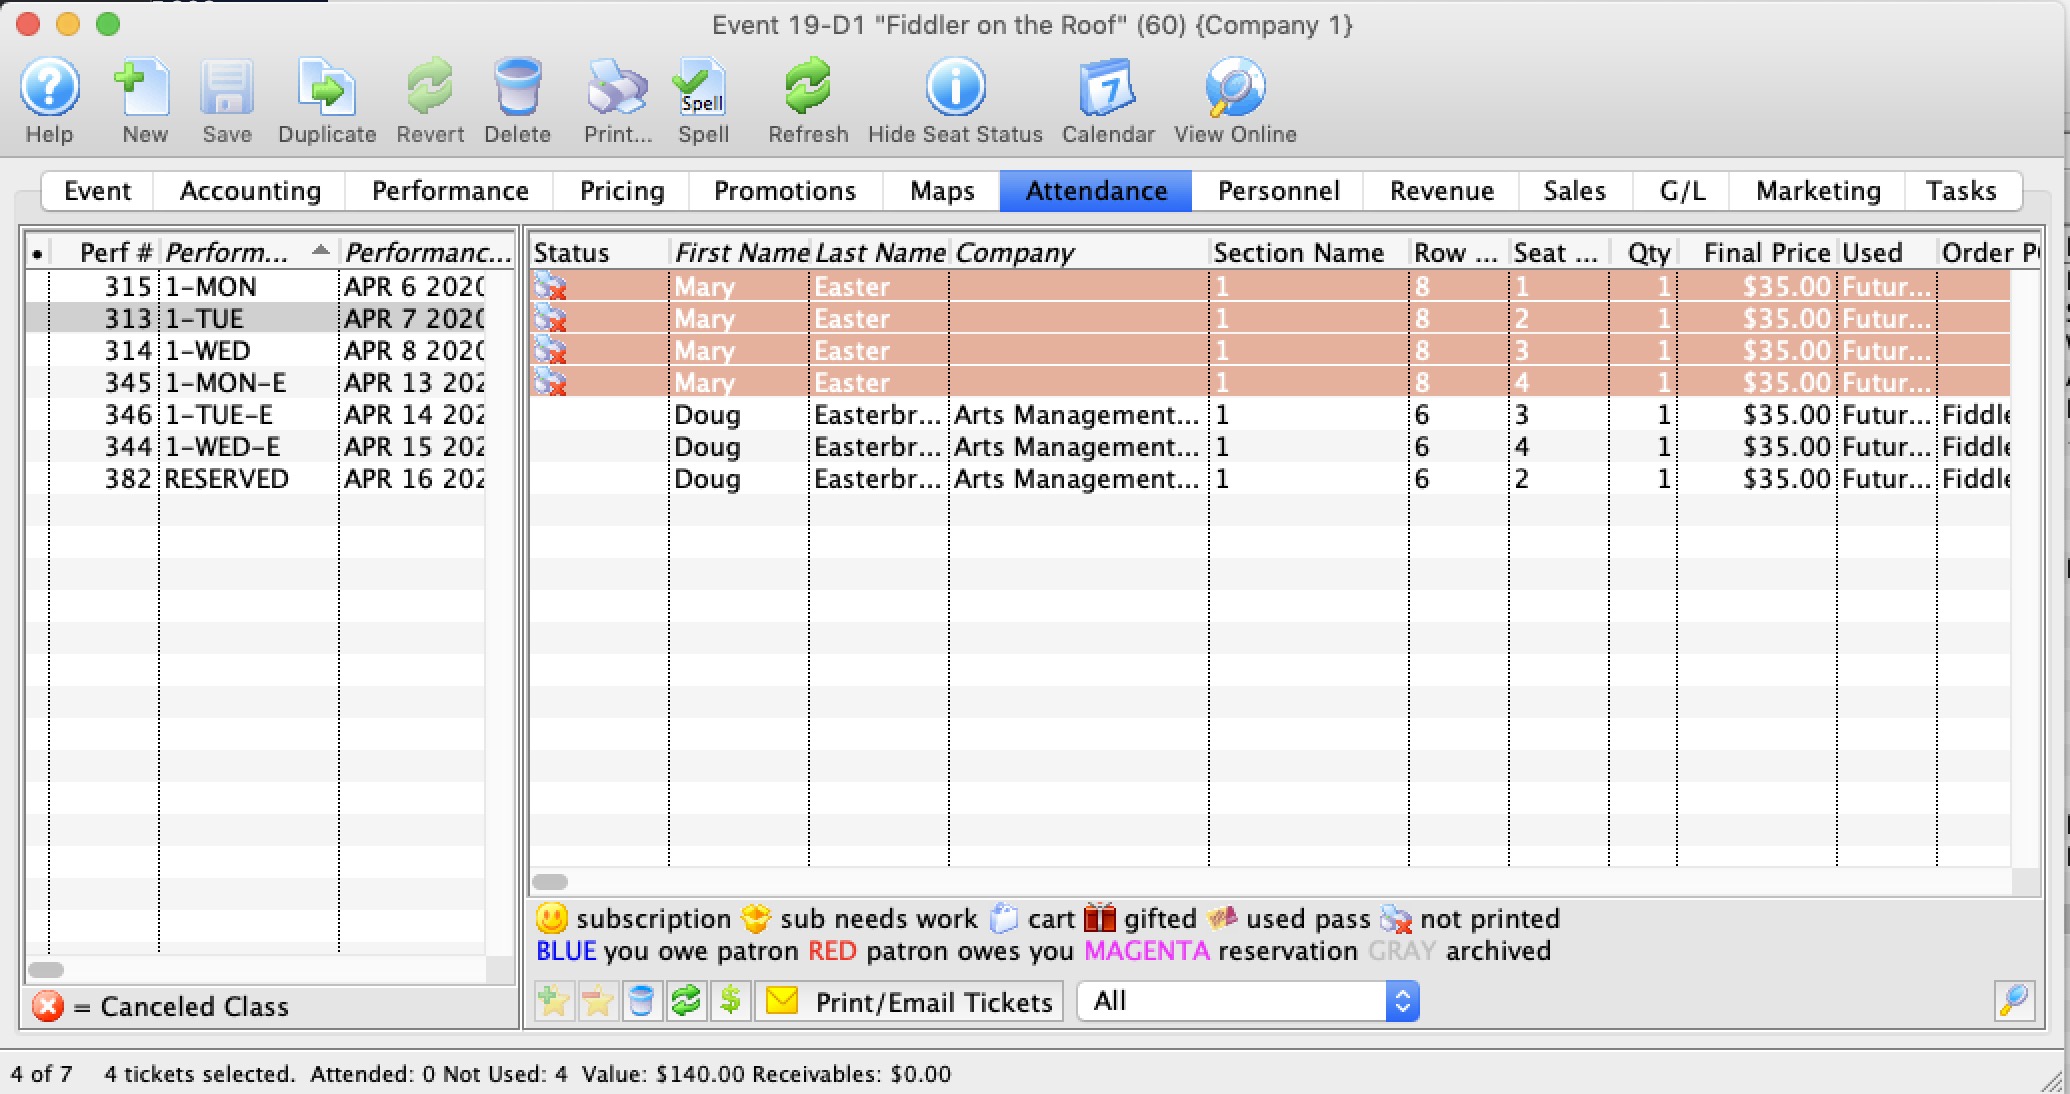
- Click the button at the bottom of the window.
The Refund Tickets Wizard opens.
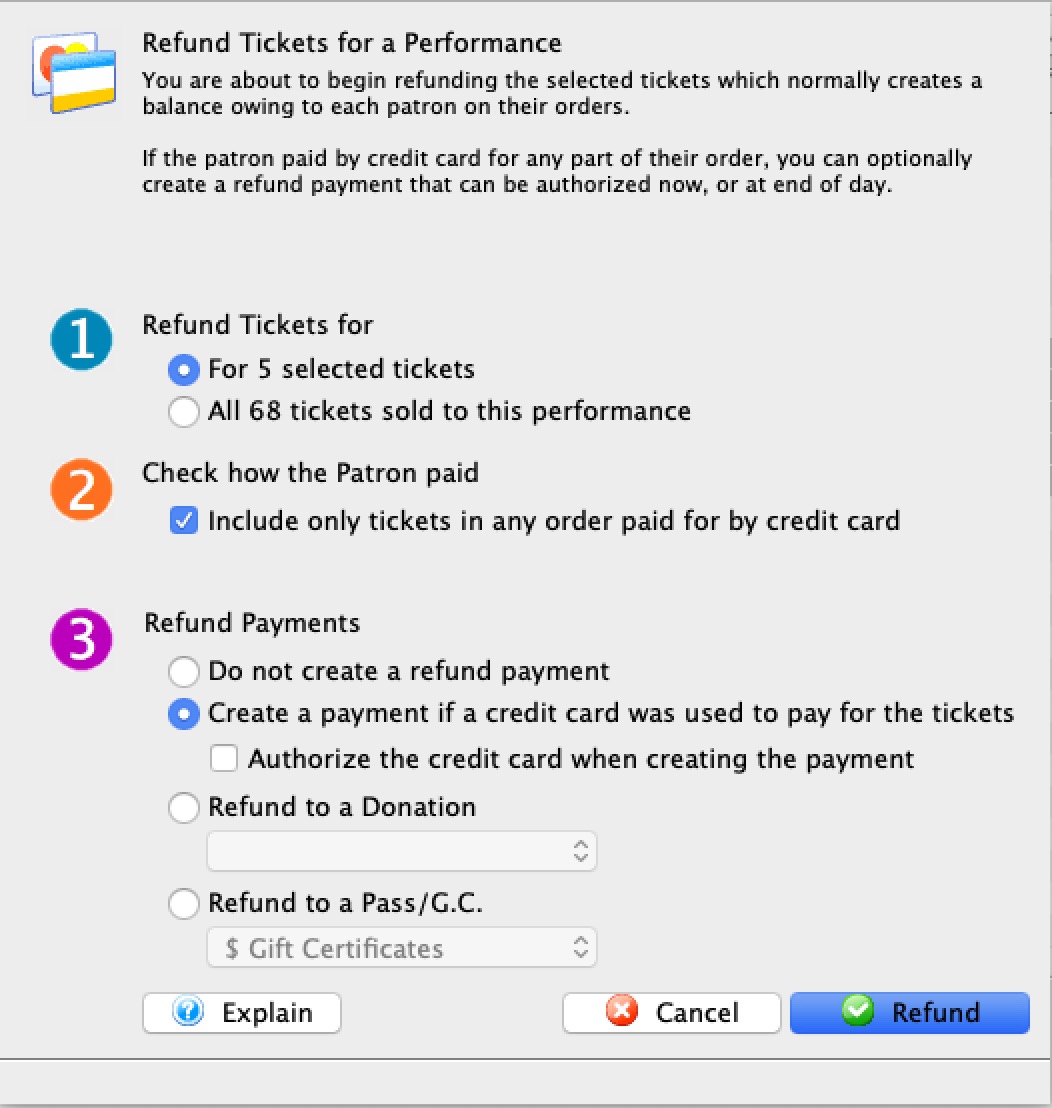
- The selected tickets, or
- All tickets for this performance
- Refund to Gift Certificate
- Refund to Donation
- Refund using Check as need be.
- Do not create a refund payment - in which case all refunds will be on account and you will need to refund patrons manually later - or -
- Create a refund only if a credit card was used for the original purchase. This will refund to the same credit card as long as there is a credit card on file or you have a merchant profile set up for this patron. Anybody with only a shredded card on file will have a payment created, and linked to a prior payment. Should authorization fail, it will need to be addressed later. The partial card number will help you when talking to the patron.
We recommend AGAINST using the authorizing at time of refund option (refer to refund processing rules) and delay it to end of day. Refunding to a credit card biases towards doing linked refunds if it can.
- Refund to a Donation lets you specify a donation campaign.
Rules:
- The value of the donation to the campaign will be the balance on the order after refunding the tickets. .
- One donation is made per order, even if the patron bought many tickets to the performance in different orders. Theatre Manager will create a note in the Notes Tab of the Donation containing the Event and Seating details for those tickets refunded. Each donation will have a record of the original tickets purchased that made up this donation.
- The campaign must be set up to allow refunds to tickets to appear in the selection. If you don't have a campaign set for refund to tickets, this option will be disabled.
- If the ticket was Gifted to another patron, the donation will be created on the ORIGINAL ticket buyer's patron record.
- The donation giving level range can have any number of ranges which must encompass all values of anticipated refunds from 0.01 through 99999999.99 (otherwise, the donation will not appear in a donation list until the giving levels are fixed)
- Refund to a Pass or Gift Certificate lets you specify a Pass/Gift Certificate.
Rules:
- If using:
- Dollar Value Gift Certificates: the gift certificate amount will be the dollar value of the balance on the order after refunding the tickets. Thus the balance goes to zero and the gift certificate is automatically the same as the balance
- Dollar Average/Admission: the pass will be set up to allow the same number of admissions as the tickets refunded. If you refund 2 tickets totaling $80, then the patron will have a pass for 2 tickets valued at $80 for use in the future. Since prices of tickets go up, it is less likely that you would use this option.
- One refund to the pass is made per order, even if the patron bought many tickets to the performance in different orders. Theatre Manager will create a note in the Notes tab of the Pass/Gift Certificate containing the Event and Seating details for those tickets refunded. Each Pass/Gift Certificate will have a record of the original tickets purchased that made up this Pass/Gift Certificate.
- The pass/gc must be set up to allow refunds to tickets to appear in the selection. If you don't have a pass/GC set for refund to tickets, this option will be disabled.
- If the ticket was Gifted to another patron, then the Pass/Gift Certificate will be created on the ORIGINAL ticket buyer's patron record
- If using:
- Click
 to continue with the refund.
 |
Options to refund either
|
||
 |
If you select this, Theatre Manager will only refund tickets in an order where that order contains at least one credit card to pay for it. If you do de-select this option, then all tickets will be refunded - you may have to apply a payment refund on a per patron basis later, depending on what you are doing to refund payments.
Note: if you refund tickets with card data first, the others will remain in the list. You can then select and refund some of the remaining tickets using another other payment method such as: |
||
 |
This further refines how you want Theatre Manager to handle the refund payment options, including:
|
The selected ticket will be refunded and returned for sale if the performance is in the future.
Refunding a Fee from an Order
- Find the Patron and open the Patron Window.
For more information on finding Patrons and opening the Patron Window, click here.
- Click on the Order
 tab.
tab.
For more information on the Order tab, click here.
- Highlight the order containing the fee you are going to refund.
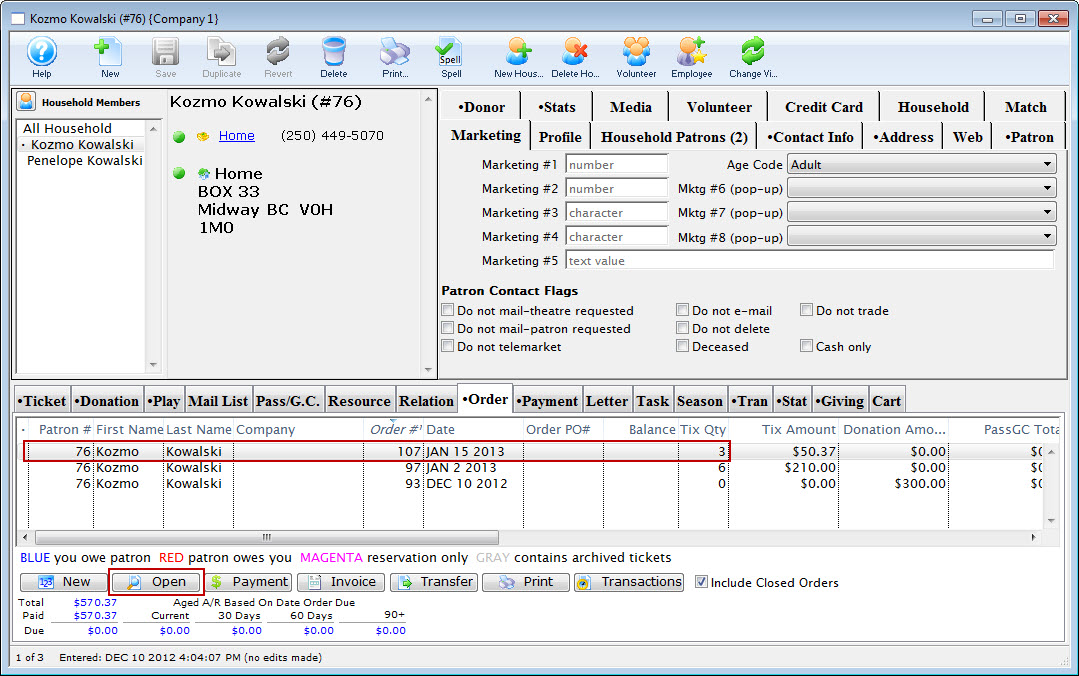
- Click the Open
 button.
The Order window opens.
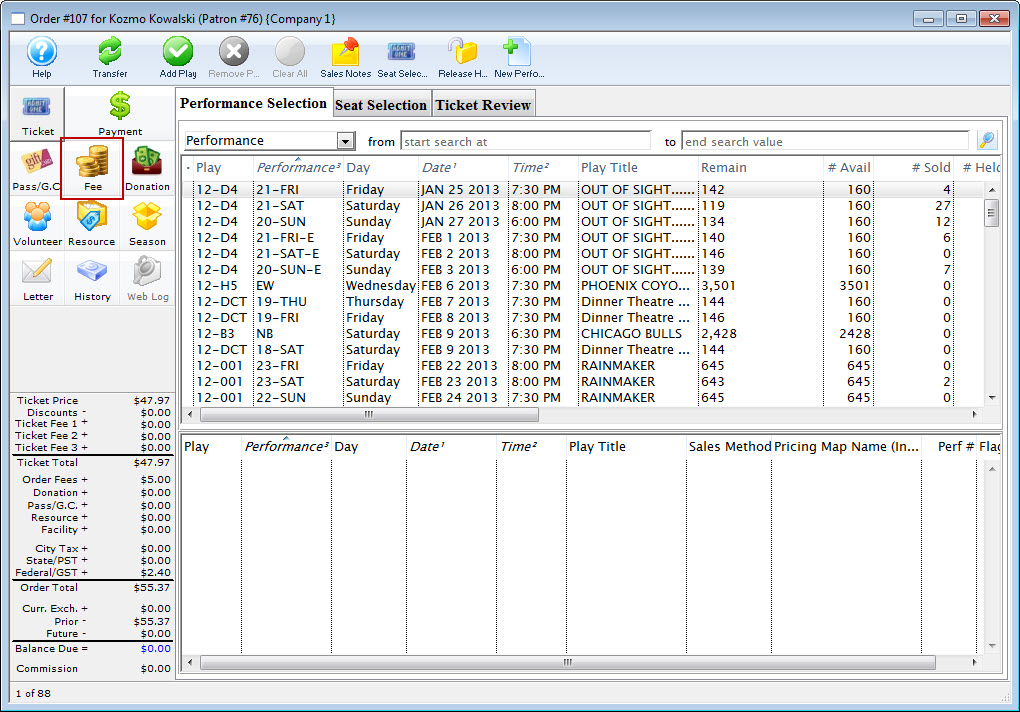
- Click on the Fee button.
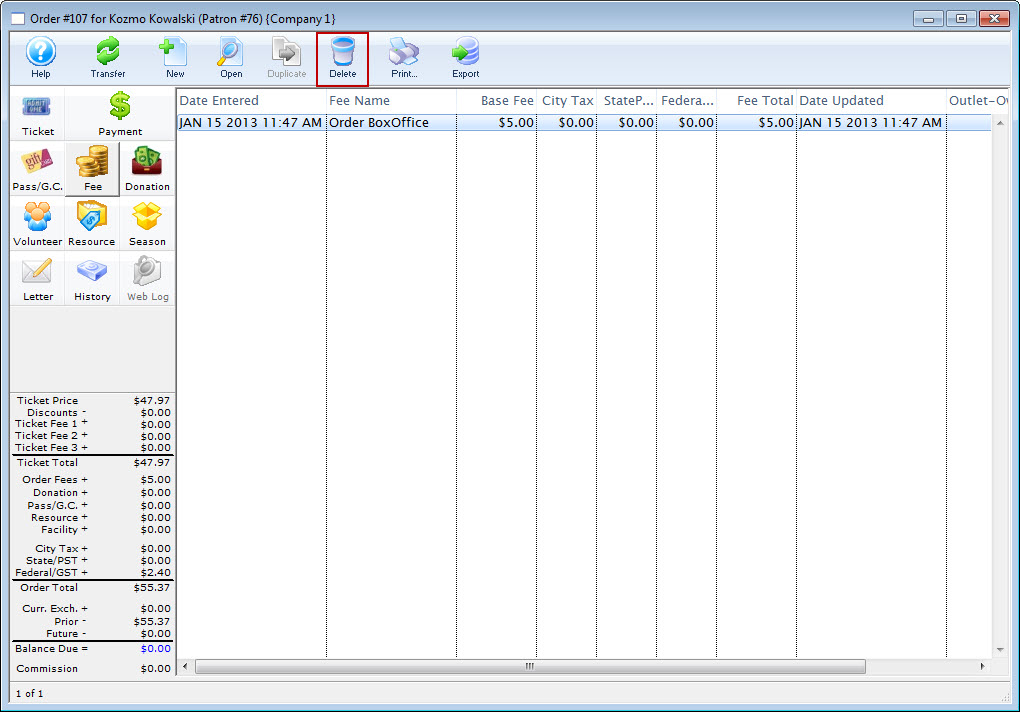
Highlight the Fee to refund.
- Click the Delete
 button.
The Delete Refund Fee warning dialog opens.
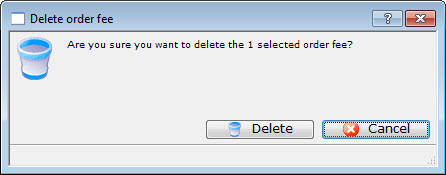
- Click the Delete
 button.
 - Click the Payment button.
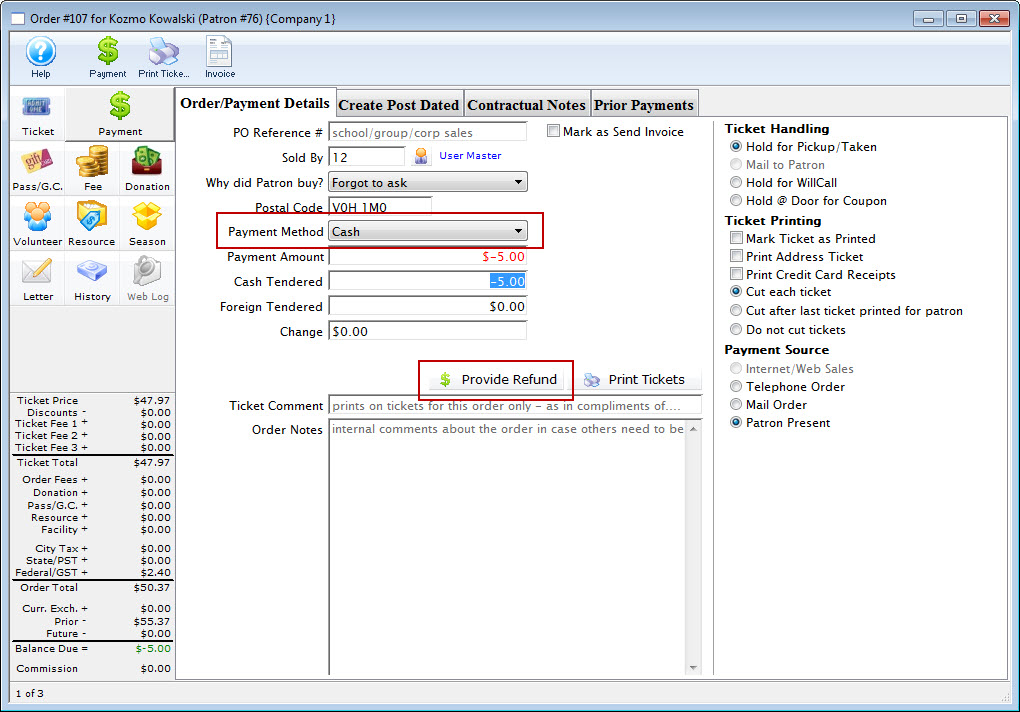
- Select the Refund Method.
- Click the Provide Refund
 button.
You have refunded the amount of the fee to the patron.
Removing a Fee from an Order in Process
- Click the Fees button.
- Highlight the fee(s) you want to remove.

- Press the Delete button.
The selected fee is removed from the sale.
- Click the Payment button.
You can now continue processing the order.
Sales Notes
You use Sales Notes to inform the purchaser or ticket seller of important information about an event. Sales Notes can be for internal use, or external use (appearing on the web) or both. It is recommended you use both fields for complete marketing and customer service efficiency.
Adding Sales Notes to an event is as easy as copying and pasting existing marketing data from in-house sources, or from the artist website directly into the Sales Notes in Theatre Manager.
Sales Notes are setup on the tab of Event setup. Click here for more information on Event setup.
You access the Sales Notes from the Order Window by clicking on the button. Online, the external sales notes are displayed when the user clicks on the event title. Examples of each appear below.
The Sales Notes window as viewed in the Box Office:
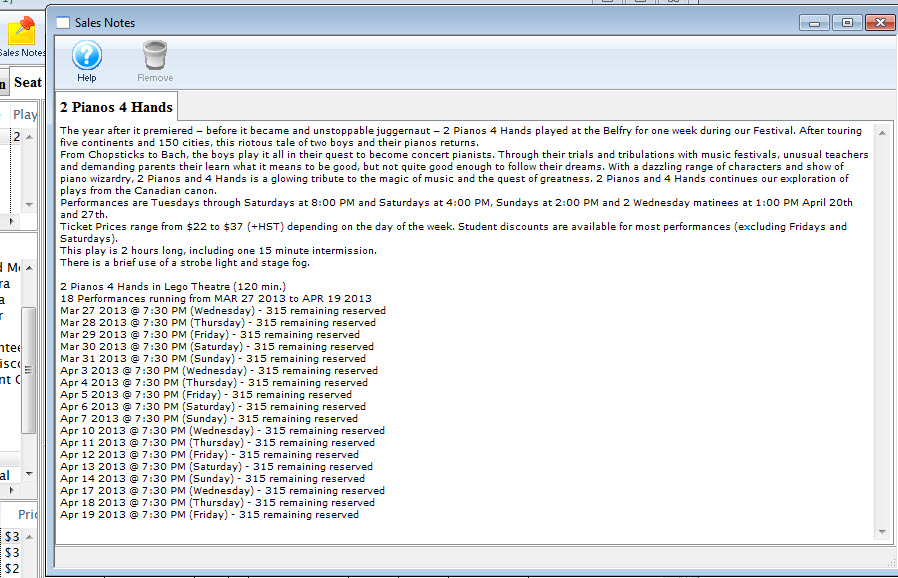
The Sales Notes window as viewed online (note: the user will click on the event title from the list and the Sales Notes page will appear):
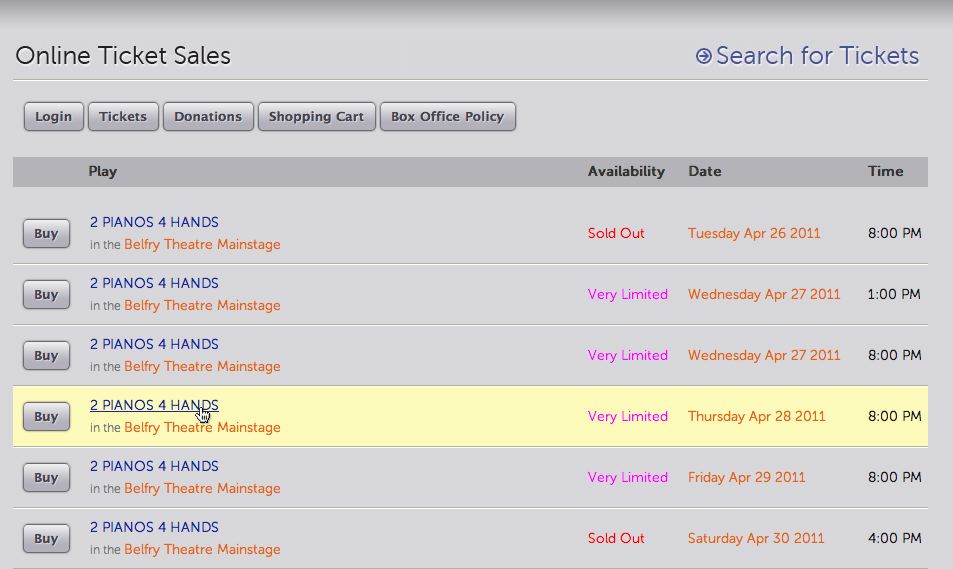
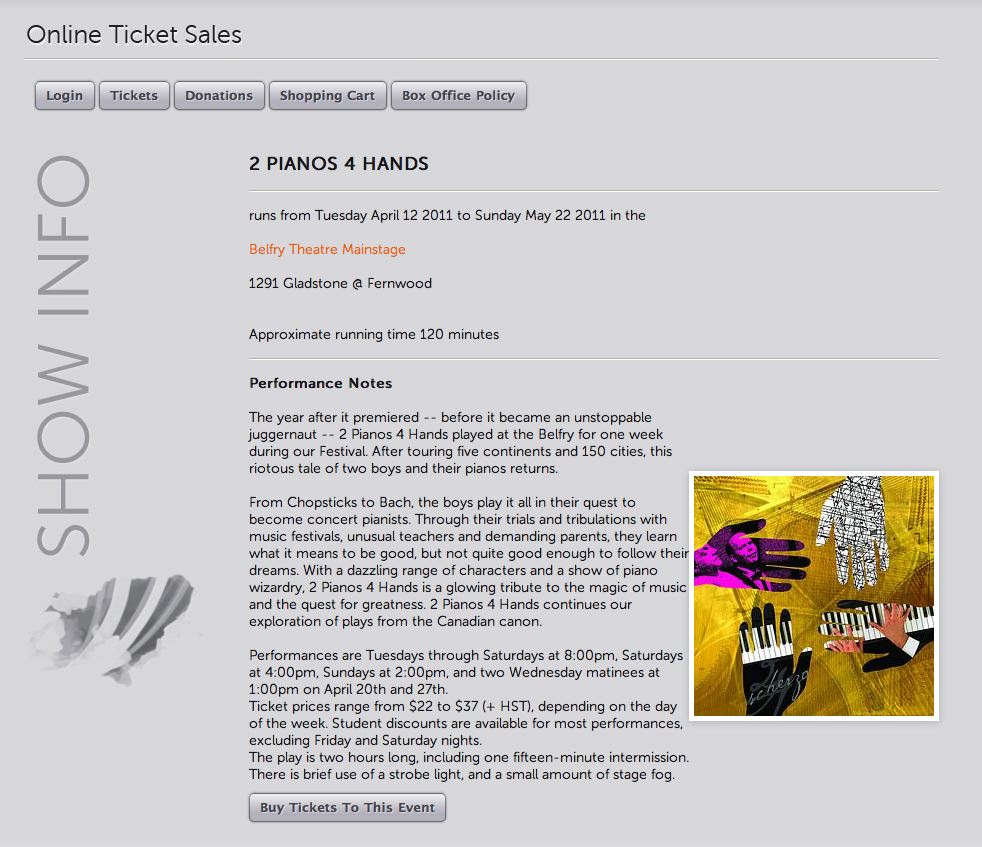
Ticket Printing
- Defining the Ticket Faces, click here.
- Setting up your ticket printers, click here.
- If you are having trouble with printing to the ticket printer, click here.
Emailing Tickets from the box office
- emailing of PDF tickets from the box office after setting up company preferences (to allow email of PDF tickets) and then following instructions below
- printing of PDF e-tickets at the box office if necessary
- emailing invoices from the box office
|
If you find you cannot send an e-ticket, please refer a list of possible reasons why it cannot |
Emailing (or printing) PDF tickets from box office
If emailing tickets from box office is enabled (and providing tickets meet the criteria described in the setup screen help), then tickets can be printed from:
- The patron 'ticket' list (see image below - the print tickets button gets replaced by a print/email tickets button)
- The order window on the payment screen
- The batch ticket print process
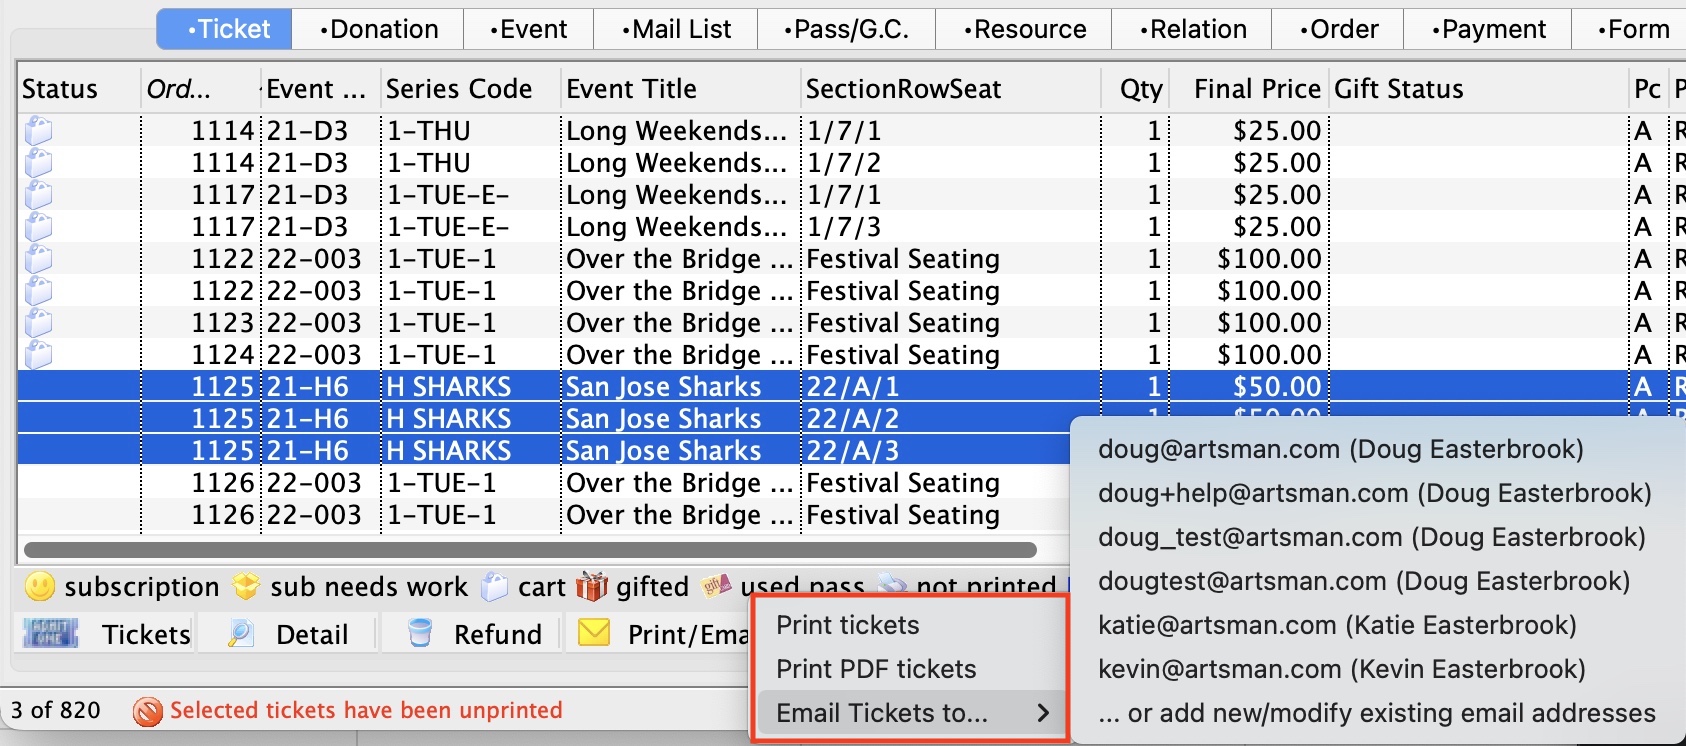
 If you select email tickets, or print PDD tickets and the system determines that they cannot be emailed or printed, you'll see a message similar to the image at the right.
Please refer to Factors That Prevent Tickets from being emailed for more information in this message.
Emailing PDF e-ticket options
When emailing tickets, the options on the window below are:
- Tickets as attachments
Selecting how you want the tickets attachments on the right side will show the feedback in the attachment list. The default for this window is set in company preferences, web options, Ticket Delivery Options/Fees
Choices are:
- ALL tickets in one PDF - placing all tickets in a single PDF attachment - which will take all the tickets that are printed and put them into one PDF document to send to the patron. This might be useful for group sales.
- One ticket per PDF - as individual PDF attachments - which creates one PDF attachment per ticket and adds it to the email being sent
- Templates and email content:
- From: specify if the PDF tickets are coming from you or from the web listener user id
- To: allows selection of any of the email addresses that belong to the patron.. If you want to change the default, type part of the name or email address and the system will present valid selections to you for that patron and/or household
- Subject: is the subject of the PDF e-ticket email
- Template: if you have set up emails that can be used as part of emailing to a patron, then pick a form letter template to fill out the letter. The text will be placed in the body and can be edited.
- Body: is the text of an message that forms the body of an email. You can free form the letter, or use something from a template, or select a template and modify the text in any way you see fit
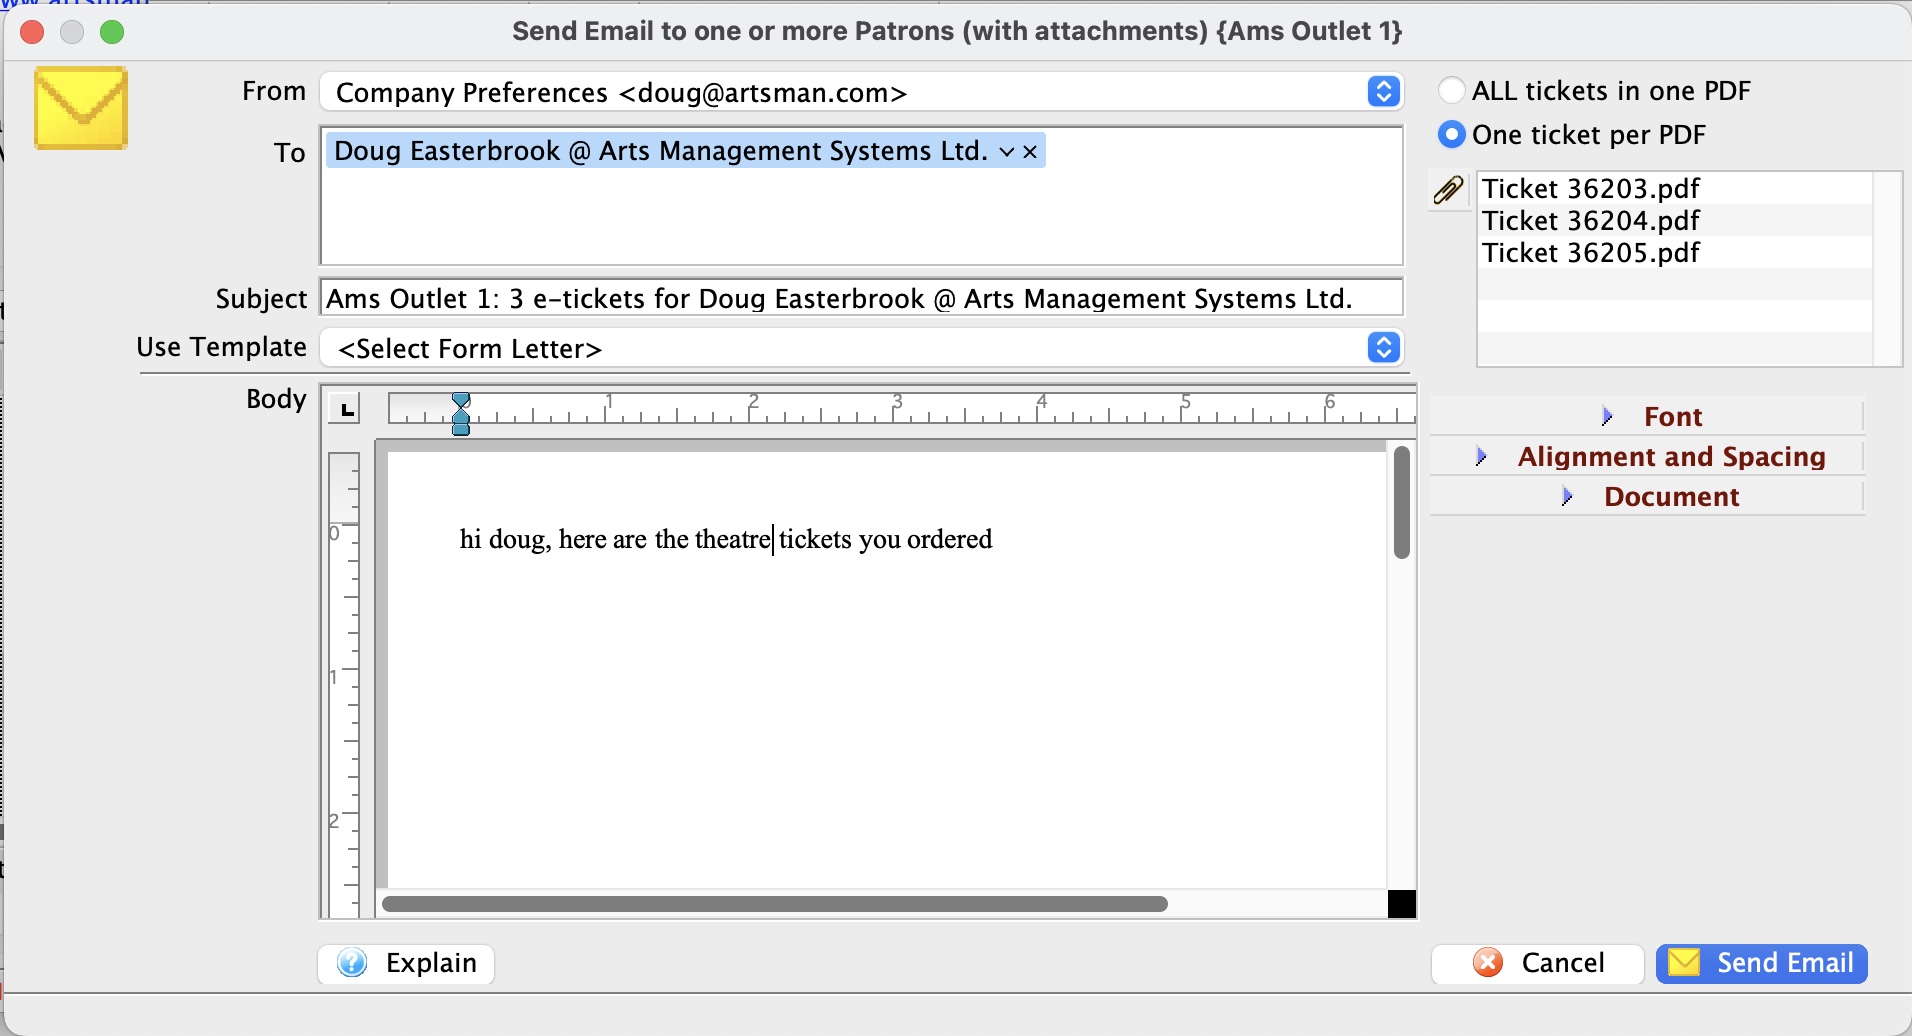
Printing PDF tickets at the box office
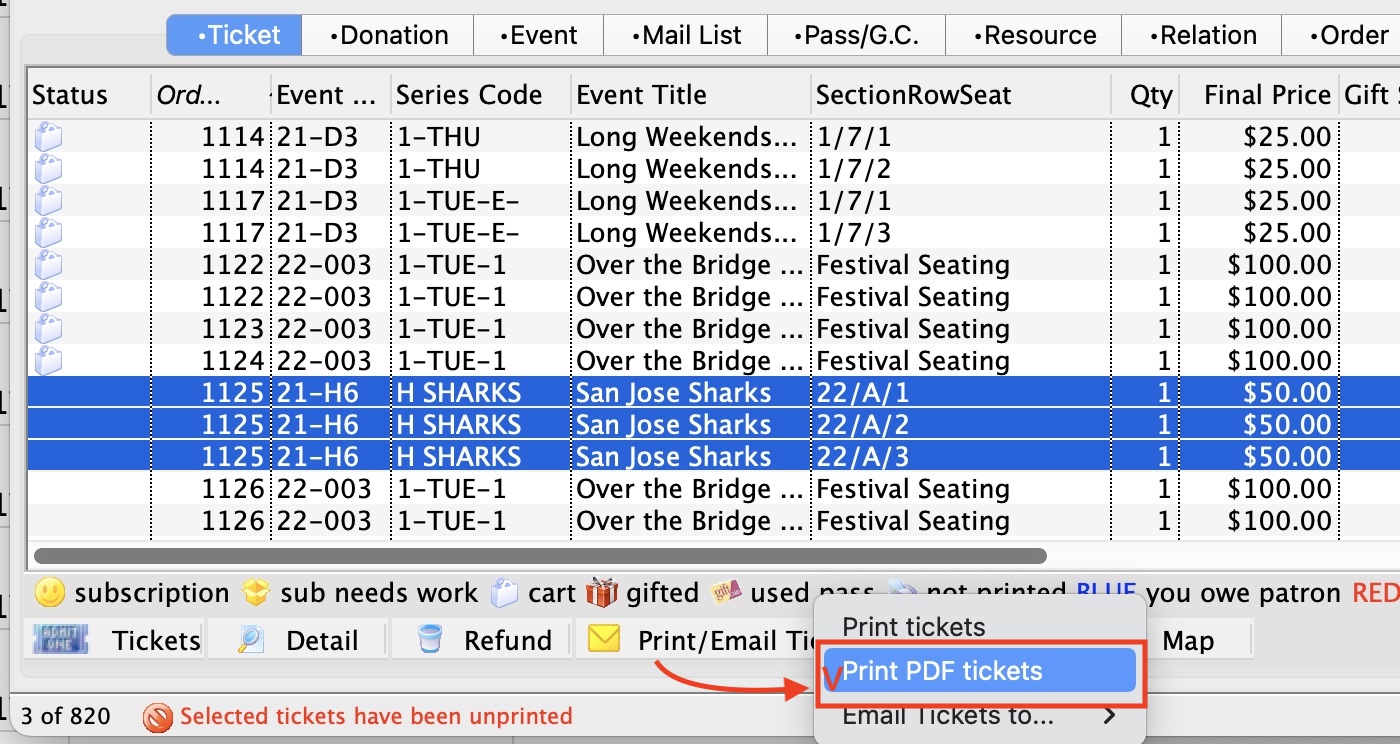 Normally you would use a thermal ticket printer to quickly print tickets for a performance while at the box office. The cost per ticket is quite a bit lower with thermal tickets, and some patrons consider thermal tickets to be the only "real" tickets.
However, it is still possible to print a PDF e-ticket on a local laser or inkjet printer if:
- you happen to be in a remote location without a ticket printer, -or-
- your ticket printer ip cannot be set or cannot be connected to on the network for any reason (refer to IP setup for ticket printers if this is the issue) -or-
- if it breaks down (a generally rare occasion)
Steps to print an e-ticket ticket to a local printer
- If you are given the option of printing tickets for a patron, click the button Print/Email Tickets
- Select Print PDF Ticket from the submenu
-
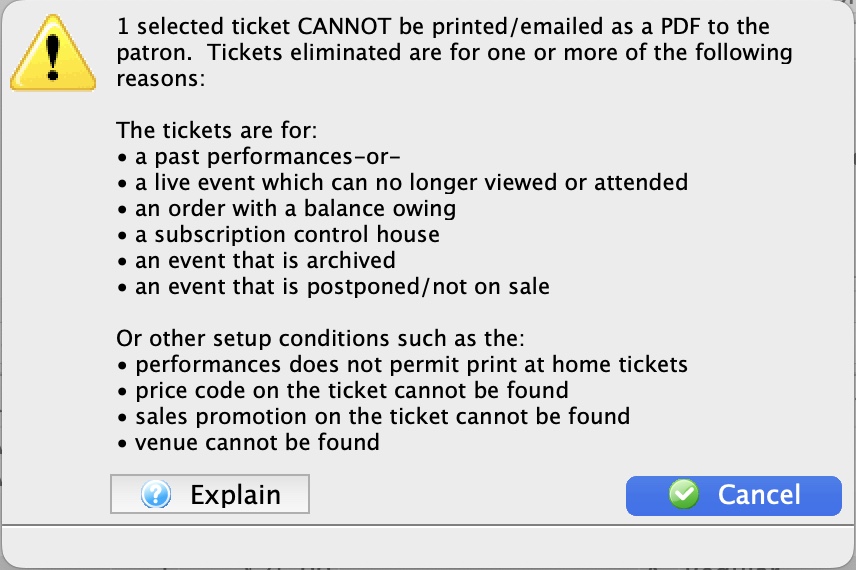 A PDF Ticket window will open similar to below. If tickets cannot be printed (eg there are no print at home or they are for a past performance), you will see a message indicating a list of possible reasons will appear.
Please refer to Factors That Prevent Tickets from being emailed for more information in this message.
- When you see the PDF ticket widow, you will see a thumbnail of tickets and an image of each ticket on the screen. You can enlarge the window if need be. At the top tight of the window above the ticket images are two icons:
- Printer Icon click to print the ticket to a selected desktop laser or inkjet printer. These tickets will not print on your ticket printer
- Download Icon click this if you want to download the ticket to disk
|
NOTE: as soon as you see the tickets as a PDF, they have been marked printed by Theatre Manager. if you close this window without printing, you will need to Unprint the tickets on the patron window before you can print them again. |

Printing Season Tickets
- Choose Setup >> Batch Functions >> Print Unprinted Tickets.
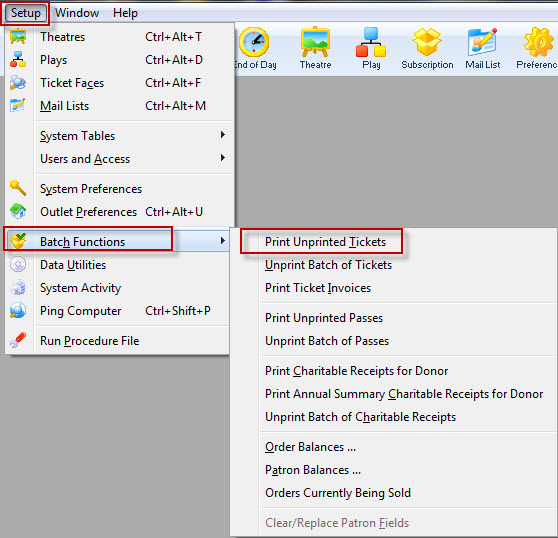
The Batch Ticket Printing window and the Parameters window will both open.
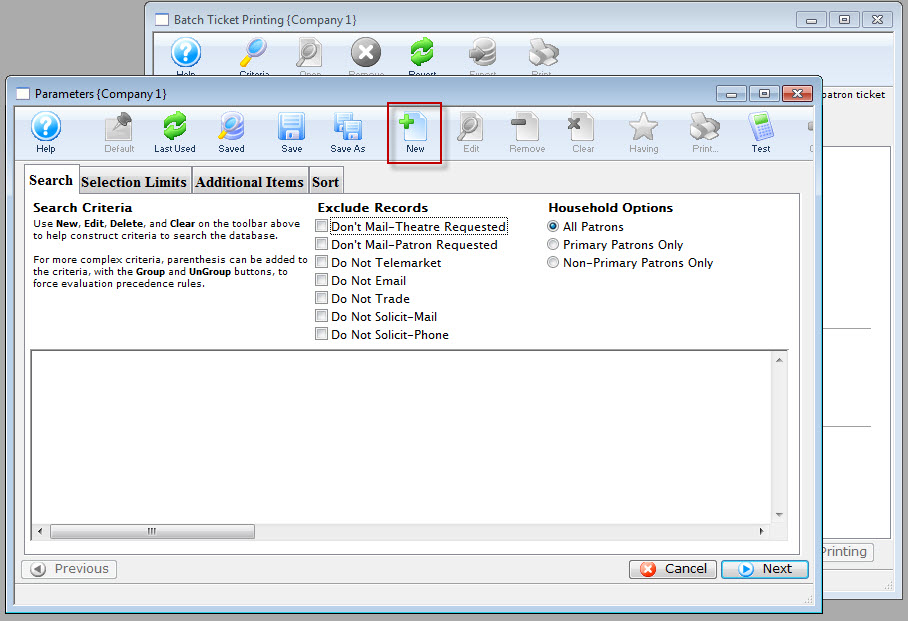
- Click the New button
to add a new criteria to the parameters window.
The Add/Edit Criteria window opens.
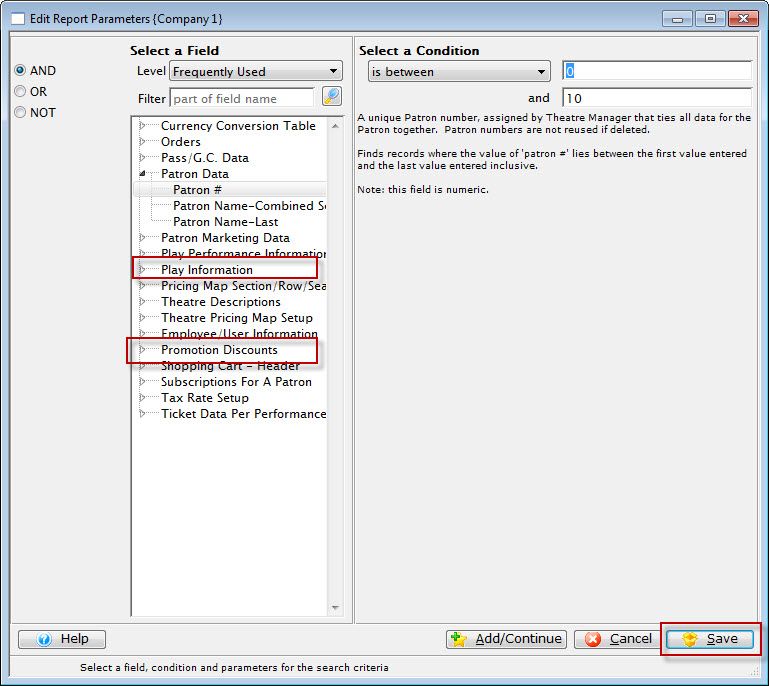
- Select the search Criteria for the tickets to print and
press the Save button.

Click here for more information on report criteria. The example above shows criteria that would print all unprinted tickets with the performance codes matching those of the season subscription and with either a subscription or early-subscription price code. To get this criteria, select Promotion # on the left hand side, and select Subscription and Early Subscription on the right hand side.
- Click the Next
 button.
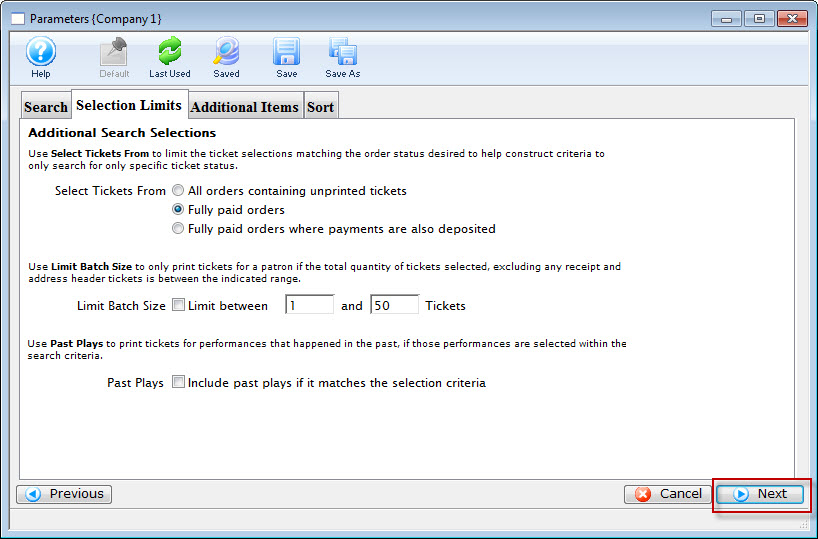
- Choose the option for "All Orders containing unprinted orders."
Select Tickets From
All Orders containing uprinted tickets
Will only select tickets meeting the criteria and that are marked as unprinted.
Fully paid orders
Will only select tickets meeting the criteria and that the order is fully paid for.
Fully paid orders where payments are also deposited
Will only select tickets meeting the criteria and that the order has been process through the End of Day.
Limit Batch Size
Limit between
This allows the batch to print only patron orders that are between the minimum and maximum limit.
Past Plays
Include past play if it matches the search criteria
This will allow tickets to be printed for performances that have occurred already provided they meet the criteria.
- Click the Next button.
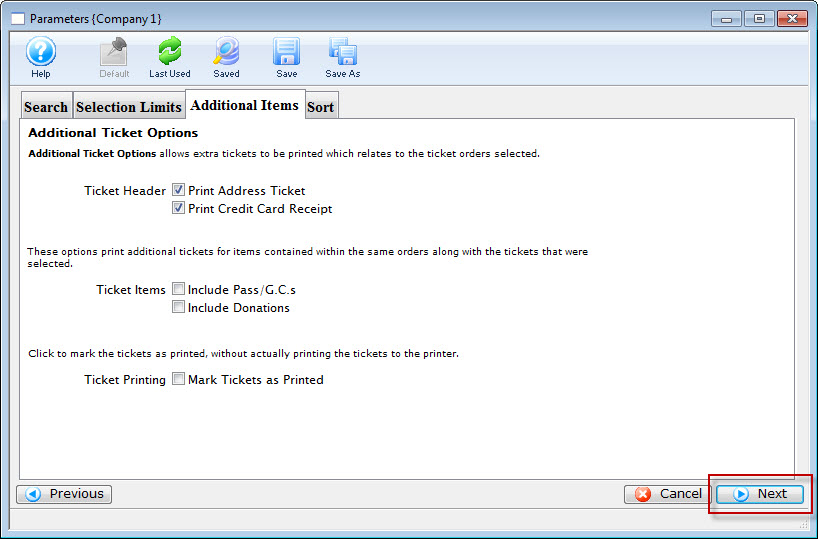
- Select the applicable data for the tickets to print.
Ticket Header
Print Address Ticket
Prints an additional ticket containing the address information of the patron.
Print Credit Card Recipt
Prints an additional ticket containing the credit card receipt if a credit card was used to pay for the order.
Ticket Items
Include Memberships
Prints an additional ticket if a Membership purchase was included on the same order.
Include Donations
Prints an additional ticket if a Donation purchase was included on the same order.
Ticket Printing
Mark Tickets as Printed
This option will print no tickets, but still mark the tickets as printed.
- Click the Next button.
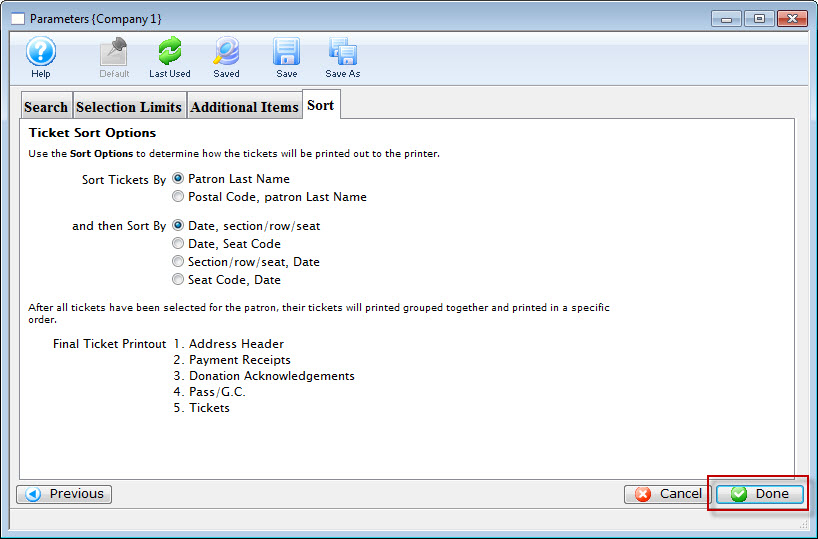
Sort Tickets By
Patron Last Name
All tickets will print in alphabetical order based on the patron's last name.
Postal Code, Patron Last Name
All tickets will be grouped together by postal code, and each group will be in alphabetical order based on the patron's last name.
and then Sort By
Date, Section/Row/Seat
For tickets to multiple performances, the individual tickets will be sorted by the performance date and then the seats.
Date, Seat Code
For tickets to multiple performances, the individual tickets will be sorted by the performance date and then the seat codes.
Section/Row/Seat, Date
For tickets to multiple performances, the individual tickets will be sorted by seat and then by the performance date.
Seat Code, Date
For tickets to multiple performances, the individual tickets will be sorted by seat code and then by the performance date.
- Click the Done
 button.
You are returned to the Ticket Printing window.
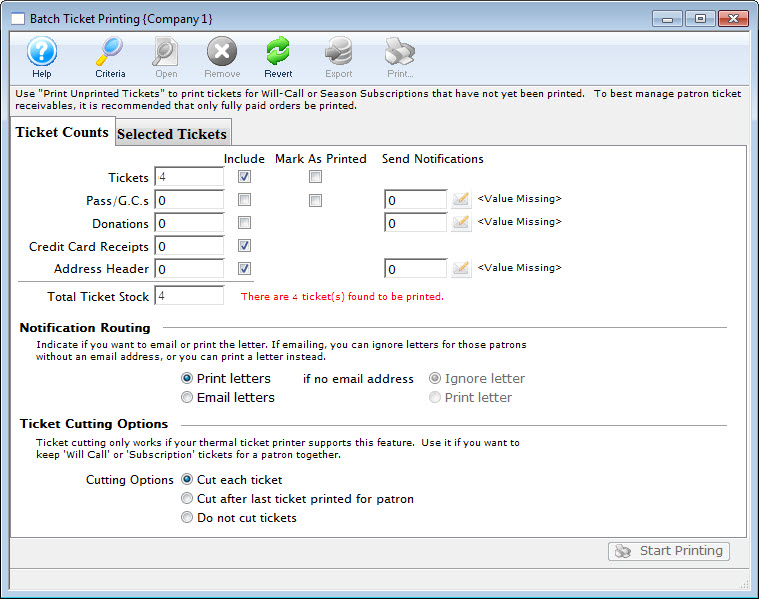
- This window will display the total number of tickets based on the
criteria, and allow any final changes to be made.
Click here for more information about this window.
- Click the Start Printing button when the batch is ready to print.
Printing Tickets at Time of Purchase
To print tickets the ticket printer preferences need to be set and the ticket printer configured. Click here for more information on configuring Practical Automation printers and Click here for more information on configuring BOCA ticket printers. Click here for more information on setting Employee Ticket Printer preferences.
- Purchase tickets the patron wants to buy.
Click here for information on buying tickets.
- Enter the method of payment and other required information on the Payment Window.
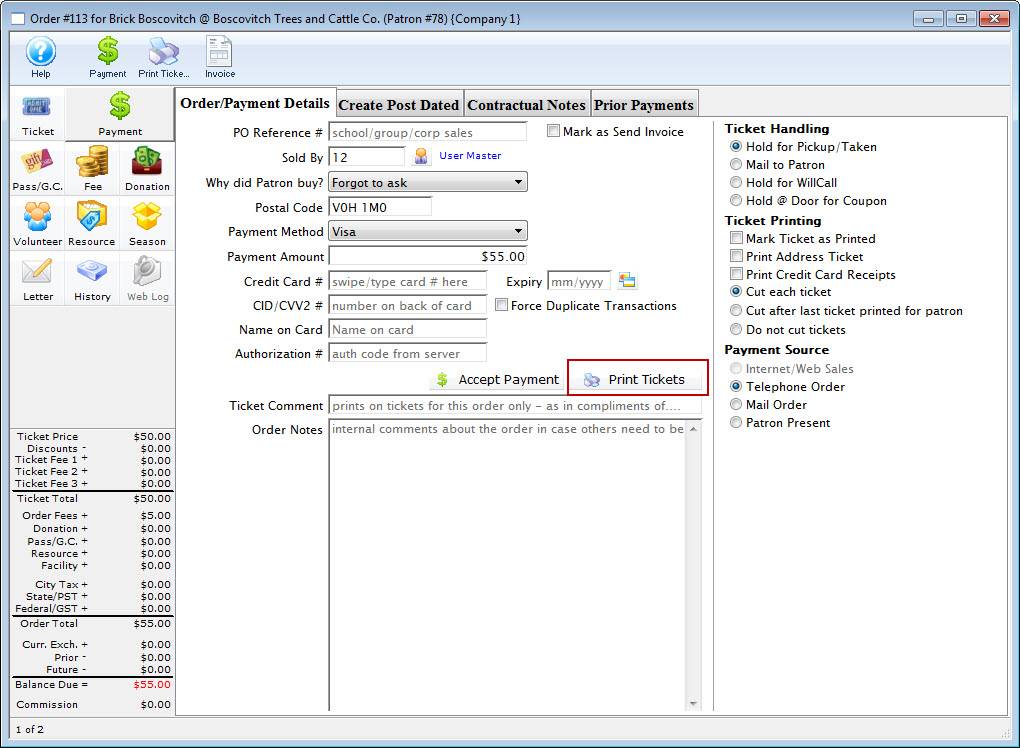
Note the two options on the right. If you select print an address ticket and click print tickets, the address ticket along with the admission tickets will be printed.
Click here for more information on creating a payment method.
- Click the Print Tickets
 button.
Clicking print accepts the payment information, prints the tickets to the specified printer, closes the ticket purchase windows and returns to the Patron Window with the purchased tickets displayed.
Print Ticket Options
During the payment process, there are options for how the tickets will be printed. Some options depend on your Box Office policy, while others depend on the type of printer you may have. Most Practical Automation printers automatically cut after each ticket face is printed.
Box Office policy items include:
- Mark Tickets as Printed
- Print Address Ticket
- Print Credit Card Receipts
These options can be defaulted in Setup->Company Preferences on the Ticket Faces tab.
Printer hardware options include:
- Cut each ticket
- Cut after last ticket printed for patron
- Do not cut tickets
The Ticket Printing options appear on the right hand side of the Payment window.
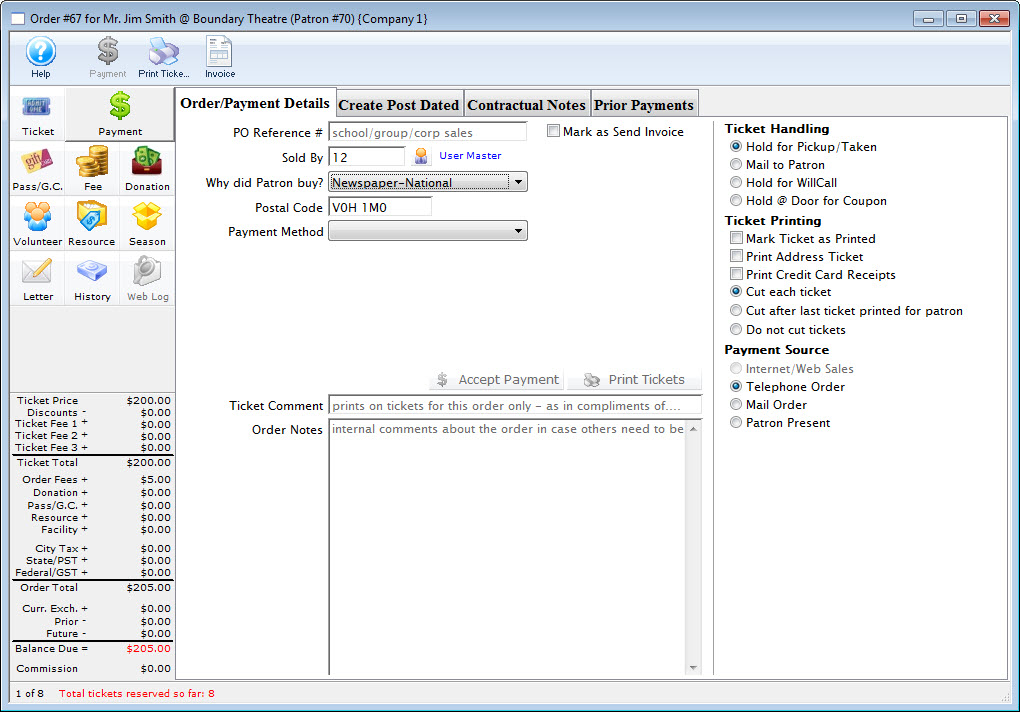
Options in Ticket Printing
| Mark Tickets as Printed | This option will mark the tickets as printed, but not print them. This is useful when you are simply tracking attendance and do not want to actually print tickets for the event. This setting will apply to all tickets within the order. Optionally, you can set "Mark tickets as Printed (but do not print)" in the Event setup. For more information on this setting in Event setup click here. |
| Print Address Ticket | This option will print an address ticket for the patron to whom the order was sold. The primary address in the patron record will be used. In order to print a credit card receipt, the specific credit card receipt ticket face must be identified in Setup>>Company Preferences on the Ticket Faces tab. For more information on ticket faces click here. For more information on the Ticket Faces tab, click here. |
| Print Credit Card Receipts | This option will print credit card receipts if a credit card (or multiple cards) were used to pay for the order. In order to print a credit card receipt, the specific credit card receipt ticket face must be identified in Setup>>Company Preferences on the Ticket Faces tab. For more information on ticket faces click here. For more information on the Ticket Faces tab, click here. |
| Cut each ticket | If your printer allows tickets to be printed without cutting them, this option instructs the printer to cut after each ticket (standard cutting). |
| Cut after last ticket printed for patron | If your printer allows tickets to be printed without cutting them, this option will cut a group of tickets after each patron's order is complete. When batch printing tickets, this option can be useful to group tickets for a patron together and provide a "fan-fold" ticket set for each patron. |
| Do not cut tickets | If your printer allows ticket to be printed without cutting them, this option will not cut tickets at all. This can be used for Season Subscription tickets so they can be mailed to the patron in a "fan-fold" format. |
Printing From the Plays and Dates Window
- Open the Plays and Dates Window.
Click here to learn how to access this window.
- Find the play to print tickets for.
Click here to learn how to find plays.
- Click the Attendance
 tab.
tab.
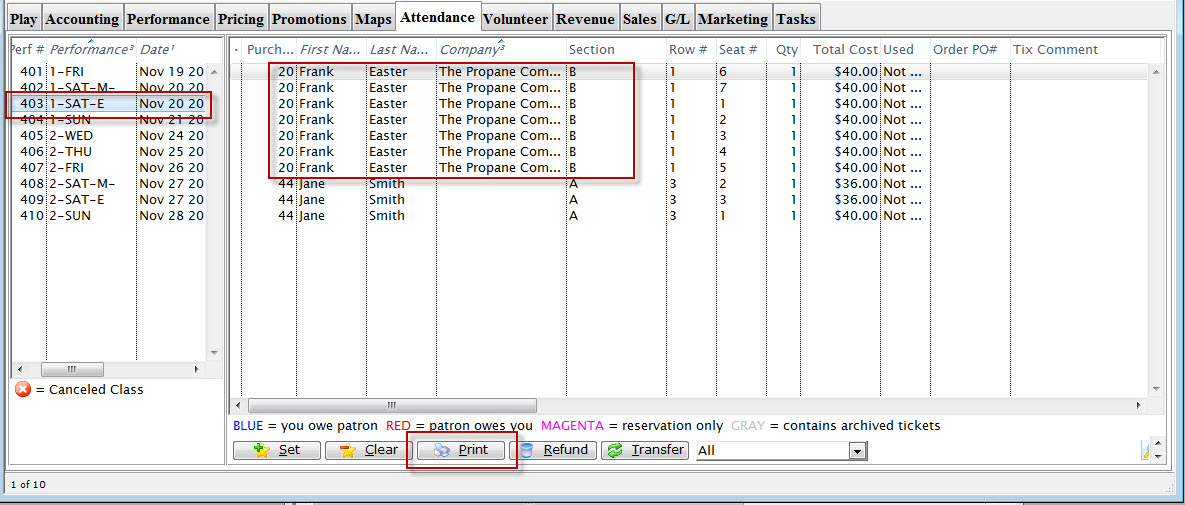
- Select the performance to print tickets for.
Select the performance from the left of the window by single clicking it.
- Select the ticket(s) to print.
- Click the Print Tickets
 button.
- Confirm the printer setup.
Click here for more information.
- Click OK / Print on the printer setup window.
The tickets will print and the user will be returned to the Plays and Dates Window.
Printing Individual Tickets
After purchasing tickets, the tickets will appear in the ticket display area of the Patron Window.
- Find the patron to print tickets for.
Click here to learn how to find patrons.
- Click the Ticket
 tab.
tab.
- Select the ticket(s) to be printed

- Click the Print button.
The tickets will now be printed.
Holding down the <OPTION> key (Mac) or <CTRL> key (PC) when printing tickets will open another window allowing for further ticket printing options.
If the order on which these tickets reside is marked as Reservation Only, when the tickets are printed, the order will be taken off of Reservation Only, and an Accounts Receivable will be created for these tickets.
Reprinting Tickets
There are two options which can be used to reprint tickets either reprint the tickets of an individual patron or reprint an entire batch. Both methods require the user to "Unprint" the tickets then print the again.
Individual Patron Tickets
- Find the patron to reprint tickets for.
Click here to learn how to find patrons.
- Select the tickets to reprint.

- Click the Un-Print
 button.
There are security settings in Theatre Manager to enable the unprinting of tickets. Click here to learn more about security features.
The tickets will be unprinted. Keep the tickets selected.

- Click the Print button.
- Confirm the printer setup and click the Print Button.
The tickets will be reprinted.
Searching for Tickets
- Open the Ticket List Window.
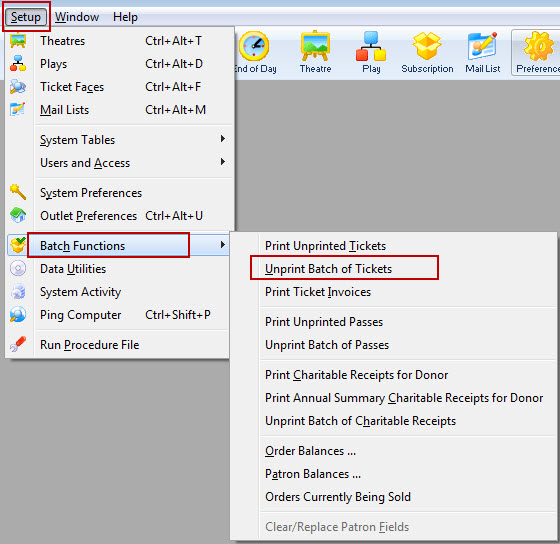
This is done through the Setup >> Batch Functions >> Unprint Batch of Tickets.
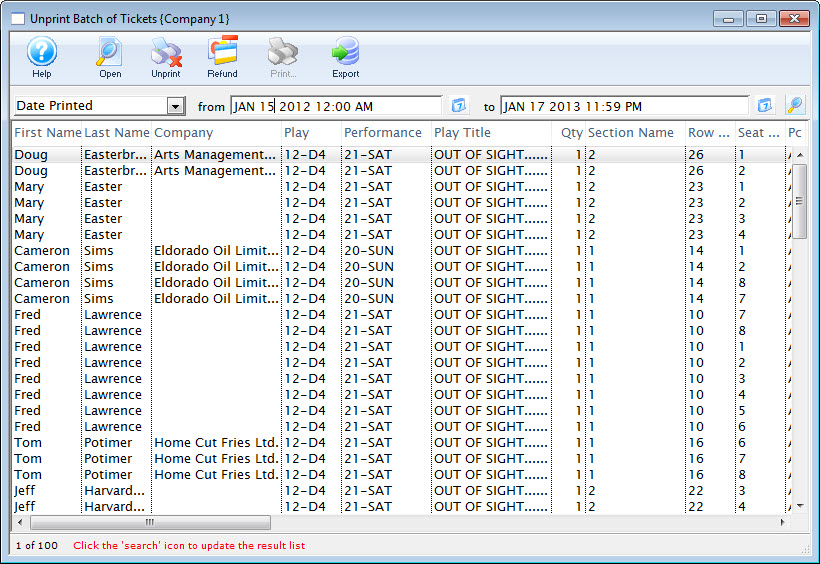
- Select the parameter you would like to search by.
Use the pull up menu in the upper right corner of the window.
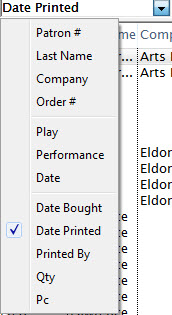
- Enter your search criteria in the From and To Fields.

- Click the Search button.
All results matching your criteria are displayed in the window.
You can now view the ticket details, unprint, refund, or repost tickets from this window. Click here for more information about unprinting tickets. Click here for more information about refunding tickets.
Unprinting Ticket
Unprinting tickets sets the print status of the selected tickets to not printed.
This is done through the Setup >> Batch Functions >> Unprint Batch of Tickets.
Click here for more information on searching for tickets.
 button.
The tickets are reset to unprinted.
Printing from the Patron Window
The Patron's tickets tab shows a summary of all tickets bought by the patron. They may be shown by different types and years using the pull down bar in the bottom left corner. Refer to Examining Purchases if the user cannot view patron tickets. For a description of the buttons on this window and the procedure to sell a ticket are described in Selling Tickets.
To print a ticket from the Patron tickets tab, you perform the following steps:
- Find the patron you want to print the tickets for.
Click here to learn how to find patrons.
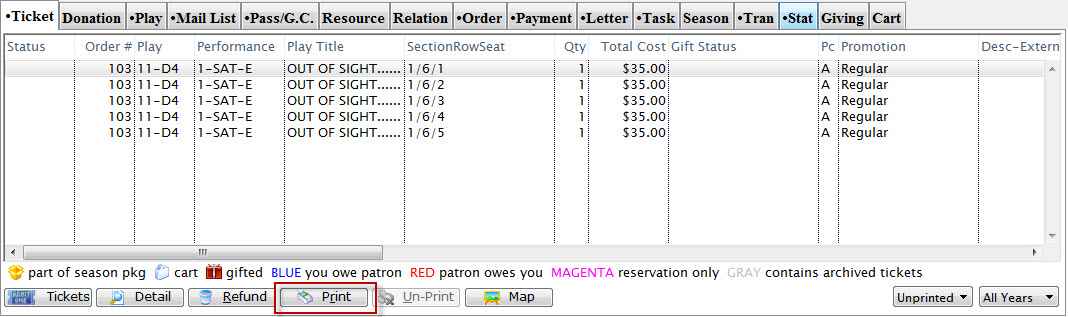
- Highlight the tickets to print and click the button.
The Print Ticket Options window opens.
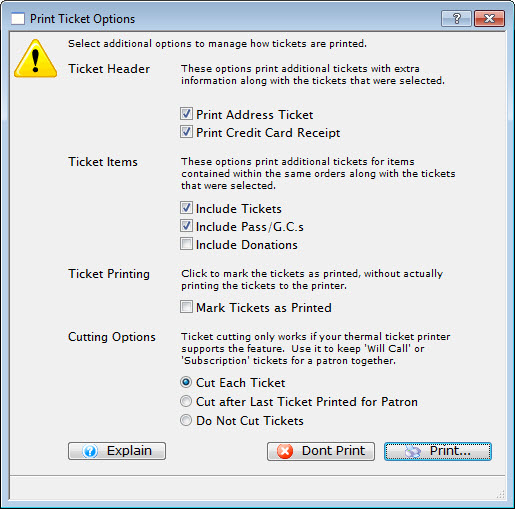
Review the options.
- Click the Print button.
Will Call Ticket Printing
Ticket printing for Will Call tickets (tickets to be held at the door for patron pickup the night of the show) is a simple batch print of tickets using the following method.
- Access Print Unprinted Tickets is through the Setup >> Batch Functions menu.
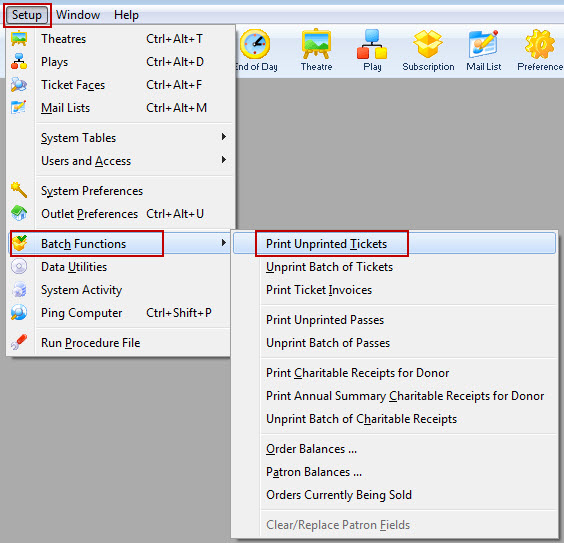
The Batch Ticket Printing window and the Parameters window will both open.
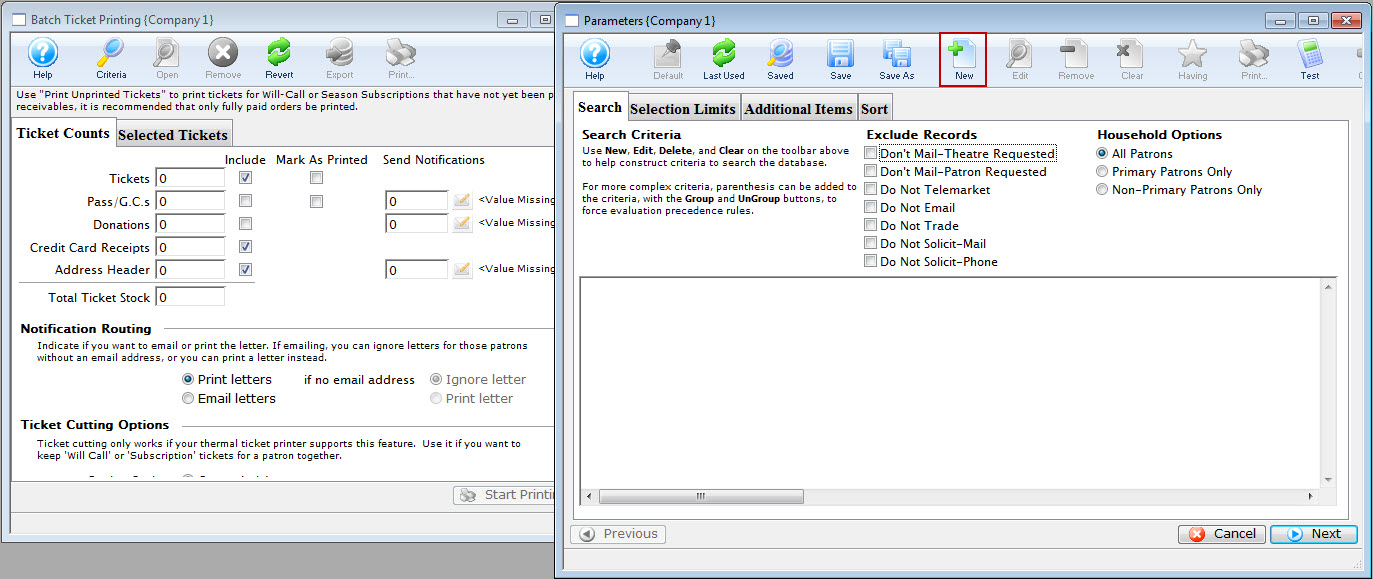
- Click the New button
to add a new criteria to the parameters window.
The Add/Edit Criteria window opens.
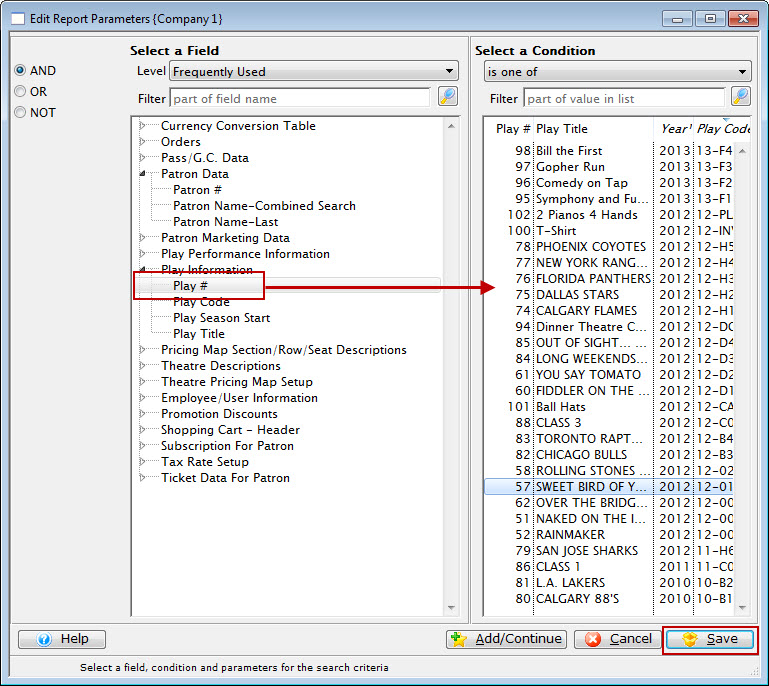
- Select the search Criteria for the tickets to print and
press the Save button.
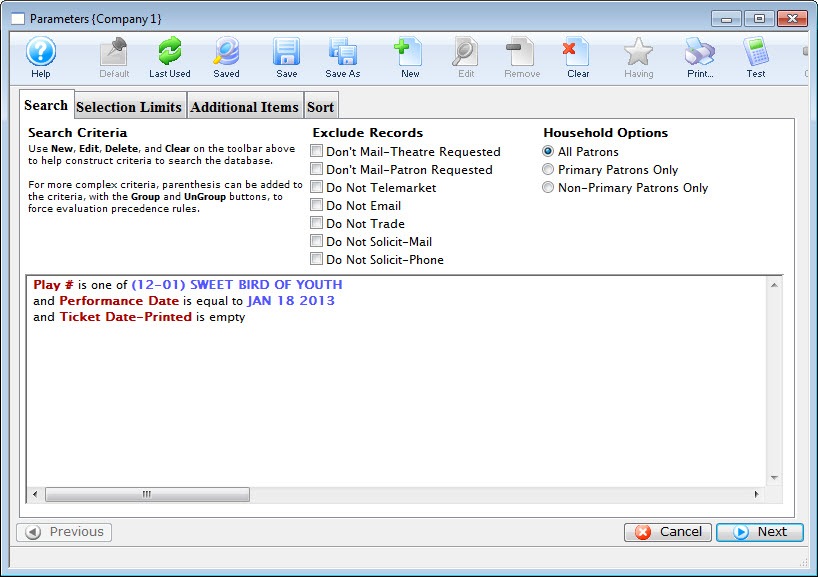
The example above shows report criteria that would print all unprinted tickets with the performance matching Sweet Bird of Youth and occuring on January 18, 2013.
You may wish to add additional criteria to specify certain groups of tickets. For example:
- Promotion Ticket Type is one of Season (prints all your season subscriber tickets for this evening)
- Promotion Flag - Requires Coupon is Checked (can help you set aside tickets where a Student ID or other coupon is required before the tickets can be claimed)
- Click the Next
 button.
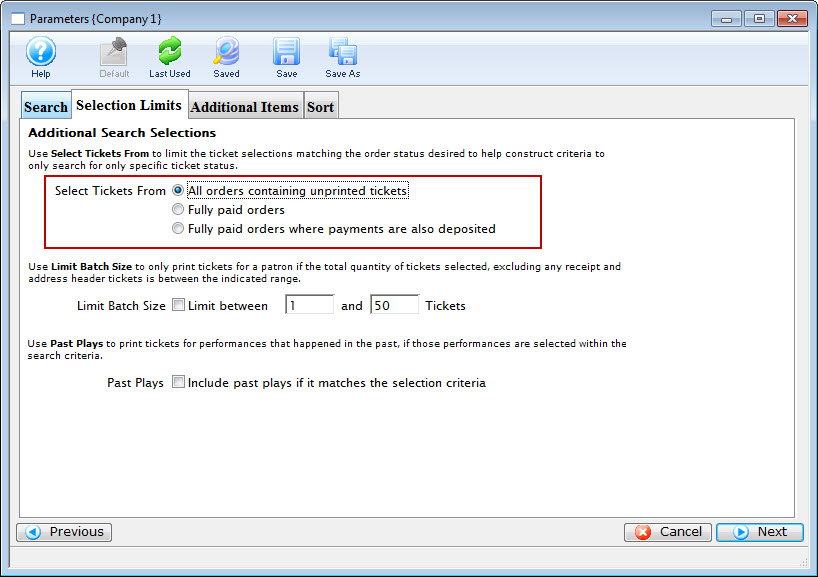
- Choose the option for "All Orders containing unprinted orders."
Select Tickets From
All Orders containing uprinted tickets Will only select tickets meeting the criteria and that are marked as unprinted. Fully paid orders Will only select tickets meeting the criteria and that the order is fully paid for. Fully paid orders where payments are also deposited Will only select tickets meeting the criteria and that the order has been process through the End of Day. Limit Batch Size
Limit between This allows the batch to print only patron orders that are between the minimum and maximum limit. Past Plays
Include past play if it matches the search criteria This will allow tickets to be printed for performances that have occurred already provided they meet the criteria. - Click the Next button.
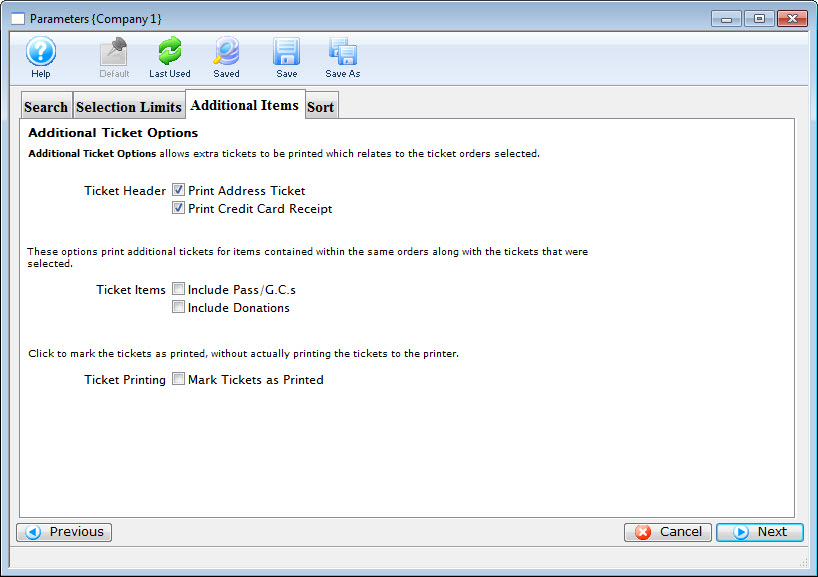
- Select the applicable data for the tickets to print.
Ticket Header
Print Address Ticket Prints an additional ticket containing the address information of the patron. Print Credit Card Recipt Prints an additional ticket containing the credit card receipt if a credit card was used to pay for the order. Ticket Items
Include Memberships Prints an additional ticket if a Membership purchase was included on the same order. Include Donations Prints an additional ticket if a Donation purchase was included on the same order. Ticket Printing
Mark Tickets as Printed This option will print no tickets, but still mark the tickets as printed. - Click the Next button.
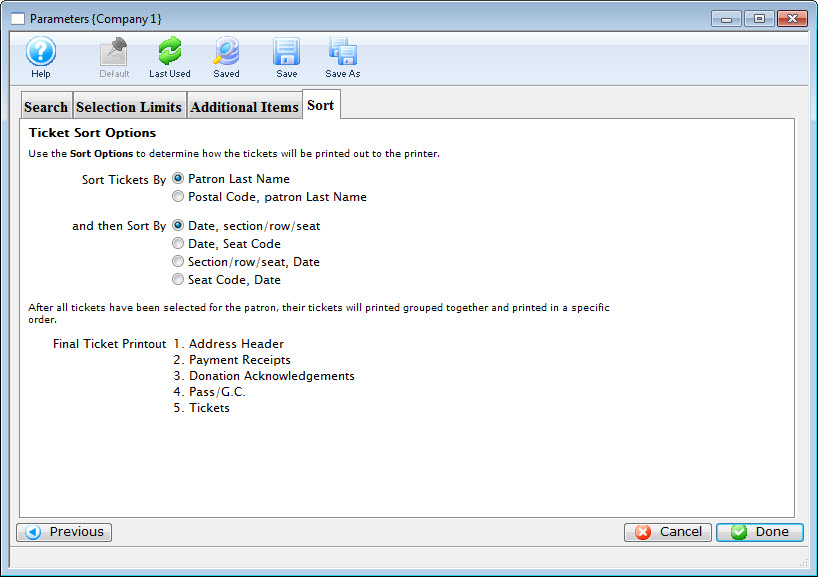
Sort Tickets By
Patron Last Name All tickets will print in alphabetical order based on the patron's last name. Postal Code, Patron Last Name All tickets will be grouped together by postal code, and each group will be in alphabetical order based on the patron's last name. and then Sort By
Date, Section/Row/Seat For tickets to multiple performances, the individual tickets will be sorted by the performance date and then the seats. Date, Seat Code For tickets to multiple performances, the individual tickets will be sorted by the performance date and then the seat codes. Section/Row/Seat, Date For tickets to multiple performances, the individual tickets will be sorted by seat and then by the performance date. Seat Code, Date For tickets to multiple performances, the individual tickets will be sorted by seat code and then by the performance date. - Click the Done button.
This will return the user to the Ticket Printing window.
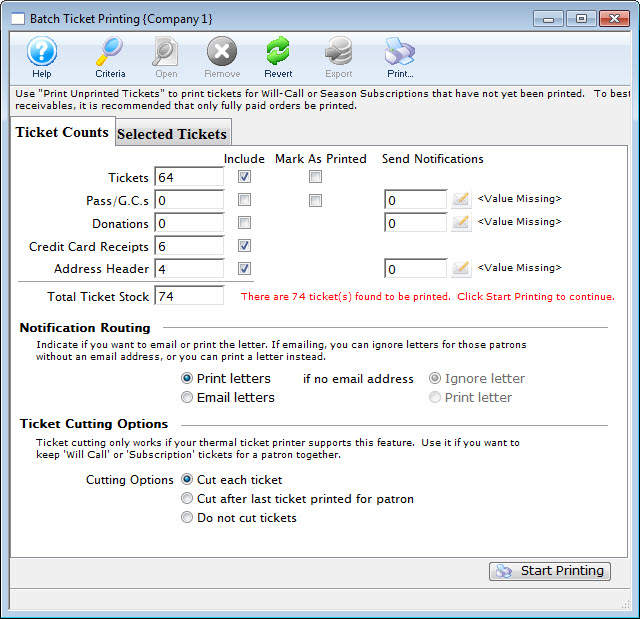
- This window display the total number of tickets based on the
criteria, and allow any final changes to be made.
Click here for more information about this window.
- Click the Start Printing
 button when the batch is ready to print.
Ticket Printing at an Offsite Location
- Remote ticket printing using a printer with an parallel connection.
- Remote ticket printing using a printer with an ethernet port in it
Remote Ticket Printing-Ethernet via RDP/Teamviewer
|
This setup assumes that your are connecting to you ticket server using Remote Desktop, Teamviewer or some other remote access program. |
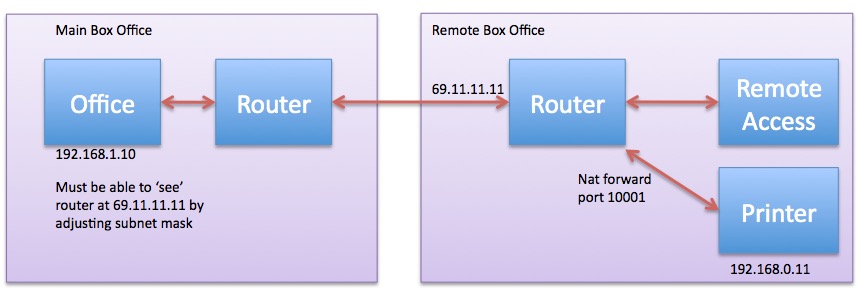
Things you will need:
- A Printer with an Ethernet connection
- A portable router that supports NAT forwarding of the ticket printer port at the remote site.
Setup:
- A portable router that can be taken to the offsite location will be needed.
- Set an internal IP addresses of the portable router that is the SAME subnet range as the office network. As some examples:
- if in the office the IP range is 192.168.0.x, then the IP addresses behind this portable router should be the same 192.168.0.x. This will ensure the Printer can be used in both networks without having to alter it's IP address.
- Alternatively, you can use network addresses that are close (eg 192.168.1.x on your main lan and 192.168.0.x at the remote box office) and adjust the subnet mask to be something like 255.255.0.0
- Take the router, printer and computer to the offsite location. Plug everything into the portable router.
- Use Microsoft Remote Desktop (Macintosh or Windows vis MSTSC) or Teamviewerto remotely access a computer in the main office.
- Enter a NAT forwarding rule in the router that forwards port 10001 to the IP address of the ticket printer. For example if your printer is at 192.168.0.15, then make a rule that forwards 10001 to that IP address.
- At the remote site, find out what the external IP address of the outside router is. This can be done by visiting www.whatismyip.com. In this example lets say the external IP is 77.12.34.56. This is where the internet thinks the router is located.
- In Theatre Manager click the Preference button at the top of the window (the yellow cog). Select the Ticket Printers tab. The IP displayed will most likely be the internal IP address of the Ticket Printer.
- Change the IP address of the ticket printer to the address supplied in step 6 above.
- Test print a ticket.
*** at this point all should work, except, the printer WILL NOT.
What you've effectively done is told Theatre Mananager to send the ticket info outside your office and all the way along to your router. Your router then says, not me, pass it inside the router to your printer (using the NAT rule).
When the ticket printer returns to the office the machine that was accessed remotely using TeamViewer will need to have the Preferences updated. Log back into Theatre Manager and click the Preference button. Select the Ticket Printers tab and change the IP address back to the address within the local network. Each time the ticket printer is taken offsite use the www.whatismyip.com site to determine the IP address to be entered for the ticket printer.
Remote Ticket Printing-Parallel
Things you will need:
- A Printer with a parallel connection
- A windows based computer with XP or later.
- A real parallel port on your remote computer or laptop (it can be via a PCMCIA add on card if need be
- Windows Terminal Server 2003 or later in your computer room.
- A connection to the internet at the remote box office.
|
Try the setup in your office to make sure it works before going to the remote location. |
|
This will only work if you DO NOT install a local printer driver on the computer at the remote box office or on the terminal server and assign it to LPT1. |
Setup:
The setup assumes that the printer will be connected to LPT1. If you are using LPT2 or another port, substitute it for all instructions below.
- Remove any printer driver you may have installed on the computer at the remote location that is attached to LPT1.
- Set up a remote desktop connection to the terminal server
- In the options for the RDC connection, make sure you share the PORTS in the local resources.
- Make the connection via RDC to the terminal server (must be terminal server 2003 or greater
- Log into Theatre Manager
- Go to the preferences for the user and click ticket printer -- and make sure LPT1 is selected as the ticket printer
- Test print a ticket.
Troubleshooting
If you are running into issues, have a look at one or more of the following:
- Make sure you DO NOT have a printer set up for LPT on the remote machine. In fact, remove all printers that you are able to remote
- DO NOT allow windows to automatically install a printer driver for you when it discovers the parallel ticket printer
- Restart the remote computer and make sure that the ticket printer rolls a ticket forward and backward on startup
- Make sure that there is a real parallel port in the device. (it can be a PCMCIA printer device. A USB to parallel device is not a real parallel port.
- Make sure that your setup for Remote Desktop is set to share the local ports.
- Make sure that your terminal server allows local ports to be shared from the remove device.
- Make sure that the printer has tickets in it
- Make sure that the clutch is down inside the printer so that the rollers can engage the printer
- Watch to see if the ticket printer receives any data when you click 'test print' in theatre manager. One of the lights will flash
- If it will not work on one machine, try another machine in your office. It make just be the machine.
Remote Ticket Printing-Ethernet and Local Lan
|
This setup assumes that your remote router is to be connected to a local network at the remote site -- and that it gives out IP addresses that you can control. If using a Mobile Thumb Drive to connect to the internet, refer to the alternate instructions for mobile/ethernet because this setup will not work. |
Things you will need:
- A Printer with an Ethernet connection
- A portable router other then those in the current network.
- Your postgres server set to allow connections from the remote location
- A relatively high speed internet connection at both ends
|
This installation assumes that your remote router is to be connected to a local network at the remote site and port 10001 can be configured. If using a Mobile Thumb Drive to connect to the internet, refer to the alternate instructions for mobile/ethernet because this setup will not work. |
Setup:
- A portable router that can be taken to the offsite location will be needed.
- Set an internal IP addresses of the portable router that is the SAME subnet range as the office network. As an example, if in the office the IP range is 192.168.0.x, then the IP addresses behind this portable router should be the same 192.168.0.x. This will ensure the Printer can be used in both networks without having to alter it's IP address.
- Take the router, printer and computer to the offsite location. Plug everything into the portable router.
- Use Teamviewer to remotely access a computer in the main office.
- Enter a NAT forwarding rule in the router that forwards port 10001 to the IP address of the ticket printer. For example if your printer is at 192.168.0.15, then make a rule that forwards 10001 to that IP address.
- At the remote site, find out what the external IP address of the outside router is. This can be done by visiting www.whatismyip.com. In this example lets say the external IP is 77.12.34.56. This is where the internet thinks the router is located.
- In Theatre Manager click the Preference button at the top of the window (the yellow cog). Select the Ticket Printers tab. The IP displayed will most likely be the internal IP address of the Ticket Printer.
- Change the IP address of the ticket printer to the address supplied in step 6 above.
- Test print a ticket.
*** at this point all should work, except, the printer WILL NOT.
What you've effectively done is told Theatre Mananager to send the ticket info outside your office and all the way along to your router. Your router then says, not me, pass it inside the router to your printer (using the NAT rule).
When the ticket printer returns to the office the machine that was accessed remotely using TeamViewer will need to have the Preferences updated. Log back into Theatre Manager and click the Preference button. Select the Ticket Printers tab and change the IP address back to the address within the local network. Each time the ticket printer is taken offsite you can use an online service (Example: https://mxtoolbox.com/whatismyip/) to determine the IP address to be entered for the ticket printer.
Remote Ticket Printing-Using a Mobile Internet Device
Things you will need:
- A Printer with an Ethernet connection
- A portable router other then those in the current network that has a USB port for the mobile internet thumb drive and can be configured to setup a VPN
- For OSX
- A licensed copy of TeamViewer.
- For Windows
- Remote Desktop and Terminal services -OR-
- A licensed copy of TeamViewer.
- A Mobile Thumb Drive for internet connection
Setup:
- Establish a VPN tunnel between your local network and the remote computer. Remote Box Office
- Set the ticket printer to a static IP address within the subnet of the remote location. Setting the IP address of the ticket printer. You will have to check your remote router when connected to the mobile internet device to determine the subnet that is issued. This may change each time.
- Take the router, printer and computer to the offsite location. Plug everything into the portable router.
- Use Teamviewer to remotely access a computer in the main office.
- In Theatre Manager click the Preference button at the top of the window (the yellow cog). Select the Ticket Printers tab. The IP displayed will most likely be the internal IP address of the Ticket Printer.
- Change the IP address of the ticket printer to the address set in step 2 above.
- Test print a ticket.
*** at this point all should work, except, the printer WILL NOT.
When the ticket printer returns to the office the machine that was accessed remotely using TeamViewer will reset the IP address to what it was previously before step 2. Log back into Theatre Manager and click the Preference button. Select the Ticket Printers tab and change the IP address back to the address within the local network. Each time the ticket printer is taken offsite you will need to reset the IP address of the ticket printer and set the user preferences in Theatre Manager.
Transferring Tickets
During the Order transfer process, all items in that order (tickets, donations, fees, resources, inventory, etc) are transferred to the selected patron.
Transfer Tickets after they have been Sold
- Find the incorrect patron which the ticket were sold to.
Click here to learn how to find patrons.
- Click the Order tab.
This displays all the orders that have been made under the patron's number.

- Select the order to be transferred.
If the order is not shown select the Include Closed Orders
 field.
 - Click the Transfer
 button.
The Transfer Order Window opens.

From this window there are the following options:
- Search for a Patron from the Patron window. Click here for information.
- Search for a Patron by Member Card #.
- Search for a Patron by Control #.
- Reverting back to the QuickBuy Patron by using the Quick Buy Patron
 button
will use the Quick Buy Patron the user has setup.
button
will use the Quick Buy Patron the user has setup.
- Once the patron or member card is entered their information will be displayed
in the window.

- Verify the information and click the Transfer
 button.
A confirmation window opens.

- Click Transfer to transfer the order.
Theatre Manager will move the order and all payment associated with it to the specified patron.
Transfer Tickets in the Middle of an Order
- Select the seats the patron would like to purchase.
- Click the Transfer button.
The Transfer Order Window opens.
From this window, you can choose the following options:
- Search for a Patron from the Patron window. Click here for information.
- Search for a Patron by Member Card #.
- Search for a Patron by Control #.
- Reverting back to the QuickBuy Patron by using the Quick Buy Patron button will use the Quick Buy patron the user has setup - but only if the sales mode is NOT currently quickbuy.
- Once the patron or member card is entered their information is displayed in the window.
- Verify the information and click the Transfer button.
A confirmation window opens.
- Click Transfer to transfer the order.
- Click the Payment button to receive payment for the ticket(s).
Click here to learn how to accept payments.
Ticket Detail
The tickets a patron has purchased are displayed using the Tickets Tab in the Patron Account. Refer to the appropriate links for more in depth descriptions.
To display tickets, you perform the following steps:
- Select the Tickets Tab in the Patron record.
Theatre Manager will display a summary of all the non-archived tickets which fall under the parameters set using the two pulldown menus on the bottom left of the tab.
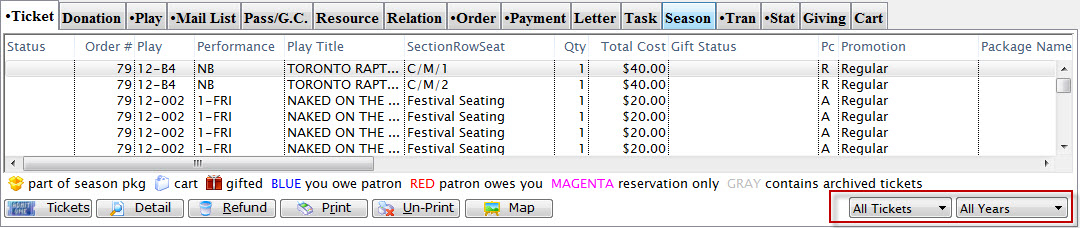
- Double click on a line of ticket information
The ticket detail window opens and displays detailed ticket information. There are four tabs within the Ticket Detail Window. Depending on the type of ticket these tabs may or may not be available to view.
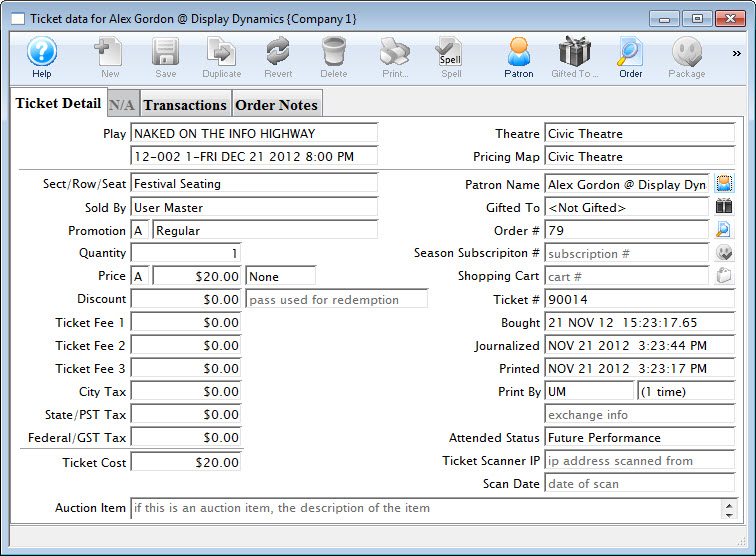
- The top portion of the window displays the event name; event code including series code, date and time; theatre name; and seat location. For traveling troupe shows, the location of the event is displayed.
- The bottom portion of the window displays pricing and payment information. Quantity is the number of people the ticket will admit. Theatre Manager can create festival seating tickets as group tickets -- one ticket could admit 10 people. A reserved seat ticket, which references a specific seat location, is always created with a quantity of one.
- The ticket cost information displays the price of the ticket, markups, discounts, and taxes. Markups and discounts are applied by selecting the applicable Sales Promotion, which is also displayed "Sold by" is the Employee who entered the order. The order number, a reference number for tracking payment information, is displayed.
- Other information displayed includes the ticket number, a unique number created by Theatre Manager for each ticket; the date and time the ticket was purchased; the date the ticket was posted to the general ledger; the date the ticket was printed; and the initials of the employee who printed the ticket. The number of times a ticket was printed is displayed. If a patron looses a ticket you may have to reprint a ticket.
- Security controls exist to prevent misuse of ticket reprinting.
- The top portion of the window displays the Special Needs assigned to this patron, as well as the phone numbers, and primary address.
- Spousal information - email address and work numbers are displayed.
- Any Patron Notes are also displayed.
- If this patron or the spouse have email addresses, the
 will allow you to send an email to the corresponding address.
- The top portion of the window displays the order number, order date and final payment date.
- The remaining portion of the window displays pricing and payment information.
- The ticket handling information displays the handling option that has been set for this ticket - Hold for Pickup/Taken, Mail to Patron, Hold for WillCall, or Hold @ Door for Coupon.
- Any Order Notes are also included.
To view detailed information on a ticket:
Ticket Numbers
The Ticket Number is generated by Theatre Manager and can be used for tracking purposes. Most commonly the ticket number is either scanned or typed into Theatre Manager to track attendance.
A ticket number cannot be changed within the database. They are sequential and thus cannot be reused or reset to start from a previously used number. Each number is assigned sequentially based on the last ticket number issued in the database, whether it be a Festival Seating (General Admission) or Reserved Seating performance.
When a Reserved Seating performance is created, each seat within the map is assigned a ticket number. The number belongs to a single seat within the performance for the event. When the ticket is sold this number prints on the ticket face and is used to create the bar code. When a ticket is refunded or exchanged, that ticket number continues to belong to the seat and that same ticket number will continue to be used even if that ticket is re-sold to another patron.
For access control purposes it is recommended that when a Reserved Seating ticket is refunded or exchanged, the original ticket should either:
- Be collected by the issuing organization, or
- The organization receive verification the ticket was destroyed.
This will help to ensure control over the ticket number.
Festival Seating tickets do not have assigned seats. Therefore they respond differently. The ticket number is not assigned until the ticket is booked. When the ticket is booked, Theatre Manager will assign the next available ticket number in the database taking into account that some ticket numbers may belong to unsold Reserved Seats in other events. When a Festival Seating ticket is refunded or exchanged within the Theatre Manager database, the ticket number is not issued again. If a new Festival Seating ticket is purchased during an exchange it will have a new, unique ticket number.
Different Modes of Selling Tickets
Patron Ticket Sales
Before Event Sales
Before Event Sales is designed to reserve and print tickets quickly for patrons who purchase tickets prior to a performance. All tickets sold using this method are sold to the same patron and can be sold within the same order or given separate orders.
Preparation
Before Event Sales can be sold for reserved and festival seating performances. To begin insert a new patron to be used as the default patron for the event. The patron's name could reflect the play the tickets are being sold to.
| It is recommended that each employee has their own individual Before Event Sales Patron. This can be defined in the Employee Preferences. Click here for more information. |
Enter the last name as the event code (e.g. 01-02) and the first name as 'Before Event Sales'. When multiple terminals are used to conduct Before Event Sales at the same time it is recommended that a separate patron account be set up for each terminal. In the case of multiple terminals, enter the last name as the play code (e.g. 01-02) and the first name as 'Before Event Sales 2'.
- Open the Before Event Sales Patron Window.
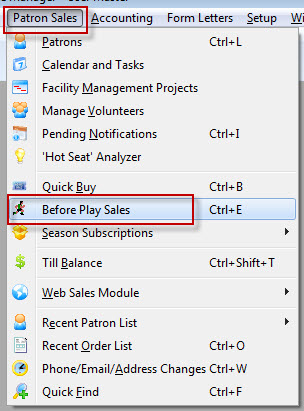
- Enter or Confirm the Before Event Sales patron number.
If this is a Pay What You Can performance please refer to the help page here for more information.
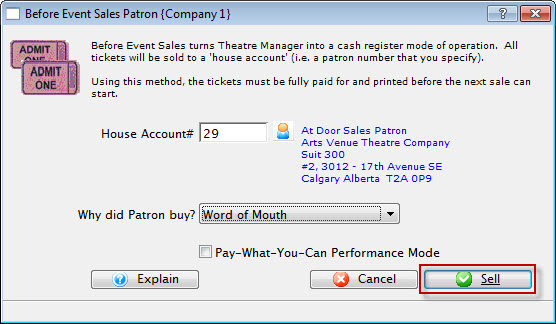
- Click the Sell
 button.
- Select the performance(s) that you will be selling tickets to.
Do this by single clicking on the performance. If the performance is not listed search for it using the search fields.
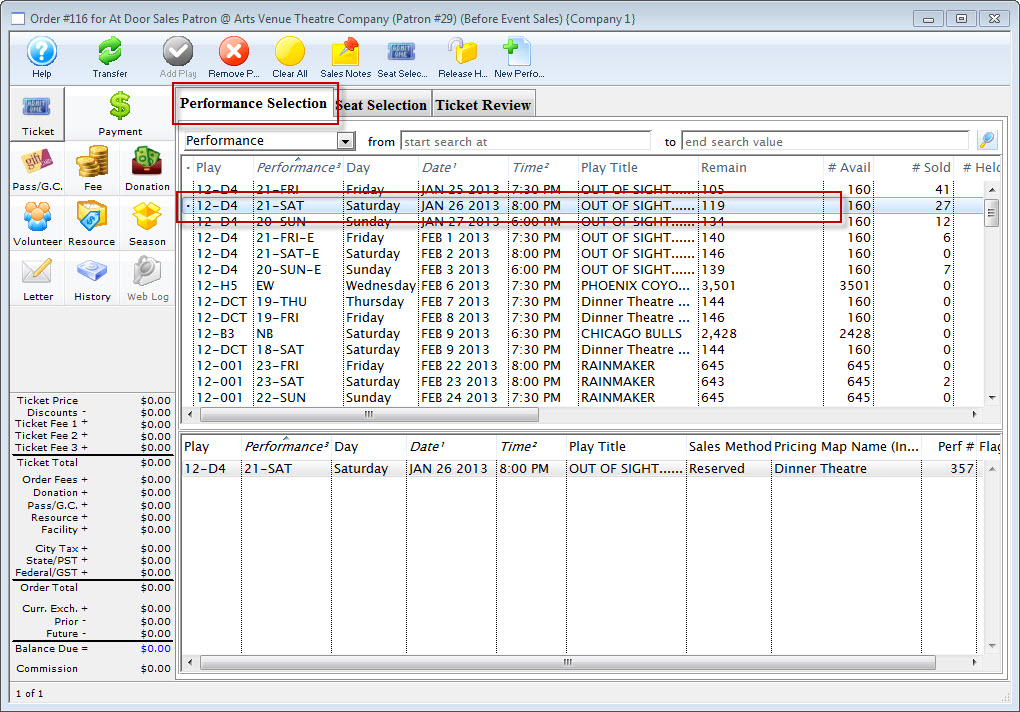
Click here to learn how to search for Performances. Click here for a detailed description of this window and its functions.
- Click the Seat Selection tab.
- Reserve the tickets.
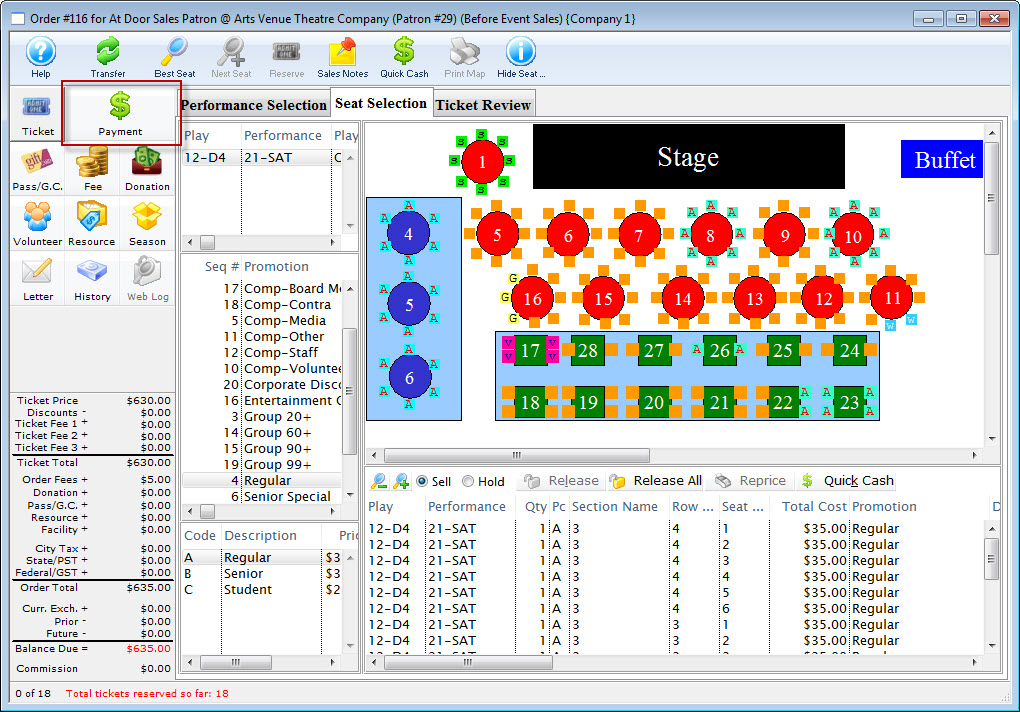
Click here to refer to the section Festival Seat Sales.
Click here for more information on Reserve Seat Sales.
- Click the Payments button in the left column.
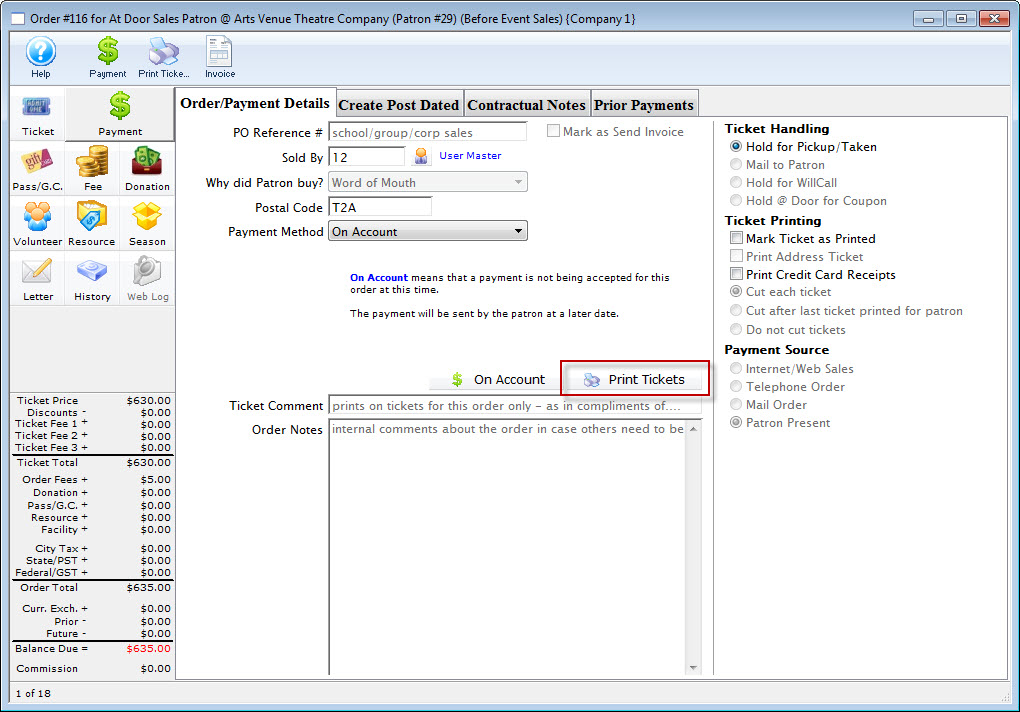
- Enter in the payment information.
Click here for more information on creating a payment.
- Click the Print Tickets button.
Clicking this button accepts the payment, prints the tickets and returns you to the Ticket Sales Window to make more ticket sales.
- Repeat steps 6 - 8 until finished with the current Before Event Sales Buy List.
- Close the window.
Pay What You Can Sales
Pay-What-You-Can Ticket (PWYC)
Philosophy
Pay-What-You-Can (PWYC) is intended to allow the sale of tickets to any performance of any event and collect from the patron any amount that they can offer toward the cost of those tickets. For example: If they only have $10 and the admission price is $15 the ticket can be sold a "pay what you can ticket". Ultimately this method of sale allows patrons from any economic status to attend your events and for those patrons who may not attend because of ticket price this becomes an offering of an affordable option.
Typically, Pay-What-You-Can tickets are for predetermined nights and sold only at the door the night of the performance. The tickets are sold as before event sales tickets to a house patron account. As these are rush tickets, a patron name and marketing information is usually not entered into Theatre Manager. You will need to set a performance as enabled for pay what you can.
This feature of Theatre Manger is accessed through the Before Event Sales routine. During this process any ticket sold may be sold at the regular admission price or by simply editing the amount of payment on the payment window. The ticket price is then converted and averaged over the number of tickets based on that payment amount entered. It is intended as an offering of any remaining seats just prior to performance time; RUSH seating. Although the intention for PWYC is for rush seating just prior to the event, there are options described below that will allow your organization to have reservations for the PWYC performance and just process the offering the patron provides for the tickets on the night of the performance.
The benefit of the PWYC feature is you are able to maintain the capability to capture attendance and sales values. The set-up and use of PWYC is described below:
| Option #1 | Pros | Cons |
| Option one would be to use Theatre Manager's Before Event
Sales Routine and selecting the Pay What You Can option during that set-up. Tickets are sold at time of request - RUSH at the door! Setting
this up is detailed in the Preparation section below.
NOTE: the performance must be set up to accept PWYC in the performance detail, otherwise you cannot use PWYC for a performance. |
|
|
| Options #2 | Pros | Cons |
| Manually accept PWYC money in a discrete collection box and take a manual head count as patrons pass through the gate/wicket. After the performance has started, then sell a matching number of tickets to the number of patrons who passed through the gate/wicket and enter the entire amount as one large payment. Theatre Manager will then allocate an average price to each and every admission ticket to the generic PYWC House account. |
|
|
| Options #3 | Pros | Cons |
|
This is similar to option #2, except in this case you are preprinting tickets ($0.00 value) for patrons to give them as they enter into the performance.
|
|
|
| Option #4 | Pros | Cons |
|
Providing the option of taking reservations for the PWYC performance. This option allows the pre-sales of PWYC and capturing of patron information, attendance, and revenue values for an event - in advance of the performance. Begin by setting up a series of sales promotion for PWYC. Refer to the Sales Promotion Set-up for more information. Flag the sales promotion as "Coupon Required" for added controls on batch printing of tickets. Example of Sales Promotion:
Enable the sale promotions specific to the performance of the event for PWYC. This way, these sale promotions will not be inadvertently used on sales to other non-PWYC performances. Capture the patron information and record the sale as a PYWC using the "PWYC-Reservation" sales promotion. This reserves the patron a ticket for the performance at a $0.00 value. Why record the reservation at $0.00? Because, even if the patron indicates the value of offering they will provide, still record the value as a $0.00 for two reasons:
When the patron is present to claim the ticket, edit the ticket value by using Quick Exchange to change the sales promotion to one of the PWYC dollar amount (PWYC-$1.00, or PWYC-$2.00, or PWYC-$3.00, etc) depending on how much the patron chooses to pay on average for each ticket. This will adjust the ticket price and record the correct revenue amount for the sale. For example, if the patron purchases 2 tickets and offers $10.00, then during the Quick Exchange process each ticket would get a "PWYC-$5.00" sales promotion. Adding both tickets together would be the sum of the total offering. |
|
|
Preparation
Before Event Sales can be sold for reserved and festival seating performances. To begin insert a new patron to be used as the default patron for the event. The patron's name could reflect the play the tickets are being sold to.
|
It is recommended that each play requiring Before Event Sales have its own Before Event Sales patron account. This will prevent any one patron account from becoming too large. As well it is recommended that each employee has their own individual Before Event Sales Patron. This can be defined in the Employee Preferences. Click here for more information. |
Enter the last name as the event code (e.g. 01-02) and the first name as 'Before Event Sales'. When multiple terminals are used to conduct Before Event Sales at the same time it is recommended that a separate patron account be set up for each terminal. In the case of multiple terminals, enter the last name as the play code (e.g. 01-02) and the first name as 'Before Event Sales 2'.
 |
To improve performance in selling tickets using Before Event Sales, close all open windows prior to starting the process. |
- Open the Before Event Sales Patron Window.
- Confirm the Before Event Sales patron number.
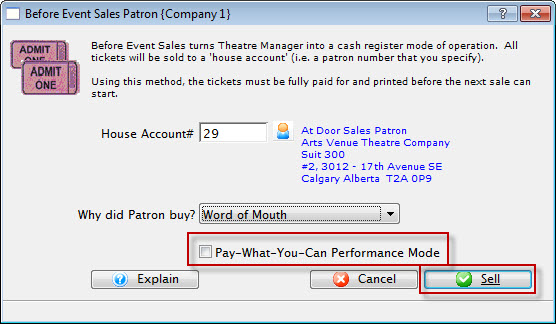
- Select Pay What You Can

- Click the Sell button.
- Select the performance(s) that tickets are being sold to.
Do this by single clicking on the performance. If the performance is not listed search for it using the search fields.
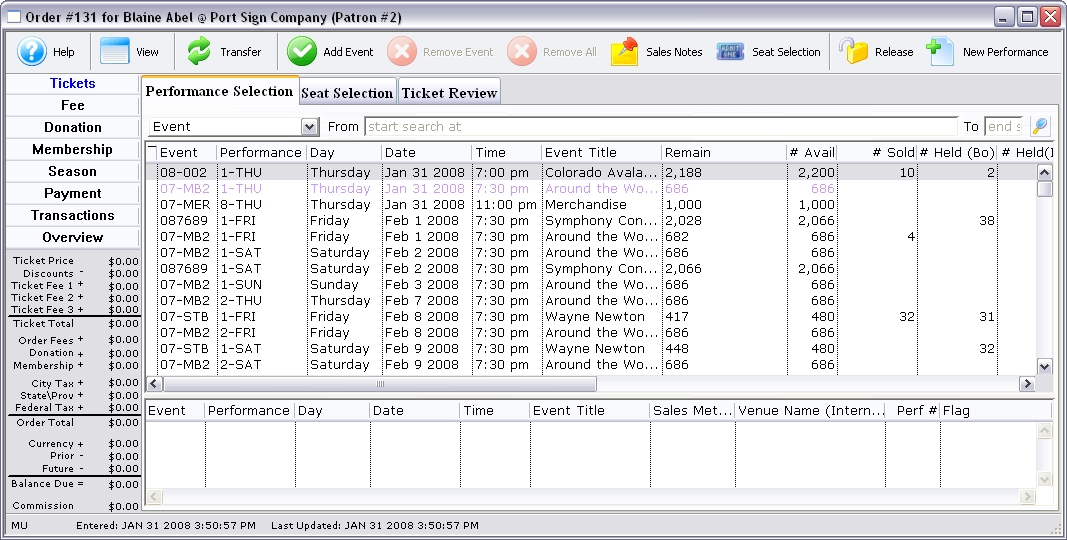
Click here to learn how to search for Performances.
Click here for a detailed description of this window and it's functions.
- Click the Seat Selection tab.
- Reserve the tickets.
Click here for more information on Festival Seat Sales. Click here for more information on Reserve Seat Sales.
- Click the Payments button in the left column.
The Payment Window will open.
- Change the payment amount to what the customer wishes to pay.
Click here for more information on accepting payments.
The payment amount for all tickets was $42.80 which has been changed in the above picture to $40.00. The amount entered here will be used to calculate the price of the tickets. i.e. 4 tickets will be $9.43 + tax(6%) = $40.00
Using this sales method creates no Accounts Receivable and you will provide no change to the patron.
- Click the Print Tickets
 button.
Theatre Manager will recalculate the ticket prices and print the tickets.
The ticket prices are calculated by taking the total price they were sold for subtracting order fees and taxes and using the remaining amount as the ticket price. The difference between the original and final prices is recorded as a discount. As you can see in this window the original ticket price was $42.80 and since the patron only paid $40.00 Theatre Manager takes that as the total order amount (i.e. plus tax and order fees). The individual ticket prices are then calculated and in total the discount was $2.60.
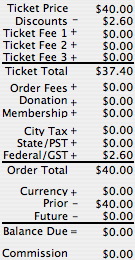
Quick Buy Ticket Sales
Quick Buy - Reserved or Festival Seating
Quick Buy is designed to reserve tickets quickly for patrons prior to getting the patron's name and information. All tickets sold using this method are sold to the same patron, creating a new order for each group of tickets. After reserving tickets using the Quick Buy method, the ticket orders are transferred to the actual patron's account who purchased the tickets. Quick Buy can be done for reserved and festival seating performances.
Preparation
Insert a new patron to be used as the Quick Buy patron for the sales. The patron's name could reflect the fact that it is the Quick Buy Patron. Enter the last name as the last two digits for the current year (e.g. 98-) and the first name as 'Quick Buy'. When multiple terminals are used to conduct Quick Buy Sales at the same time, a separate patron account could be set up for each terminal. In the case of multiple terminals, enter the last name as the last two digits for the current year (e.g. 98-) and the first name as 'Quick Buy 2'.
| It is recommended that each Theatre Manager user have their own Quick Buy patron account. This will prevent any one patron account from becoming too large. This can be defined in the Employee Preferences. Click here for more information. |
- Access Quick Buy in the Patron Sales menu.
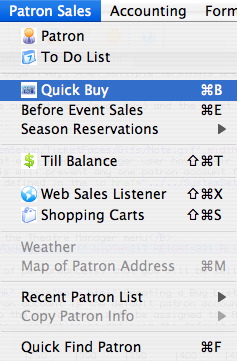
- Create the Buy List of performance(s) that the user will be selling
tickets to.
The Quick Buy patron account is the default patron account to which all the tickets sold to the performance will be assigned to. Click here for more information on Employee Preferences and defining the default patron account to be used when performing Quick Buy Sales.
- Click the Seat Selection tab.
- Reserve tickets as would be done with a real patron's account.
Click here for more information on Festival Seat Sales. Click here for more information on Reserve Seat Sales.
- Click the Transfer
 button.
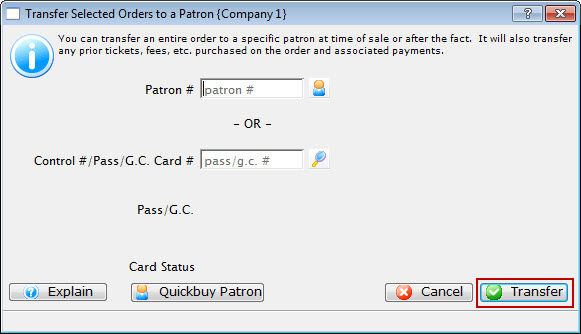
From this window there are the following options:
- Add a new Patron. Click here for information.
- Search for a Patron by Name. Click here for information.
- Search for a Patron by Member Card #. Click here for information.
- Reverting back to the QuickBuy Patron by using the Quick Buy Patron
 button
will use the
Quick Buy Patron the user has setup.
button
will use the
Quick Buy Patron the user has setup.
- Once the patron or member card is entered their information will be
displayed in the window.

- Verify the information and click the Transfer button.
A confirmation window will appear.
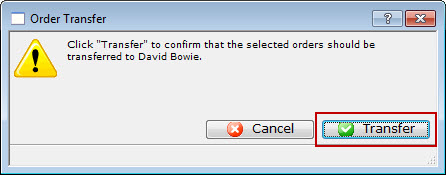
- Click Yes
 to transfer the order.
- Click the Payment
 button
to receive payment for the ticket(s).
button
to receive payment for the ticket(s).
Click here to learn how to accept payments.