
Main menu
You are here
The Filter Pane
Filters are a key part of the calendar.
- You decide what data you want to see on your calendars, that is, you do not see data that does not match the filter.
- There are a standard 4 filters available to all users. These show the maximum amount of data.
- You can change the filter you are using to show you what you need to know.
- You can customize filters for specific positions or staff, that way they don't see data they don't need.
- The starting filter can be customized.
- All Plays
- All Tasks
- All Volunteers
- My Calendar
- Click the Add icon to create a new filter. Click here to learn more about creating a filter.
- Click the Delete icon to delete a filter.
- Click the Edit icon to modify a filter. Click here to learn how to edit an exisiting filter.
- Click the Save Current icon to save the current view and filter as a new filter. This is most often used if you have opened this window from within a Project (or other area where this feature is available) to display all it's tasks in a new calendar. The current view and filter are saved to a new filter.
For example: You only want to see what is happening in the venue. You don't care about who owns it or what needs to be done. You weant to start with the Month, Week or Day view. These custiomizations are just an appearnace. You can view any or all just by changing your filter. Remember the Rubic's Cube®.
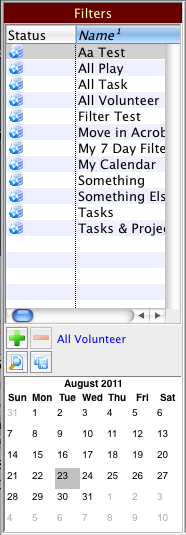 |
The Filter pane is on the left side of the Calendar window and allows you to quickly and easily subset your data by selecting a filter. You can select which data to see and which data not to see.
A filter allows you to select which tasks, performances, volunteer activities, and projects to display. It also allows you to select the visual display for the calendar, such as the view, and whether certain calendar features display or not. All these are stored in the filter. You are able to create an unlimited number of different filtures based on your own specific requirements. When you initially open the calendar window, whatever filter was last selected when the window was closed is restored when the window is reopened. Theatre Manager has 4 standard default filters that cannot be deleted or modified. They are the only filters available to someone without the Facility Management module. If you do not have the Facility Management module, you cannot create any new filters. The 4 standard filters are: |
 |
The filter pane has 4 buttons: Add, Delete, Edit and Save Current.
|